
Leveraging RoadRunner to Support NVIDIA’s Synthetic Data Generation Workflow by Creating Realistic Traffic Scenarios
NVIDIA has recently introduced a Synthetic Data Generation (SDG) workflow for traffic scenarios, enabling the creation of photorealistic synthetic traffic videos using Cosmos models, such as Cosmos Reason 1 and Cosmos Transfer 2.5.
This SDG workflow requires two primary inputs:
- Maps: 3D road network models defined by OpenDRIVE files.
- Scenario logs: Detailed records of actor actions and events during simulation runs.
RoadRunner enables the creation of realistic roads and environments for the map. It also supports the use of geographic information system (GIS) data for geospecific scene reconstruction (see the link for more details). Alternatively, a set of pre-built sample maps provided by CARLA can be used to test the SDG workflow.
In addition to the map, the SDG workflow requires a scenario log. RoadRunner Scenario allows you to design complex, realistic scenarios and co-simulate with CARLA to generate the necessary scenario log files.
This article provides a step-by-step guide for creating realistic scenes and scenarios to support the SDG workflow.
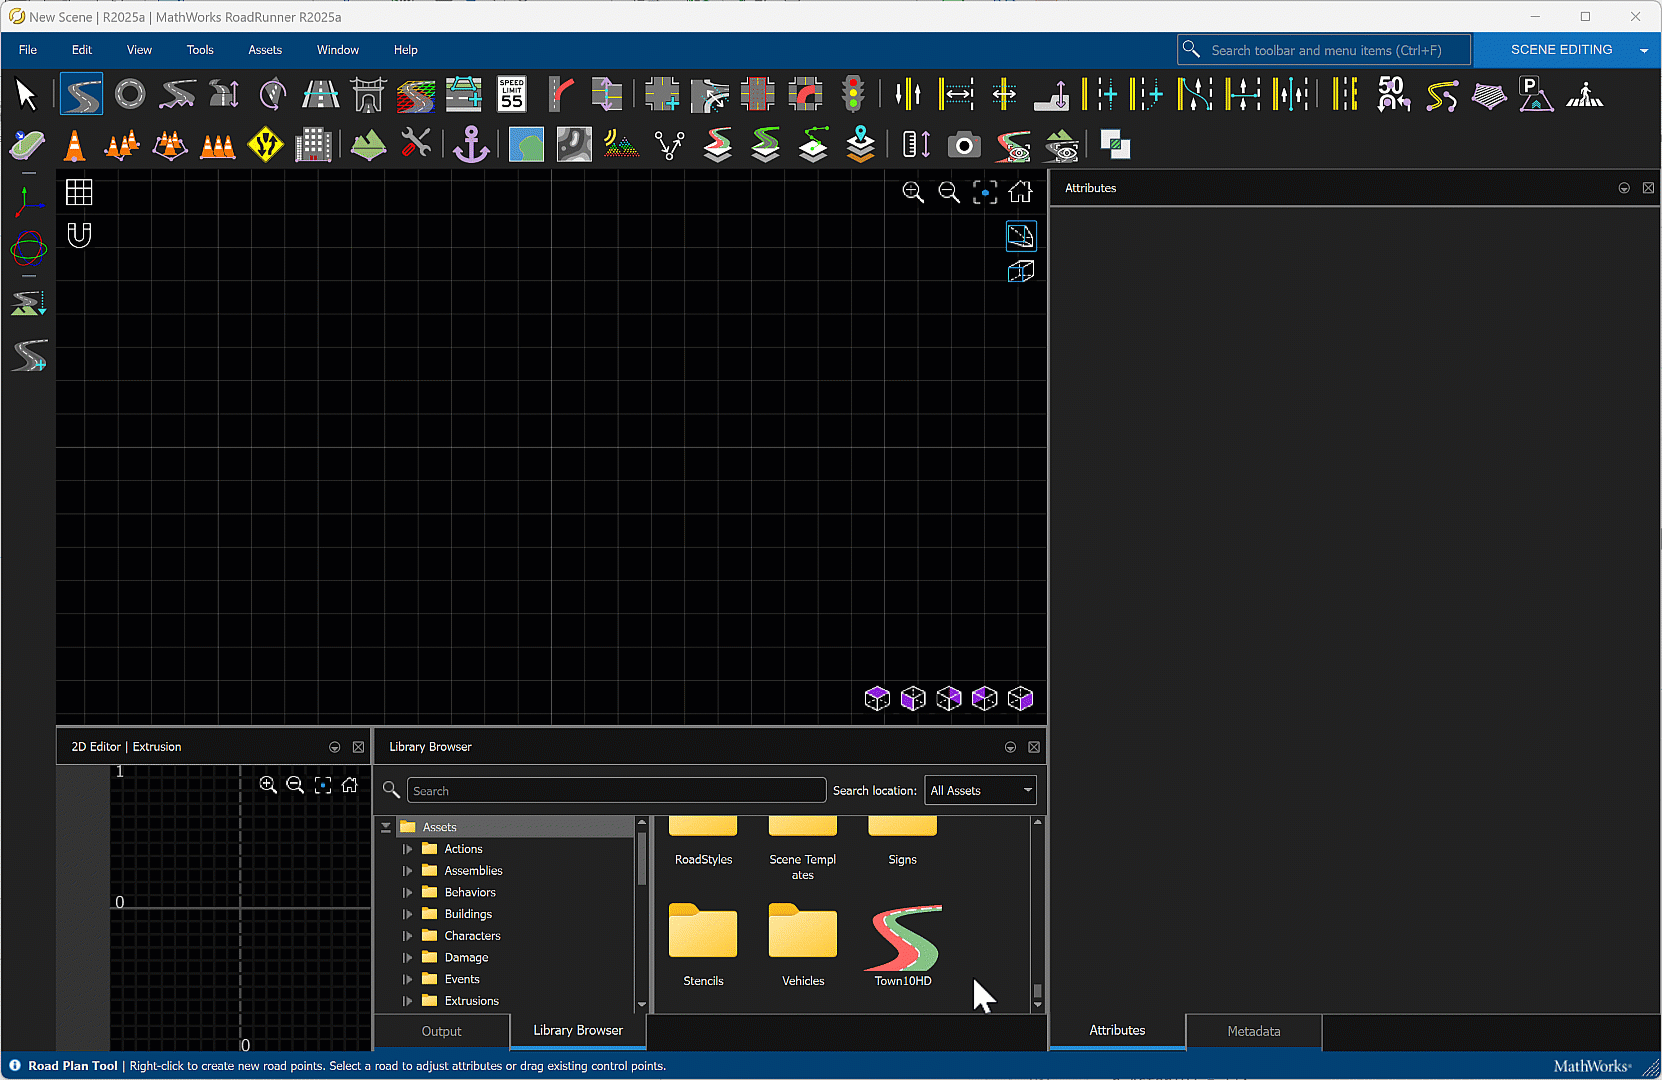
Create Scenes in RoadRunner by importing OpenDRIVE
RoadRunner offers a variety of tools for building realistic road networks, including junctions, traffic signs, props, and more. In addition to manual design, you can also create new scenes by importing ASAM OpenDRIVE (.xodr) files. For more details about the workflow and additional resources, please refer to the following links.
In this workflow, rather than creating a scene from scratch, we import the OpenDRIVE file for the Town 10 scene from the pre-built CARLA sample maps. The following video demonstrates how to create a new scene in RoadRunner using the Town 10 OpenDRIVE file.
Create Collision Scenarios in RoadRunner Scenario
Driving safely through urban intersections is particularly challenging for self-driving vehicles due to complex road geometries and the highly dynamic maneuvers of oncoming traffic, both of which increase the risk of collisions. To mitigate this risk, it is necessary to train self-driving models on a wide range of potential collision scenarios. However, obtaining hazardous real-world collision data is not trivial. Therefore, we aim to create realistic synthetic collision scenarios using the RoadRunner Scenario tool.
In RoadRunner Scenario, two vehicles are placed near an intersection and assigned individual paths to simulate a collision scenario. In this example, the ego vehicle turns left through the intersection while the target vehicle travels straight, resulting in a collision. Using the RoadRunner Scenario Logic Editor, stopping conditions are defined such that both vehicles apply the brakes when the distance between them falls below 9 meters. For more details on the workflow and additional resources, please refer to the links below.

Add Randomized Ambient Traffic
To simulate the collision scenario within a realistic traffic environment, you can add randomized ambient traffic to the collision scenario created in the previous section. The following section provides a step-by-step workflow for generating randomized ambient traffic using RoadRunner tools.
Export to RoadRunner HD Map from the Scene
RoadRunner can export scenes in the RoadRunner HD Map file format, representing road layouts with lanes, lane boundaries, junctions, and other elements. See the link below for more details.
The exported RoadRunner HD map can be easily visualized using its road geometry data. To create randomized ambient traffic, first sample candidate vehicle positions randomly within a region of interest (ROI), then snap each candidate to the nearest drivable lane by projecting it onto the lane geometry.

Configure Traffic Swarm Parameters
We set the traffic swarm parameters to generate randomized traffic:
- Speed Range (m/s): Specifies the speed variation for each vehicle.
- Time-To-Contact (sec): Defines the minimum safe distance between vehicles to prevent collisions.
- Minimum Route Length (m): Sets the minimum travel distance for vehicles during simulation.
- Traffic Distribution: Determines the total number of vehicles, the percentages, and the types of vehicles included.
- Region of Interest (ROI): Specifies the area where the traffic swarm is generated.
Paste the following code into MATLAB to see an example of traffic swarm parameter settings.
%--- Define traffic swarm configuration
trafficSwarmConfig.initialSpeedRange = [10, 15]; % speed range [vmin, vmax] in m/s
trafficSwarmConfig.TTC = 1;                      % Safe distance between vehicles in Time-To-Contact (sec)
trafficSwarmConfig.MinRouteLength = 400;         % min route length in meters

%--- Define traffic distribution
actor(1).Asset = "Sedan";
actor(1).NumOfActor = 5; % Set number of actors for Sedan
actor(2).Asset = "SK_PickupTruck";
actor(2).NumOfActor = 3; % Set number of actors for CompactCar
actor(3).Asset = "DeliveryVan";
actor(3).NumOfActor = 2; % Set number of actors for DeliveryVan

trafficSwarmConfig.TrafficDistribution = actor;
trafficSwarmConfig.NumberOfVehicles = sum([actor.NumOfActor]);
trafficSwarmConfig.ROI = [-128.8 -107.4 163.3 158.1]; % ROI in [x0,y0,width,height]
Create the Traffic Swarm
After configuring the parameters, we generate a randomized traffic swarm on the map.
rrApi = roadrunnerAPI(rrApp);
AmbientTraffic = createTrafficSwarm(mapInfo,trafficSwarmConfig,actors,rrApi);
The createTrafficSwarm() function randomizes traffic poses on the map while maintaining safe distances between vehicles according to the specified traffic swarm parameters.
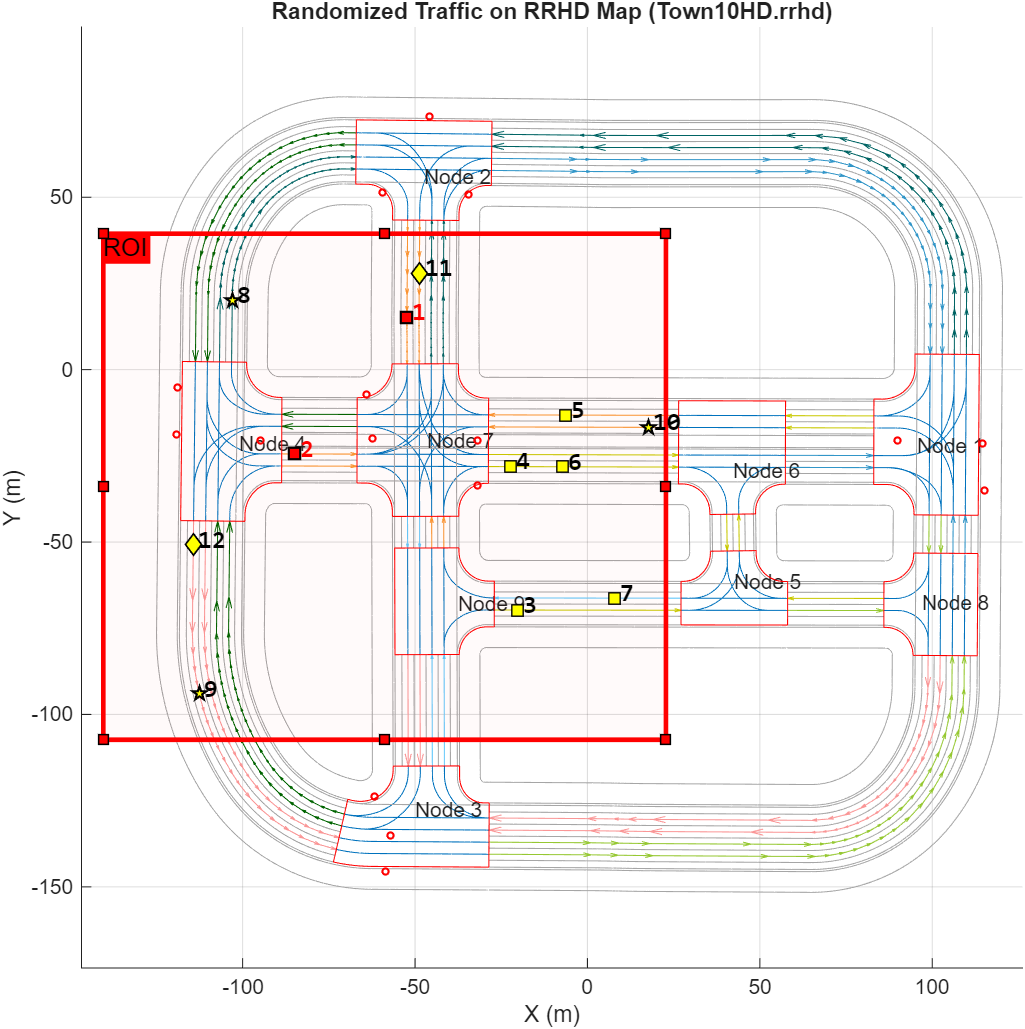
The red square markers labeled 1 and 2 represent the two primary vehicles (ego and target) involved in the collision scenario, while the yellow markers labeled 3 to 12 indicate the randomized ambient traffic. Different marker symbols distinguish between various vehicle types.
Add Ambient Traffic to RoadRunner Scenario
We add the randomized traffic swarm to RoadRunner Scenario using the RoadRunner Scenario Authoring APIs. These MATLAB functions allow you to programmatically create and author scenarios in RoadRunner.
The following MATLAB code demonstrates how to use MATLAB functions to define actor assets, initial positions, routes, behavior model, and scenario logic for each ambient traffic vehicle.
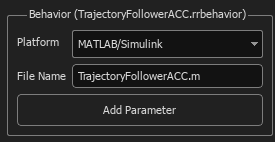
prj = rrApi.Project;          % get current RoadRunner project
rrs = rrApi.Scenario;         % get current RoadRunner Scenario
phaseLogic = rrs.PhaseLogic;  % get object for Scenario Logic

numActors = trafficSwarmConfig.NumberOfVehicles; % get number of traffic vehicles
builtInBehavior = getAsset(prj,"Behaviors/TrajectoryFollowerACC.rrbehavior","BehaviorAsset");
                              % get behavior asset
for i = 1:numActors
    assetPath  = getAssetPath(AmbientTraffic.ActorType(i));
    actorAsset = getAsset(prj,assetPath, "VehicleAsset"); % extract vehicle asset
    actors{i} = rrs.addActor(actorAsset, AmbientTraffic.InitPosition(idx,:));
                                                  % add actor to RoadRunner Scenario
    actors{i}.Color = colors(i,:);                % assign actor color, RGBA
    actors{i}.BehaviorAsset = builtInBehavior;    % assign Actor Behavior

    actors{i}.InitialPoint.autoAnchor(); % Set initial position to nearest road
    numPoints = height(AmbientTraffic.Route(idx).waypoints);

    for k = 1:numPoints
        wpts = AmbientTraffic.Route(idx).waypoints(k,:);  % get waypoints
        pt = actors{i}.InitialPoint.Route.addPoint(wpts); % add waypoints to route
        pt.autoAnchor();                                  % Anchor point to nearest road
    end

    % Set initial speed to an absolute value
    initPhase = phaseLogic.initialPhaseForActor(actors{i});
    initSpeedAction = initPhase.findActions("ChangeSpeedAction");
    initSpeedAction.Speed = AmbientTraffic.Speed(idx);
    initSpeedAction.SpeedReference = "absolute";
end
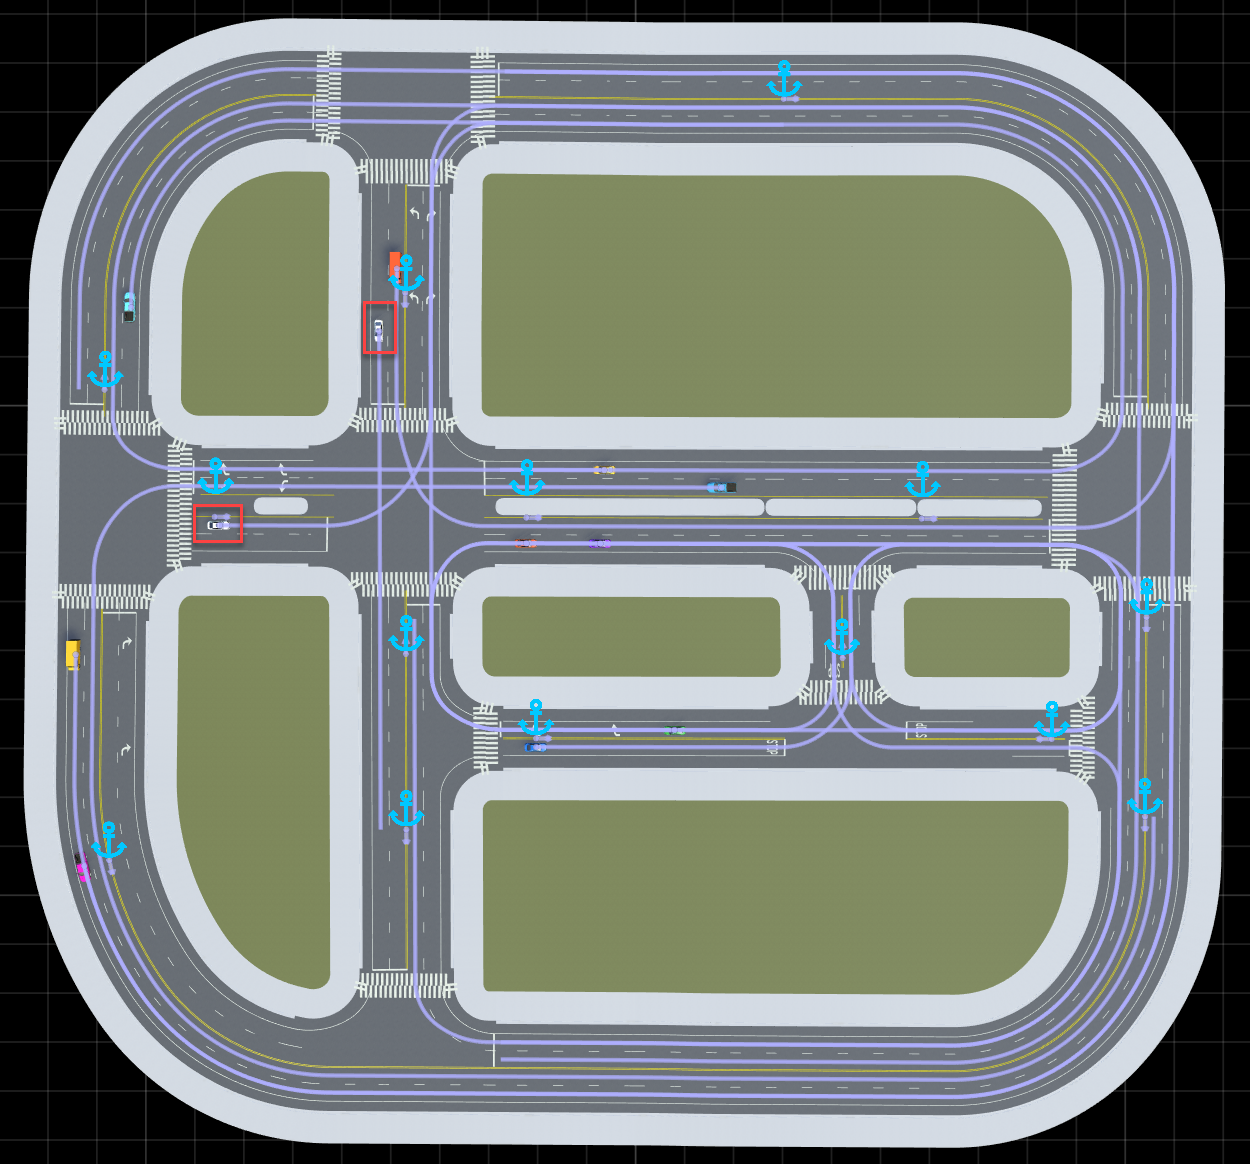
After adding the ambient traffic to the RoadRunner scenario, the ambient traffic actors will appear with randomized initial positions and routes.
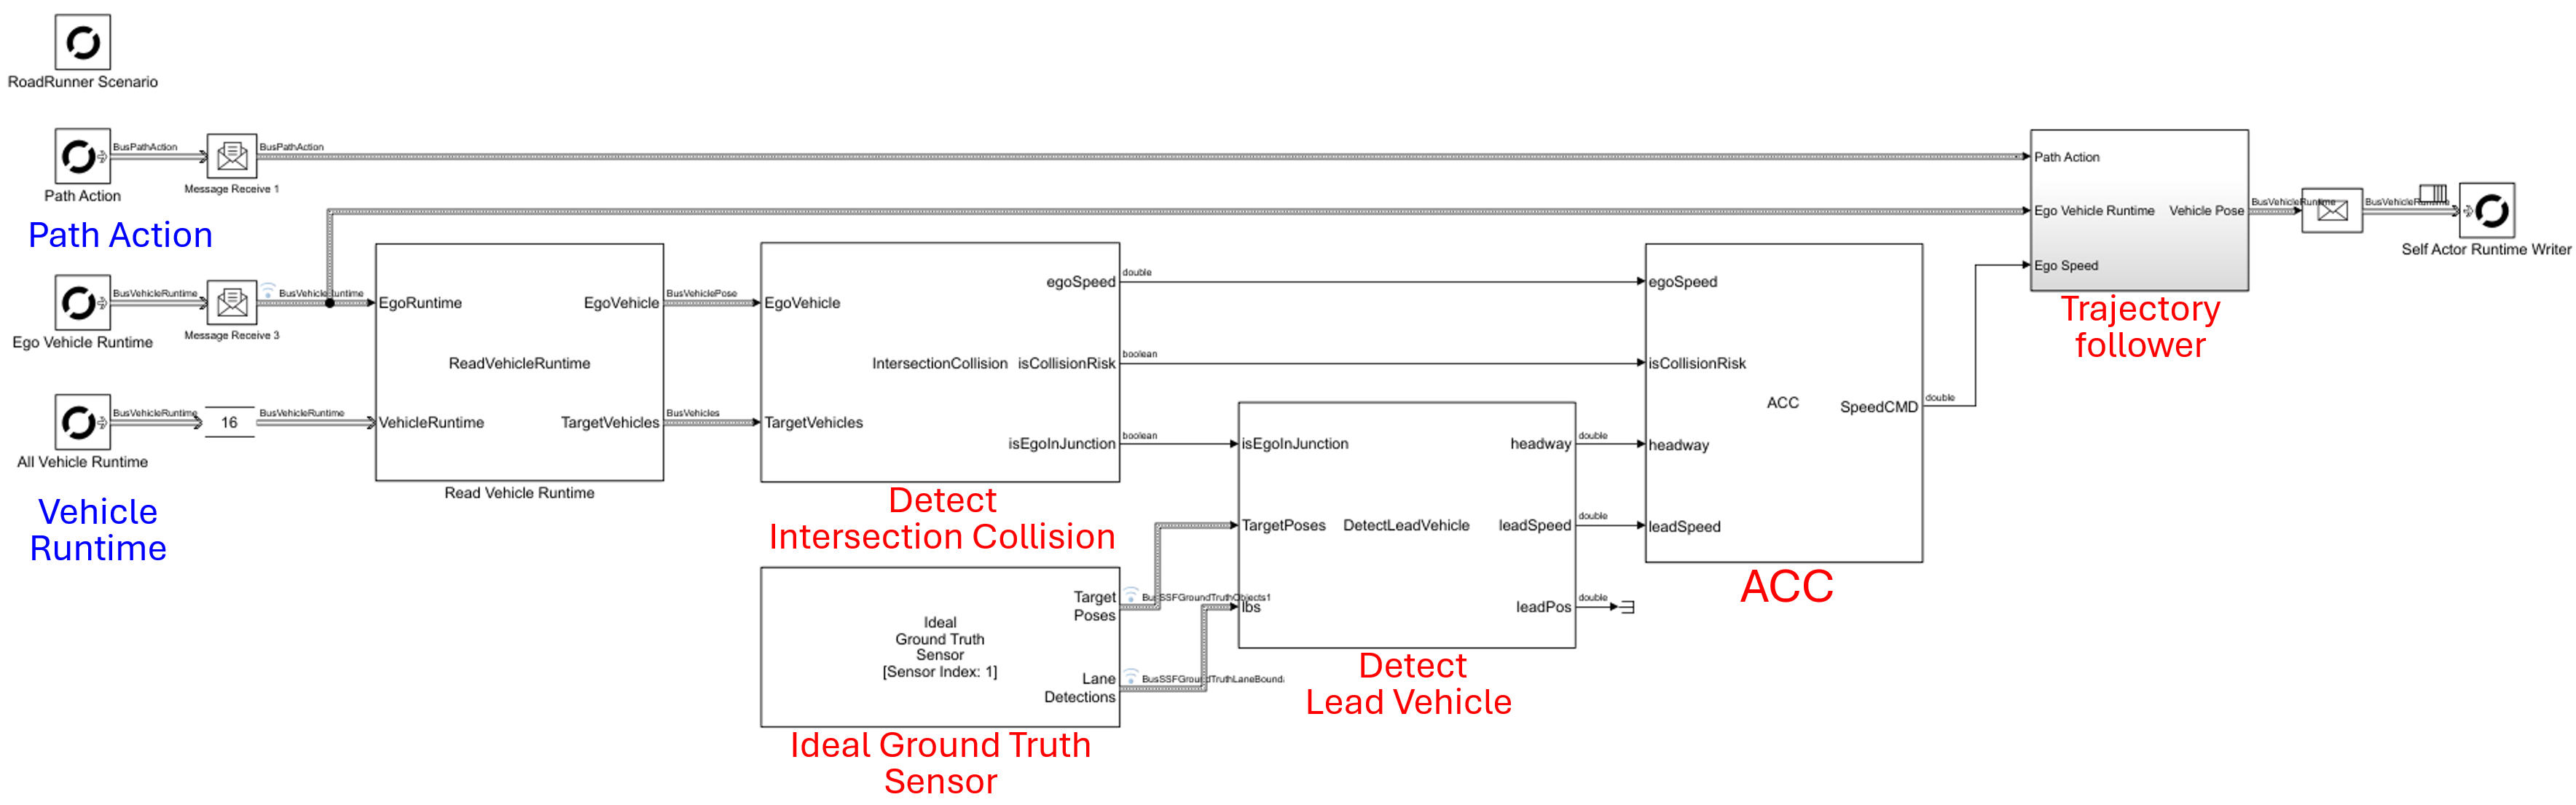
Assign Actor Behaviors to the Ambient Traffic Vehicles
Each ambient traffic vehicle should be assigned a behavior model that enables it to follow the designated route while avoiding collisions. We implement this behavior model in MATLAB, incorporating the following controllers:
- Trajectory Follower
- Adaptive Cruise Control
- Intersection Collision Avoidance
For more information on creating actor behaviors using MATLAB and Simulink, please refer to the following links.
- Overview of Simulating RoadRunner Scenarios with MATLAB and Simulink
- Scalable Actor Behavior Design for Randomized Traffic in RoadRunner
Run Scenario Simulation
Before running the scenario simulation, we need to create the RoadRunner simulation object, as the actor behavior model requires access to the actor runtime through this object.
rrSim = rrApp.createSimulation();
To start the scenario simulation, click the Simulation Tool in RoadRunner Scenario.
The video below illustrates the simulation results: A collision occurs between two white sedans when one vehicle initiates a left-hand turn across the path of an oncoming straight-moving vehicle; simultaneously, ambient traffic agents execute emergency braking maneuvers, successfully mitigating secondary impacts.
Cosimulate CARLA with RoadRunner Scenario
RoadRunner Scenario and CARLA can cosimulate a large number of actors within a simulation. Through this integration, RoadRunner Scenario orchestrates target vehicle behaviors with precise state control, while CARLA manages ego vehicle dynamics, maintaining high simulation fidelity. This cosimulation framework seamlessly combines RoadRunner’s intuitive design capabilities with CARLA’s robust scalability. For more details about the workflow and additional resources, please refer to the following link.
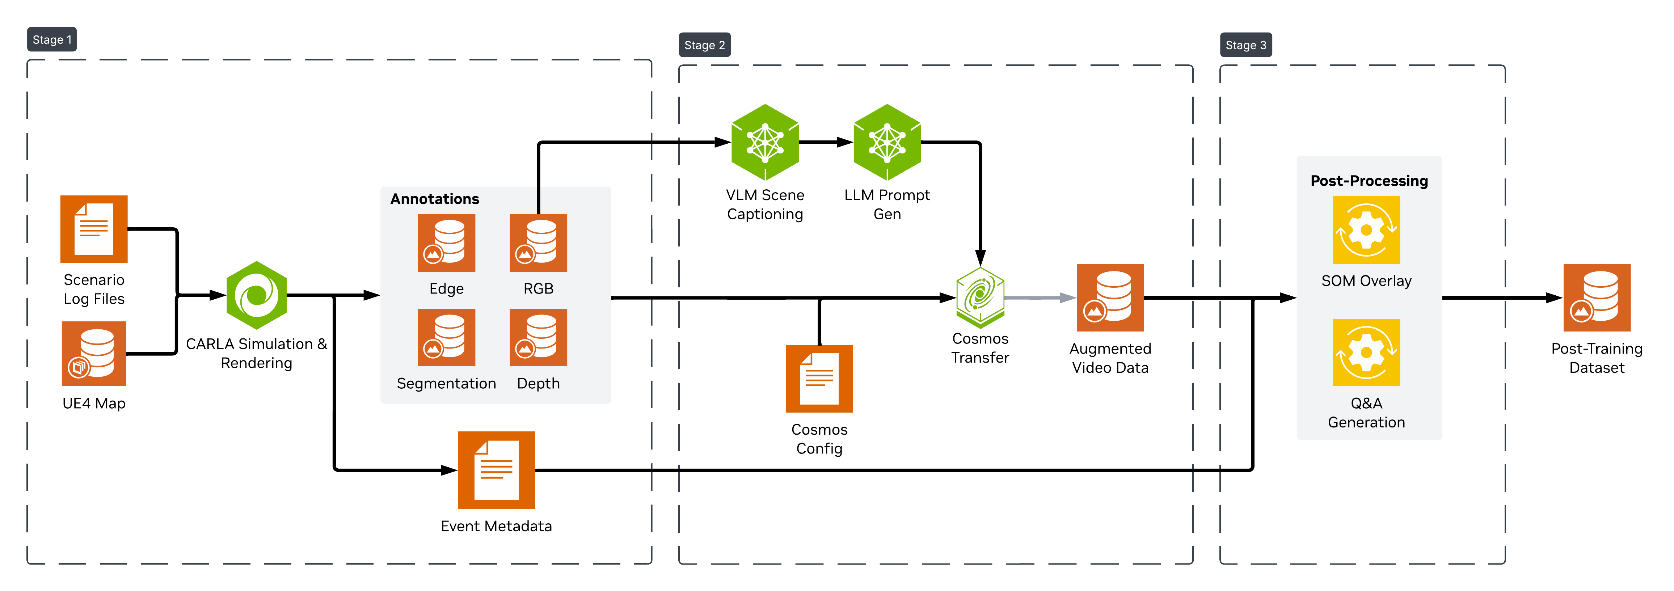
Synthetic Data Generation (SDG) Workflow
A Python bridge connects the two systems, recording CARLA log files based on the RoadRunner simulation. These log files capture actor definitions (vehicles, pedestrians) and their precise movements throughout the scenario. See details on the CARLA documentation page for more info on log files.
The recorded log files then feed into the CARLA Ground Truth generation stage. Here, CARLA plays back the logs along with camera configurations and map data, extracting ground truth including RGB footage, depth maps, semantic and instance segmentation, surface normals, and 2D/3D bounding boxes.
These synthetic videos then move to the COSMOS Augmentation stage, which transforms them into photo-realistic footage—bridging the sim-to-real domain gap that typically limits models trained on synthetic data. Cosmos Transfer 2.5 takes the videos and annotations along with positive/negative prompts to generate augmented, realistic-looking footage. Scene captioning is powered by Cosmos Reason 1, while Nemotron handles template and prompt generation. This allows scaling synthetic data with customizable augmentation variables to produce diverse, visually authentic training samples for Vision-Language Models.
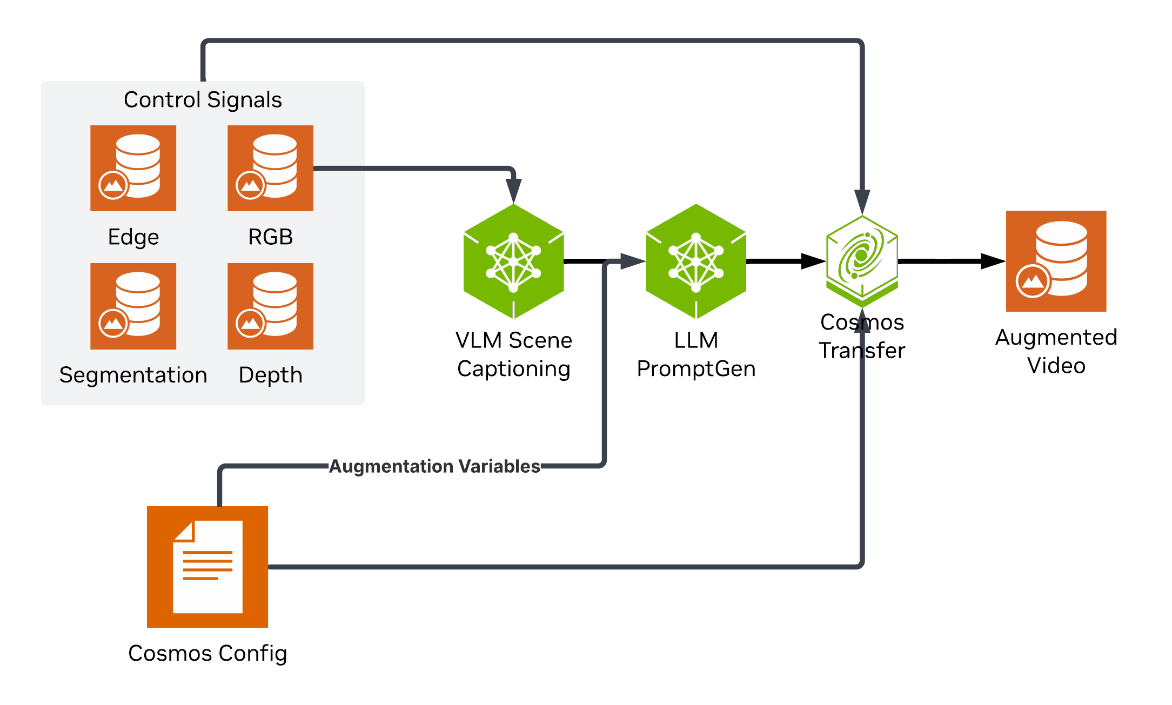
For more details on the SDG workflow, please refer to the Cosmos Cookbook.
The video below showcases an example of video augmentation in snowy weather conditions.
To request MATLAB scripts or receive technical support for randomized traffic generation, please contact MathWorks at automated-driving@mathworks.com.


コメント
コメントを残すには、ここ をクリックして MathWorks アカウントにサインインするか新しい MathWorks アカウントを作成します。