
From HD Maps to Photorealistic Driving Video with RoadRunner, MATLAB, and NVIDIA Cosmos
1 From an HD Map to Realistic Video
The workflow begins with the environment. A road scene can be:
- Created directly in RoadRunner
- Generated programmatically using the RoadRunner Scene API
- Created with assistance from an AI agent
- Imported from HD map data, such as data provided by Dynamic Map Platform
Vehicle and pedestrian motion is then defined using RoadRunner Scenario.
From the scene and scenario, MATLAB generates the data required to create a World Scenario Video (WSV). The WSV provides spatial and temporal conditioning for NVIDIA Cosmos-Transfer2.5 Auto Multiview, which generates photorealistic multi-camera driving video.
This means that real-world road geometry captured in an HD map can become the foundation for many visually different driving datasets without rebuilding each environment manually.
For example, the same scenario could be rendered as:
- Clear daytime
- Rain
- Snow
- Fog
- Nighttime
- Sun glare
The traffic geometry and vehicle motion remain defined by the simulation, while the visual appearance can be changed through the generative model.
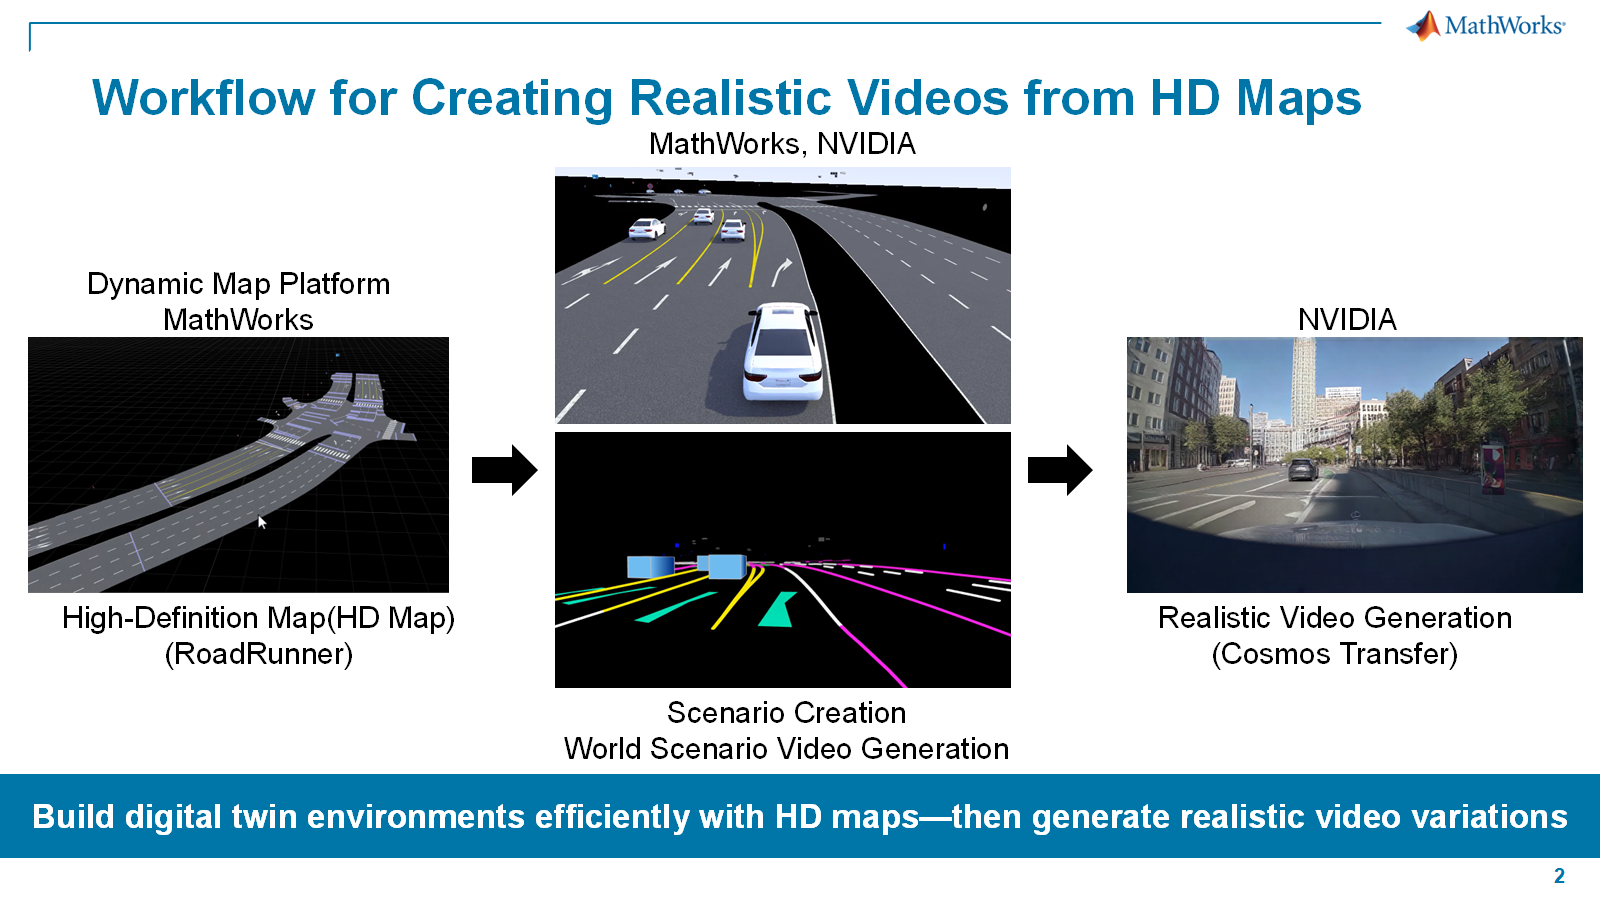
The key point is that RoadRunner scenes can be generated automatically from HD maps and then converted into photorealistic video with Cosmos-Transfer2.5 Auto Multiview. This approach makes it possible to generate realistic video variations efficiently, without the substantial manual effort typically required to build a highly detailed digital twin environment.
2 What Is a “World Scenario Video”?
A key element of the workflow is the World Scenario Video (WSV).
Cosmos-Transfer2.5 Auto Multiview does not rely on a text prompt alone. It also uses a structured control video that describes the underlying driving scene.
A WSV uses a black background and projects information such as:
- Lane markings
- Road boundaries
- Traffic-signal and sign locations
- Vehicles
- Pedestrians
- 3D object bounding boxes
into each camera view.
Conceptually, the generation process becomes:
Text prompt + World Scenario Video → photorealistic multi-camera video
The two inputs play different roles.
The World Scenario Video constrains scene geometry and object motion, while the text prompt controls visual appearance and environmental conditions.
That separation is particularly useful for engineering applications. Instead of asking a generative model to invent both the scenario and its appearance, engineers can explicitly define the scenario and use generative AI primarily to create realistic visual variations.
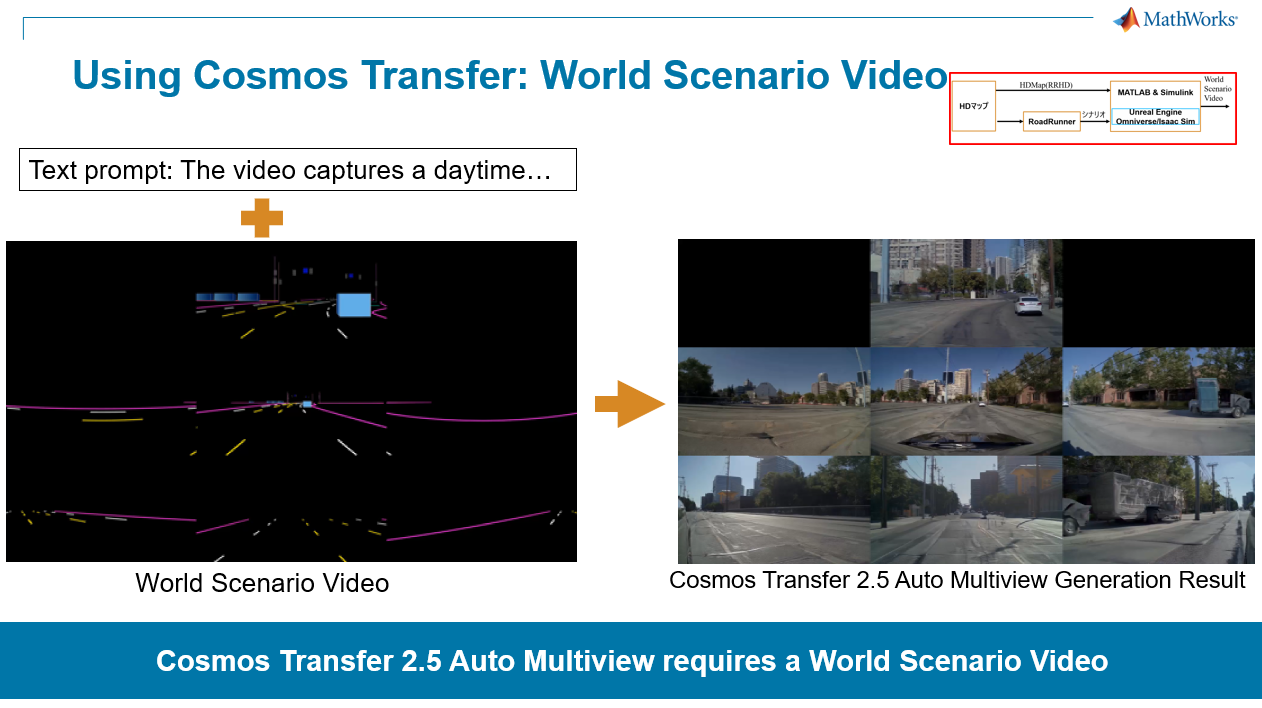
A World Scenario Video is required to use Cosmos-Transfer2.5 Auto Multiview. The central question for this workflow, then, is how to create WSVs from HD map data and RoadRunner scene and scenario data.
3 World Scenario Video Generation Pipeline
The workflow converts RoadRunner scene and scenario information into the format expected by Cosmos-Transfer2.5 Auto Multiview.
There are three main stages.
1) Create the scene and scenario
Users prepare:
- A RoadRunner scene or HD map
- Vehicle and pedestrian motion in RoadRunner Scenario
The scene contains the road environment, while the scenario describes how actors move through it.
2) Convert RoadRunner data in MATLAB
A MATLAB utility developed for this demonstration, convertRRHD2CosmosWSV.m, reads the RoadRunner HD scene data and scenario trajectory information. It then converts the information into scene annotations stored in Parquet format. These annotations include the road geometry, actor information, trajectories, and camera configuration required for WSV generation.
3) Render the World Scenario Video
NVIDIA provides generate_control_videos.py as part of the Cosmos-Transfer workflow. The Python utility reads the scene annotations and renders the World Scenario Video for each configured camera. The result is a set of geometrically consistent control videos that can be supplied to Cosmos-Transfer2.5 Auto Multiview.
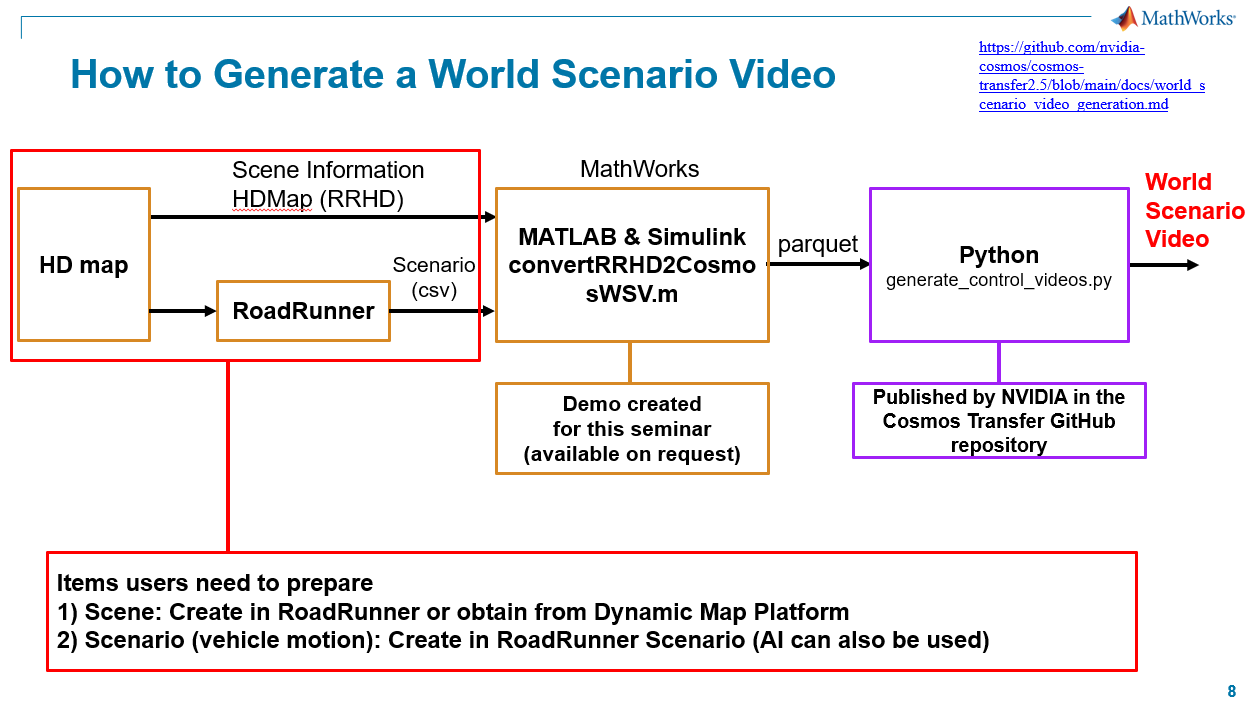
The WSV creation procedure is documented in the official NVIDIA documentation.
4 Exporting the Scene and Scenario
There are two ways to export vehicle-motion data for a scenario to CSV.
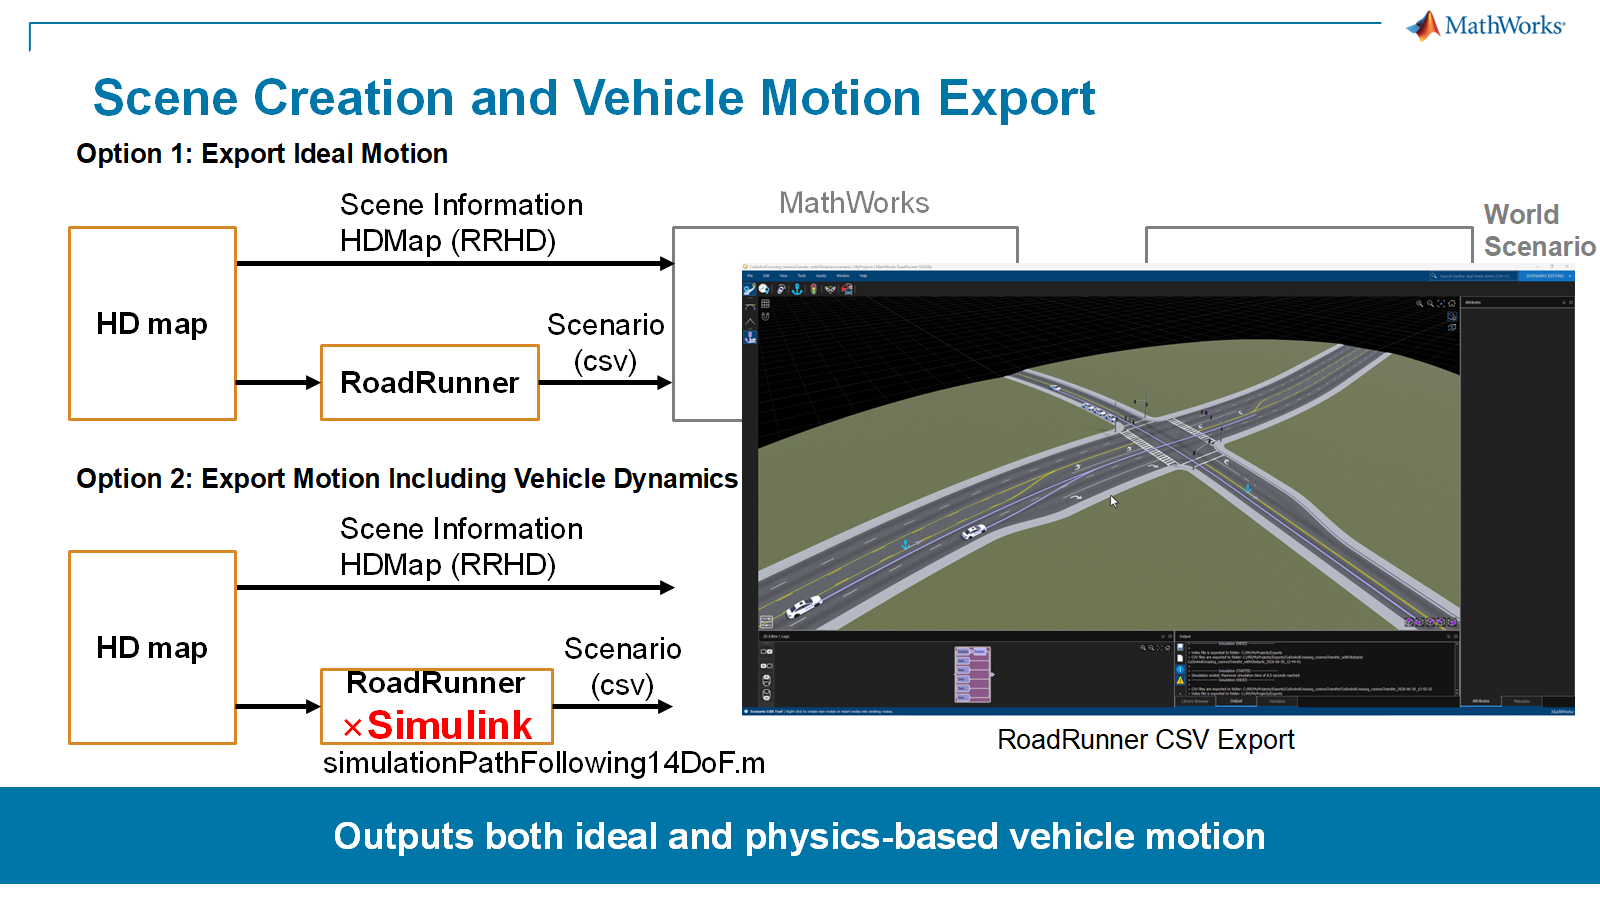
- Option 1: Export prescribed scenario motion – Export the prescribed motion from RoadRunner Scenario directly to CSV. Use this option when you need to create a WSV quickly.
- Option 2: Export vehicle-dynamics-based motion – Use RoadRunner-Simulink co-simulation to export the trajectory and vehicle pose computed by a vehicle dynamics model to CSV. This workflow uses simulationPathFollowing14DoF.m, a 14-degree-of-freedom vehicle dynamics model.
4-1. Why Vehicle Dynamics Matter: Camera Motion Follows Vehicle-Body Motion
The cameras are rigidly mounted to the vehicle body, so suspension deflection and vehicle pitch directly affect camera motion and orientation. The workflow forms a “RoadRunner road-surface model -> controller -> vehicle dynamics” loop, and the vehicle-body response to the road profile and control inputs is propagated to the camera poses.
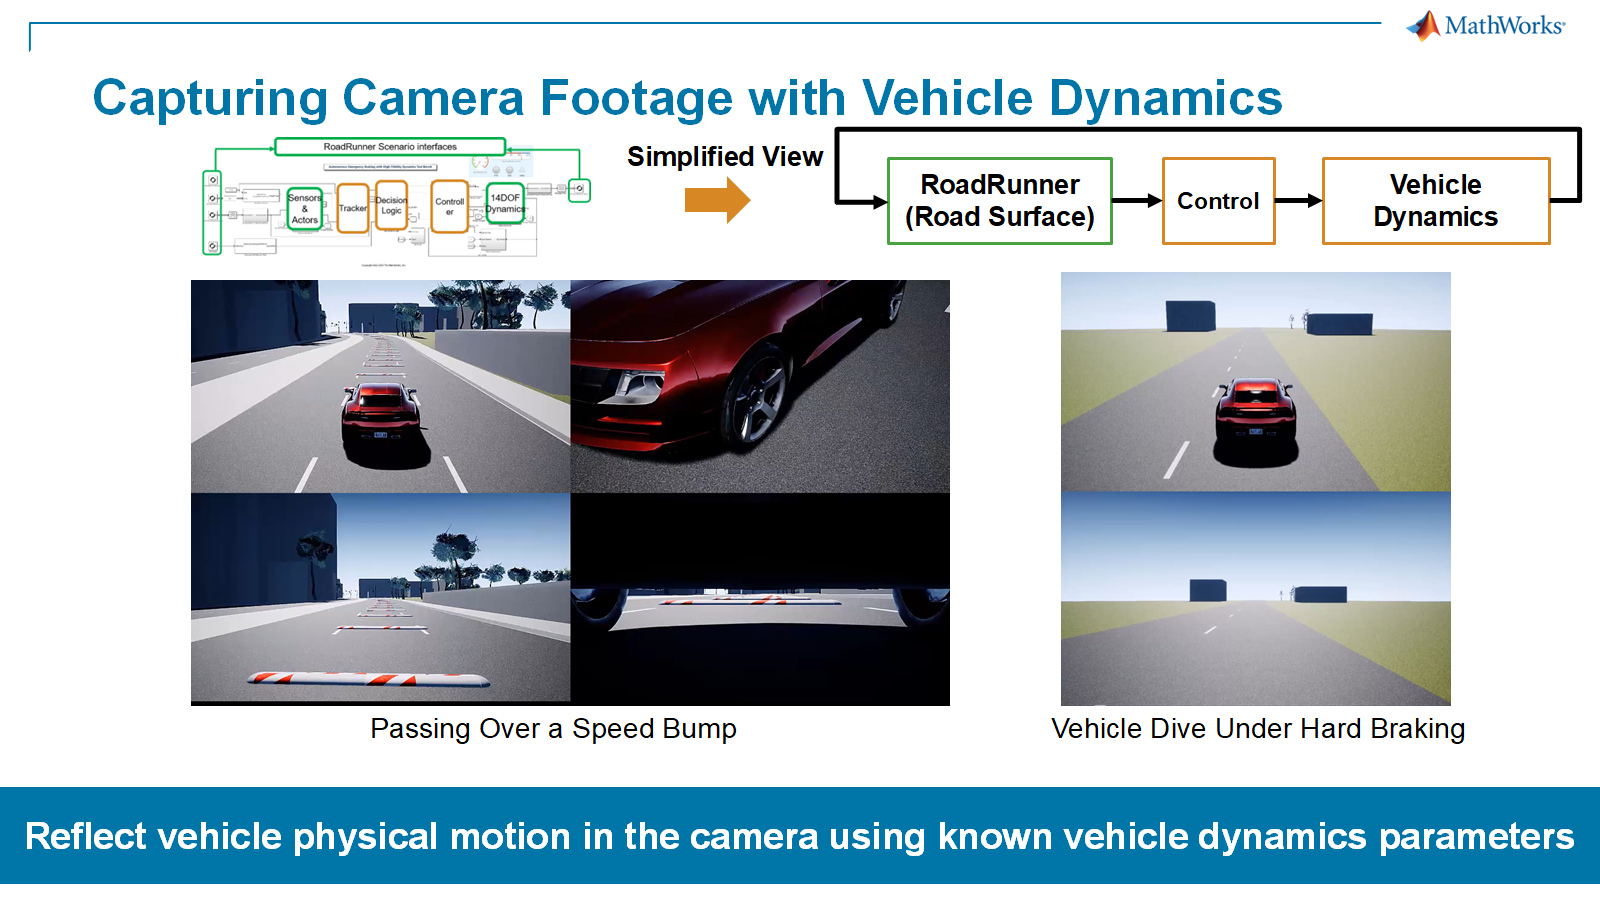
By using known vehicle dynamics parameters to propagate physical vehicle motion to the camera poses, training and validation workflows can use sensor imagery that includes physically plausible, numerically simulated vehicle motion.
4-2. Running RoadRunner-Simulink Co-Simulation
Main input arguments for simulationPathFollowing14DoF.m:
- scenarioName: Name of the scenario saved in the RoadRunner project
- outputFolder: Output folder for the CSV files
- Optional name-value arguments: rrProjectDir (RoadRunner project folder), rrInstallDir (RoadRunner installation folder), egoVehicleName (name of the ego vehicle; actor ID 0 is used when omitted)
% Specify the scenario name and output folder, then run
% Example: simulationPathFollowing14DoF('FourWayTraffic_sample', 'output_FourWay', egoVehicleName='ego');
simulationPathFollowing14DoF('CCRs40_TenVehicles', 'output_CCRs40', maxSimulationTime=8.5);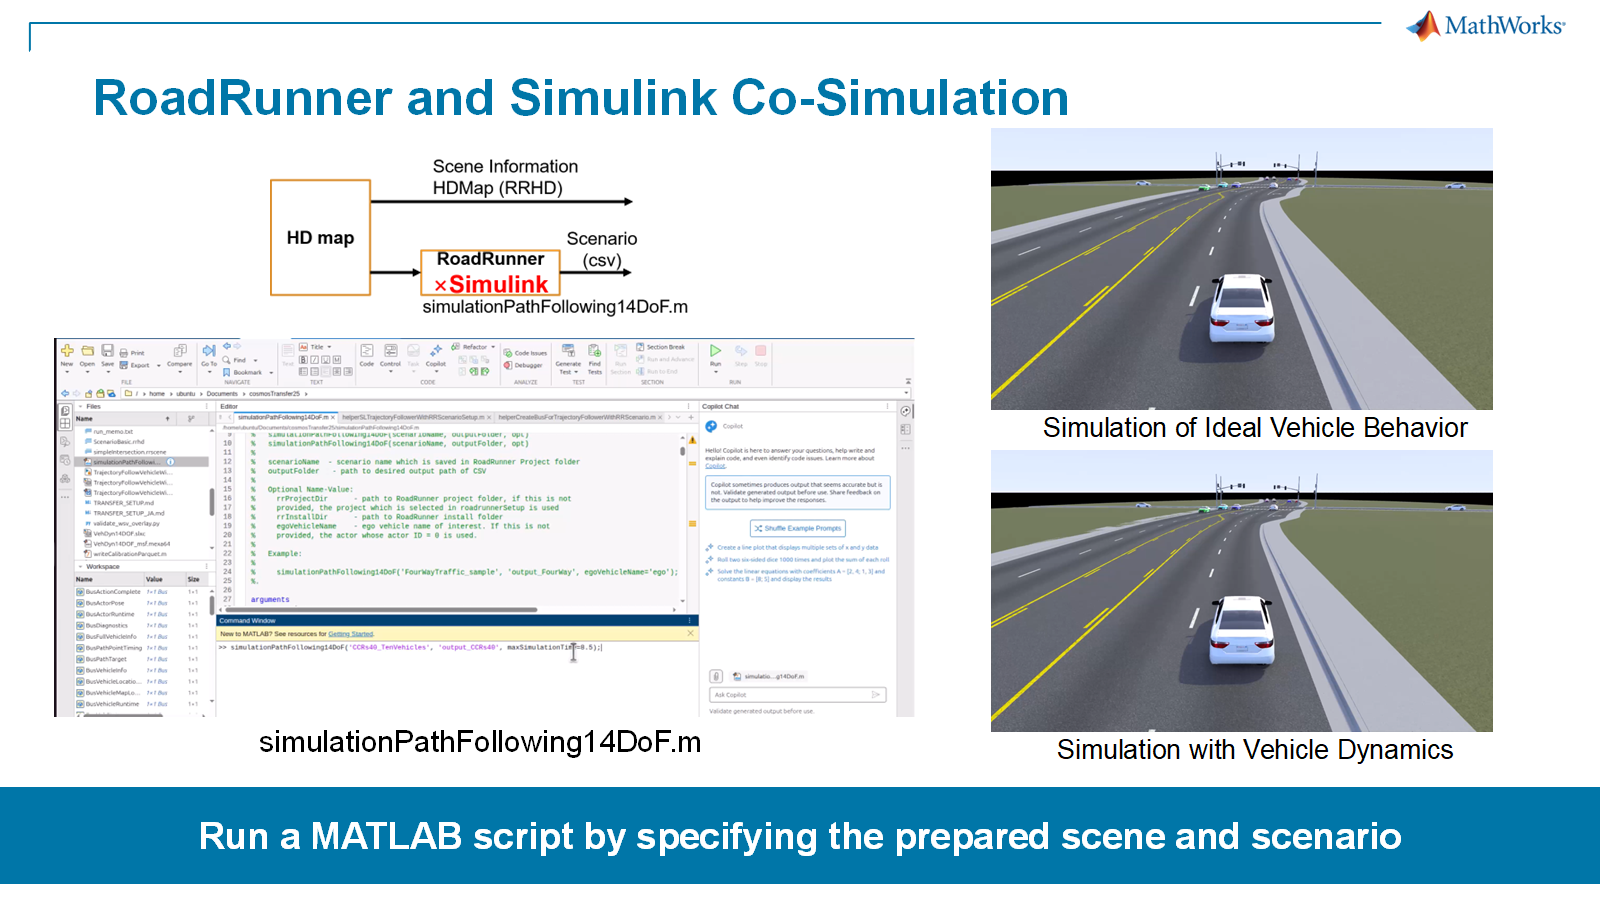
5 Generating the World Scenario Video
When the scene (RRHD) and scenario data (CSV) are ready, you can generate the WSVs.
Step 1: Convert to Parquet in MATLAB
Run convertRRHD2CosmosWSV.m to generate Parquet scene-annotation files for Cosmos-Transfer2.5 Auto Multiview from the RRHD file and scenario CSV.
Step 2: Render the WSV in Python
python cosmos-transfer2.5/scripts/generate_control_videos.py \
    -i <input/scene_annotations> \
    -o <output/world_scenario_videos>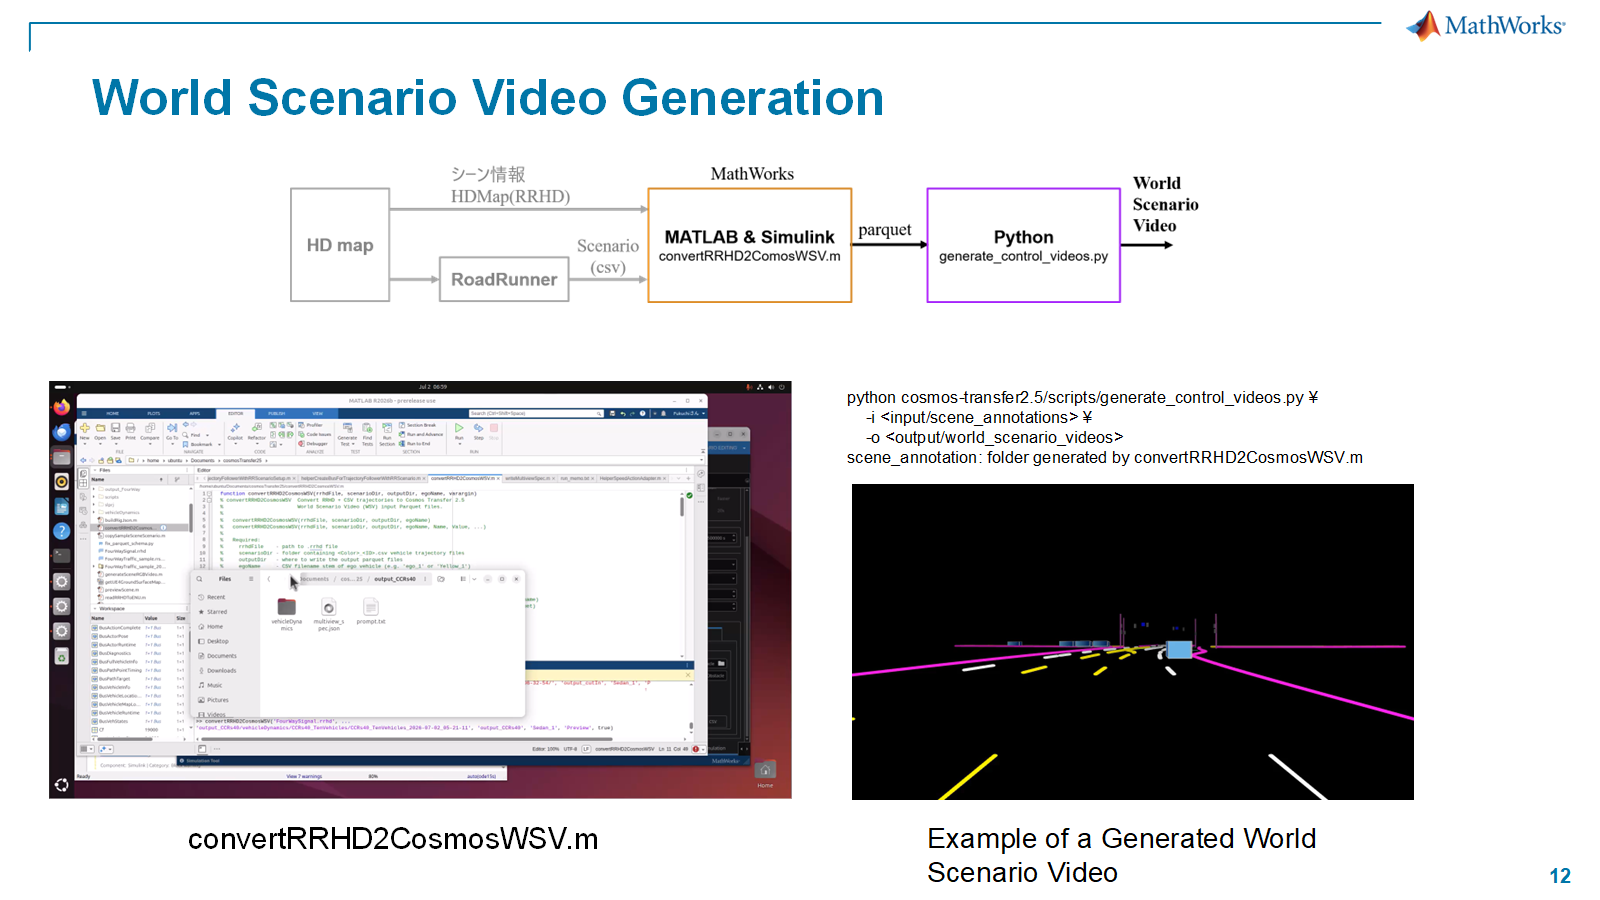
6 Validating the Generated WSV
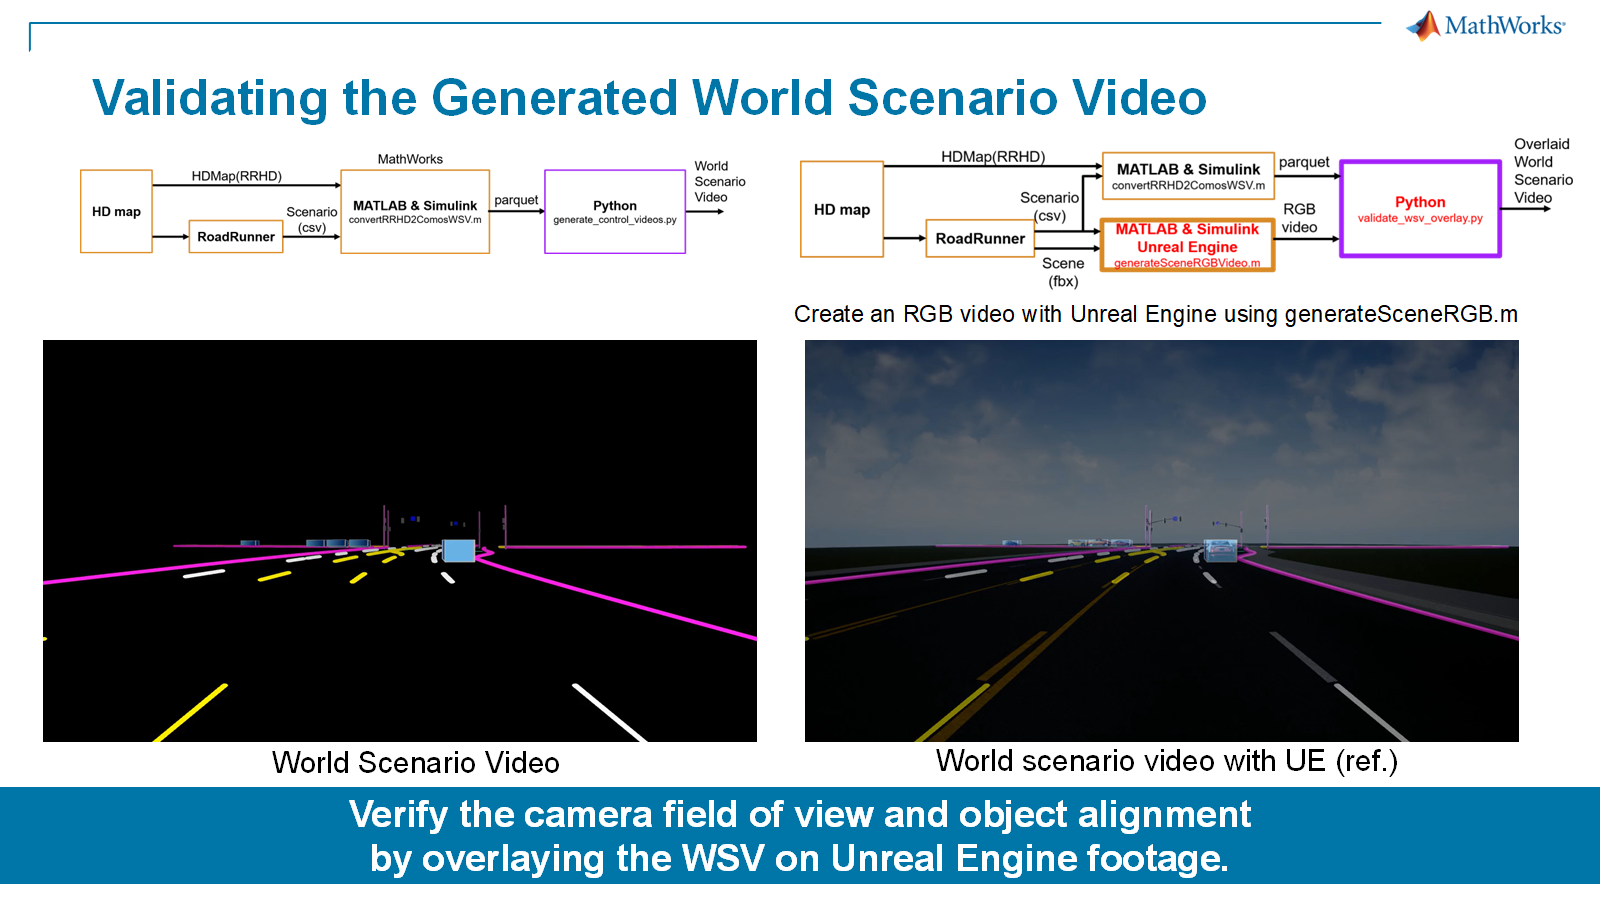
Although this step is optional, you can validate the generated WSV to confirm that it uses the intended camera field of view (FOV) and that the projected lines and cuboids align with the corresponding road features and objects. generateSceneRGB.m creates an RGB reference video using Unreal Engine, and validate_wsv_overlay.py overlays the WSV onto that reference video.
By overlaying the WSV on the Unreal Engine video, you can verify that the configured FOV is correct and that the projected lines and cuboids align with the corresponding road features and objects. In practical workflows, checking the quality of the control inputs before passing them to the generative AI model is critical.
7 Generating Photorealistic Video with NVIDIA Cosmos
Once the World Scenario Videos have been generated, each camera WSV is assigned to the corresponding camera input in the Cosmos-Transfer2.5 Auto Multiview configuration.
Example configuration JSON for Cosmos-Transfer2.5 Auto Multiview:
{
    "name": "cutin_daytime",
    "prompt_path": "prompt_daytime.txt",
    "num_conditional_frames": 0,
    "enable_autoregressive": true,
    "num_chunks": 3,
    "chunk_overlap": 1,
    "save_combined_views": false,
    "front_wide":  {"control_path": "world_scenario_videos/camera_front_wide_120fov.mp4"},
    "cross_left":  {"control_path": "world_scenario_videos/camera_cross_left_120fov.mp4"},
    "cross_right": {"control_path": "world_scenario_videos/camera_cross_right_120fov.mp4"},
    "rear_left":   {"control_path": "world_scenario_videos/camera_rear_left_70fov.mp4"},
    "rear_right":  {"control_path": "world_scenario_videos/camera_rear_right_70fov.mp4"},
    "rear":        {"control_path": "world_scenario_videos/camera_rear_tele_30fov.mp4"},
    "front_tele":  {"control_path": "world_scenario_videos/camera_front_tele_30fov.mp4"}
}
The main generation parameters are listed below.
| Parameter | Description |
|---|---|
| num_conditional_frames | Number of initial RGB frames used for conditioning. Set this to 0 when using only control videos |
| enable_autoregressive> | Enables autoregressive generation for longer videos by using multiple chunks |
| num_chunks | Number of video chunks to generate. Use 2 or more for longer sequences |
| chunk_overlap | Number of overlapping frames between adjacent chunks |
| save_combined_views | Saves all camera views into a single combined video |
Example calculation for a longer video: Each chunk contains 29 frames at 10 fps, or 2.9 seconds. With num_chunks=3 and chunk_overlap=1, the total length is 29*num_chunks – chunk_overlap*(num_chunks – 1) = 29*3 – 1*(3 – 1) = 85 frames, or approximately 8.5 seconds.
A text prompt then describes the desired appearance of the scene. For example, the prompt can specify:
- Time of day
- Weather
- Road-surface appearance
- Lighting
- Visibility
- Surrounding urban environment
Example prompt used in the seminar for a daytime cut-in scenario: “A realistic daytime urban driving scene captured by a front-facing automotive camera mounted on the ego vehicle. The ego vehicle travels smoothly through a multi-lane urban intersection in clear daylight. The environment includes dry asphalt pavement, clearly visible lane markings, lane boundaries, traffic signals, road signs, sidewalks, curbs, utility poles, and mid-rise urban buildings on both sides of the road. At the start of the scene, a lead vehicle is traveling ahead of the ego vehicle in the right lane, in the same direction of travel. The lead vehicle then cuts in front of the ego vehicle, creating a potential collision risk. The ego vehicle brakes to avoid the cut-in vehicle, then continues toward the intersection. Another vehicle approaches the intersection from the left and crosses the ego vehicle’s path after the ego vehicle has slowed. In the front-left area of the ego vehicle, three vehicles are stopped in the lane from the beginning of the video. These stopped vehicles partially occlude the vehicle entering the intersection from the left. The video should resemble natural automotive camera footage, with realistic daytime exposure, balanced lighting, clear visibility, stable camera motion, consistent road geometry, coherent vehicle positions, realistic vehicle scale, and smooth temporal consistency. The ego vehicle continues through the intersection while following the road layout and surrounding traffic. Preserve the lane structure, intersection geometry, vehicle positions, and motion from the input control video”.
The prompt defines the scene appearance, events such as the cut-in and deceleration, surrounding-vehicle positions, and the instruction to “preserve the lane structure, intersection geometry, vehicle positions, and motion from the input control video.” The WSV constrains the scenario geometry, while the prompt controls visual appearance variations. This is how the two inputs divide responsibilities.
8 Results Gallery
The following are selected video-generation results. To view all variants, watch the seminar recording: Physical AI Training and Validation Enabled by HD Maps and Simulation: The Latest in Data Generation Ecosystems from Dynamic Map Platform, NVIDIA, and MathWorks – MATLAB & Simulink (Japanese)
AEB Scenario with a Stationary Lead Vehicle (CCRs)
This is the Euro NCAP Car-to-Car Rear stationary (CCRs) scenario, in which the ego vehicle approaches a stationary lead vehicle and AEB performance is evaluated. When this scenario is combined with Option 2, which exports motion with vehicle dynamics, the vehicle-body response during hard braking is captured as well. Although the JSON configuration above specifies seven cameras, only six camera views are shown here to make the layout easier to view; the front_wide camera in the JSON is excluded.
Clear Weather
Sun Glare
Nighttime
Snow
This workflow is valuable because it can safely generate large volumes of data for combinations that are difficult to capture in real-world vehicle testing, such as hazardous scenarios under adverse conditions, including nighttime rain or cut-ins on snow-covered roads.
9 Summary
The joint demonstration by DMP, MathWorks, and NVIDIA highlighted the following:
- HD maps from Dynamic Map Platform enable real-world road geometry to be reconstructed quickly
- RoadRunner and MATLAB generate World Scenario Videos as control inputs for Cosmos-Transfer2.5 Auto Multiview
- Simulink integration enables camera motion that reflects vehicle dynamics
- Cosmos-Transfer2.5 Auto Multiview generates photorealistic driving video, while text prompts control weather, background, and other visual variations
The complete demonstration workflow, including convertRRHD2CosmosWSV.m, was created by MathWorks for this seminar. To learn more, contact MathWorks Japan.
References
- MathWorks resources:
- Dynamic Map Platform resources (including RRHD files):
- Link to NVIDIA Cosmos-Transfer2.5: https://github.com/nvidia-cosmos/cosmos-transfer2.5/tree/main
Note: The latest generation of NVIDIA Cosmos is Cosmos 3, an omnimodal model that integrates language, images, video, audio, and actions. Single View Transfer is already available in Cosmos 3, and Auto Multiview support is expected in a future Cosmos 3 release. At the time this article was written, however, Auto Multiview was available only in Cosmos-Transfer2.5, so this workflow uses Cosmos-Transfer2.5 Auto Multiview.
This article is adapted from the presentation “Generating Input Videos for Cosmos Transfer Using RoadRunner/MATLAB” by the Application Engineering team at MathWorks Japan, delivered as part of the July 15, 2026 seminar.
Collecting enough realistic data for automated driving and ADAS development can be challenging, especially for hazardous scenarios or difficult environmental conditions. A cut-in or emergency-braking event, for example, may need to be evaluated during the day, at night, in snow, or under strong sun glare.
A joint demonstration from Dynamic Map Platform (DMP), NVIDIA, and MathWorks explored another approach: define the driving scenario in simulation, then use generative AI to create photorealistic visual variations.
The workflow connects HD maps, RoadRunner, MATLAB and Simulink, and NVIDIA Cosmos-Transfer2.5 Auto Multiview:
HD map or RoadRunner scene → driving scenario → World Scenario Video → photorealistic multi-camera video
RoadRunner provides the road environment and traffic scenario. MATLAB converts the scene and actor information into the structured data needed to create a World Scenario Video (WSV), which provides spatial conditioning for Cosmos-Transfer2.5 Auto Multiview.
Cosmos then combines the WSV with a text prompt to generate photorealistic multi-camera video.
A useful way to think about the workflow is:
Simulation defines what happens. Generative AI defines what it looks like.
The WSV helps preserve elements such as road geometry, lane structure, vehicle positions, and motion, while the text prompt controls visual appearance such as weather, lighting, and time of day.
Simulink can also bring vehicle dynamics into the workflow. Because cameras are mounted to the vehicle body, hard braking, road disturbances, and suspension motion affect camera pose. RoadRunner-Simulink co-simulation can propagate this physical vehicle motion into the camera trajectories used for WSV generation.
Before sending the WSV to the generative model, the workflow can also validate it against an Unreal Engine reference video to check camera field of view and alignment of lanes, road features, and objects.
The demonstration generated several visual variations of the same underlying driving scenarios, including clear weather, sun glare, nighttime, and snow. This provides a way to explore conditions that may be difficult or impractical to reproduce repeatedly through real-world vehicle testing.
The result illustrates how simulation and generative AI can complement each other for synthetic data generation: simulation provides engineering control over the environment, scenario, and vehicle behavior, while generative AI expands the visual diversity of the resulting data.
[The example above is a six-camera driving video in a snowy environment, with front-left, front, front-right, rear-left, rear, and rear-right views. Cosmos-Transfer2.5 Auto Multiview generated the video from a RoadRunner scene containing static elements such as roads, signs, and buildings, together with a scenario containing dynamic actors such as vehicles and pedestrians.]
Want to See How the Workflow Is Built?
The following sections provide a step-by-step look at how RoadRunner, MATLAB, Simulink, and NVIDIA Cosmos work together—from scenario creation and World Scenario Video generation to validation and photorealistic video generation.
Continue below for the technical deep dive:
- From an HD Map to Realistic Video
- What Is a World Scenario Video?
- World Scenario Video Pipeline
- Exporting the Scene and Scenario
- Generating the World Scenario Video
- Validating the Generated WSV
- Configuring and Running Cosmos-Transfer2.5 Auto Multiview
- Results Gallery
- Summary
1 From an HD Map to Realistic Video
The workflow begins with the environment. A road scene can be:
- Created directly in RoadRunner
- Generated programmatically using the RoadRunner Scene API
- Created with assistance from an AI agent
- Imported from HD map data, such as data provided by Dynamic Map Platform
Vehicle and pedestrian motion is then defined using RoadRunner Scenario.
From the scene and scenario, MATLAB generates the data required to create a World Scenario Video (WSV). The WSV provides spatial and temporal conditioning for NVIDIA Cosmos-Transfer2.5 Auto Multiview, which generates photorealistic multi-camera driving video.
This means that real-world road geometry captured in an HD map can become the foundation for many visually different driving datasets without rebuilding each environment manually.
For example, the same scenario could be rendered as:
- Clear daytime
- Rain
- Snow
- Fog
- Nighttime
- Sun glare
The traffic geometry and vehicle motion remain defined by the simulation, while the visual appearance can be changed through the generative model.
The key point is that RoadRunner scenes can be generated automatically from HD maps and then converted into photorealistic video with Cosmos-Transfer2.5 Auto Multiview. This approach makes it possible to generate realistic video variations efficiently, without the substantial manual effort typically required to build a highly detailed digital twin environment.
2 What Is a “World Scenario Video”?
A key element of the workflow is the World Scenario Video (WSV).
Cosmos-Transfer2.5 Auto Multiview does not rely on a text prompt alone. It also uses a structured control video that describes the underlying driving scene.
A WSV uses a black background and projects information such as:
- Lane markings
- Road boundaries
- Traffic-signal and sign locations
- Vehicles
- Pedestrians
- 3D object bounding boxes
into each camera view.
Conceptually, the generation process becomes:
Text prompt + World Scenario Video → photorealistic multi-camera video
The two inputs play different roles.
The World Scenario Video constrains scene geometry and object motion, while the text prompt controls visual appearance and environmental conditions.
That separation is particularly useful for engineering applications. Instead of asking a generative model to invent both the scenario and its appearance, engineers can explicitly define the scenario and use generative AI primarily to create realistic visual variations.
A World Scenario Video is required to use Cosmos-Transfer2.5 Auto Multiview. The central question for this workflow, then, is how to create WSVs from HD map data and RoadRunner scene and scenario data.
3 World Scenario Video Generation Pipeline
The workflow converts RoadRunner scene and scenario information into the format expected by Cosmos-Transfer2.5 Auto Multiview.
There are three main stages.
1) Create the scene and scenario
Users prepare:
- A RoadRunner scene or HD map
- Vehicle and pedestrian motion in RoadRunner Scenario
The scene contains the road environment, while the scenario describes how actors move through it.
2) Convert RoadRunner data in MATLAB
A MATLAB utility developed for this demonstration, convertRRHD2CosmosWSV.m, reads the RoadRunner HD scene data and scenario trajectory information. It then converts the information into scene annotations stored in Parquet format. These annotations include the road geometry, actor information, trajectories, and camera configuration required for WSV generation.
3) Render the World Scenario Video
NVIDIA provides generate_control_videos.py as part of the Cosmos-Transfer workflow. The Python utility reads the scene annotations and renders the World Scenario Video for each configured camera. The result is a set of geometrically consistent control videos that can be supplied to Cosmos-Transfer2.5 Auto Multiview.
The WSV creation procedure is documented in the official NVIDIA documentation.
4 Exporting the Scene and Scenario
There are two ways to export vehicle-motion data for a scenario to CSV.
- Option 1: Export prescribed scenario motion – Export the prescribed motion from RoadRunner Scenario directly to CSV. Use this option when you need to create a WSV quickly.
- Option 2: Export vehicle-dynamics-based motion – Use RoadRunner-Simulink co-simulation to export the trajectory and vehicle pose computed by a vehicle dynamics model to CSV. This workflow uses simulationPathFollowing14DoF.m, a 14-degree-of-freedom vehicle dynamics model.
4-1. Why Vehicle Dynamics Matter: Camera Motion Follows Vehicle-Body Motion
The cameras are rigidly mounted to the vehicle body, so suspension deflection and vehicle pitch directly affect camera motion and orientation. The workflow forms a “RoadRunner road-surface model -> controller -> vehicle dynamics” loop, and the vehicle-body response to the road profile and control inputs is propagated to the camera poses.
By using known vehicle dynamics parameters to propagate physical vehicle motion to the camera poses, training and validation workflows can use sensor imagery that includes physically plausible, numerically simulated vehicle motion.
4-2. Running RoadRunner-Simulink Co-Simulation
Main input arguments for simulationPathFollowing14DoF.m:
- scenarioName: Name of the scenario saved in the RoadRunner project
- outputFolder: Output folder for the CSV files
- Optional name-value arguments: rrProjectDir (RoadRunner project folder), rrInstallDir (RoadRunner installation folder), egoVehicleName (name of the ego vehicle; actor ID 0 is used when omitted)
% Specify the scenario name and output folder, then run
% Example: simulationPathFollowing14DoF('FourWayTraffic_sample', 'output_FourWay', egoVehicleName='ego');
simulationPathFollowing14DoF('CCRs40_TenVehicles', 'output_CCRs40', maxSimulationTime=8.5);
5 Generating the World Scenario Video
When the scene (RRHD) and scenario data (CSV) are ready, you can generate the WSVs.
Step 1: Convert to Parquet in MATLAB
Run convertRRHD2CosmosWSV.m to generate Parquet scene-annotation files for Cosmos-Transfer2.5 Auto Multiview from the RRHD file and scenario CSV.
Step 2: Render the WSV in Python
python cosmos-transfer2.5/scripts/generate_control_videos.py \
    -i <input/scene_annotations> \
    -o <output/world_scenario_videos>
6 Validating the Generated WSV
Although this step is optional, you can validate the generated WSV to confirm that it uses the intended camera field of view (FOV) and that the projected lines and cuboids align with the corresponding road features and objects. generateSceneRGB.m creates an RGB reference video using Unreal Engine, and validate_wsv_overlay.py overlays the WSV onto that reference video.
By overlaying the WSV on the Unreal Engine video, you can verify that the configured FOV is correct and that the projected lines and cuboids align with the corresponding road features and objects. In practical workflows, checking the quality of the control inputs before passing them to the generative AI model is critical.
7 Generating Photorealistic Video with NVIDIA Cosmos
Once the World Scenario Videos have been generated, each camera WSV is assigned to the corresponding camera input in the Cosmos-Transfer2.5 Auto Multiview configuration.
Example configuration JSON for Cosmos-Transfer2.5 Auto Multiview:
{
    "name": "cutin_daytime",
    "prompt_path": "prompt_daytime.txt",
    "num_conditional_frames": 0,
    "enable_autoregressive": true,
    "num_chunks": 3,
    "chunk_overlap": 1,
    "save_combined_views": false,
    "front_wide":  {"control_path": "world_scenario_videos/camera_front_wide_120fov.mp4"},
    "cross_left":  {"control_path": "world_scenario_videos/camera_cross_left_120fov.mp4"},
    "cross_right": {"control_path": "world_scenario_videos/camera_cross_right_120fov.mp4"},
    "rear_left":   {"control_path": "world_scenario_videos/camera_rear_left_70fov.mp4"},
    "rear_right":  {"control_path": "world_scenario_videos/camera_rear_right_70fov.mp4"},
    "rear":        {"control_path": "world_scenario_videos/camera_rear_tele_30fov.mp4"},
    "front_tele":  {"control_path": "world_scenario_videos/camera_front_tele_30fov.mp4"}
}
The main generation parameters are listed below.
| Parameter | Description |
|---|---|
| num_conditional_frames | Number of initial RGB frames used for conditioning. Set this to 0 when using only control videos |
| enable_autoregressive> | Enables autoregressive generation for longer videos by using multiple chunks |
| num_chunks | Number of video chunks to generate. Use 2 or more for longer sequences |
| chunk_overlap | Number of overlapping frames between adjacent chunks |
| save_combined_views | Saves all camera views into a single combined video |
Example calculation for a longer video: Each chunk contains 29 frames at 10 fps, or 2.9 seconds. With num_chunks=3 and chunk_overlap=1, the total length is 29*num_chunks – chunk_overlap*(num_chunks – 1) = 29*3 – 1*(3 – 1) = 85 frames, or approximately 8.5 seconds.
A text prompt then describes the desired appearance of the scene. For example, the prompt can specify:
- Time of day
- Weather
- Road-surface appearance
- Lighting
- Visibility
- Surrounding urban environment
Example prompt used in the seminar for a daytime cut-in scenario: “A realistic daytime urban driving scene captured by a front-facing automotive camera mounted on the ego vehicle. The ego vehicle travels smoothly through a multi-lane urban intersection in clear daylight. The environment includes dry asphalt pavement, clearly visible lane markings, lane boundaries, traffic signals, road signs, sidewalks, curbs, utility poles, and mid-rise urban buildings on both sides of the road. At the start of the scene, a lead vehicle is traveling ahead of the ego vehicle in the right lane, in the same direction of travel. The lead vehicle then cuts in front of the ego vehicle, creating a potential collision risk. The ego vehicle brakes to avoid the cut-in vehicle, then continues toward the intersection. Another vehicle approaches the intersection from the left and crosses the ego vehicle’s path after the ego vehicle has slowed. In the front-left area of the ego vehicle, three vehicles are stopped in the lane from the beginning of the video. These stopped vehicles partially occlude the vehicle entering the intersection from the left. The video should resemble natural automotive camera footage, with realistic daytime exposure, balanced lighting, clear visibility, stable camera motion, consistent road geometry, coherent vehicle positions, realistic vehicle scale, and smooth temporal consistency. The ego vehicle continues through the intersection while following the road layout and surrounding traffic. Preserve the lane structure, intersection geometry, vehicle positions, and motion from the input control video”.
The prompt defines the scene appearance, events such as the cut-in and deceleration, surrounding-vehicle positions, and the instruction to “preserve the lane structure, intersection geometry, vehicle positions, and motion from the input control video.” The WSV constrains the scenario geometry, while the prompt controls visual appearance variations. This is how the two inputs divide responsibilities.
8 Results Gallery
The following are selected video-generation results. To view all variants, watch the seminar recording: Physical AI Training and Validation Enabled by HD Maps and Simulation: The Latest in Data Generation Ecosystems from Dynamic Map Platform, NVIDIA, and MathWorks – MATLAB & Simulink (Japanese)
AEB Scenario with a Stationary Lead Vehicle (CCRs)
This is the Euro NCAP Car-to-Car Rear stationary (CCRs) scenario, in which the ego vehicle approaches a stationary lead vehicle and AEB performance is evaluated. When this scenario is combined with Option 2, which exports motion with vehicle dynamics, the vehicle-body response during hard braking is captured as well. Although the JSON configuration above specifies seven cameras, only six camera views are shown here to make the layout easier to view; the front_wide camera in the JSON is excluded.
Clear Weather
Sun Glare
Nighttime
Snow
This workflow is valuable because it can safely generate large volumes of data for combinations that are difficult to capture in real-world vehicle testing, such as hazardous scenarios under adverse conditions, including nighttime rain or cut-ins on snow-covered roads.
9 Summary
The joint demonstration by DMP, MathWorks, and NVIDIA highlighted the following:
- HD maps from Dynamic Map Platform enable real-world road geometry to be reconstructed quickly
- RoadRunner and MATLAB generate World Scenario Videos as control inputs for Cosmos-Transfer2.5 Auto Multiview
- Simulink integration enables camera motion that reflects vehicle dynamics
- Cosmos-Transfer2.5 Auto Multiview generates photorealistic driving video, while text prompts control weather, background, and other visual variations
The complete demonstration workflow, including convertRRHD2CosmosWSV.m, was created by MathWorks for this seminar. To learn more, contact MathWorks Japan.
References
- MathWorks resources:
- Dynamic Map Platform resources (including RRHD files):
- Link to NVIDIA Cosmos-Transfer2.5: https://github.com/nvidia-cosmos/cosmos-transfer2.5/tree/main
Note: The latest generation of NVIDIA Cosmos is Cosmos 3, an omnimodal model that integrates language, images, video, audio, and actions. Single View Transfer is already available in Cosmos 3, and Auto Multiview support is expected in a future Cosmos 3 release. At the time this article was written, however, Auto Multiview was available only in Cosmos-Transfer2.5, so this workflow uses Cosmos-Transfer2.5 Auto Multiview.




评论
要发表评论,请点击 此处 登录到您的 MathWorks 帐户或创建一个新帐户。