Bringing TensorFlow Models into MATLAB
In release R2021a, a converter for TensorFlow models was released as a support package supporting import of TensorFlow 2 models into Deep Learning Toolbox. In this blog, we will explore the ways you can use the converter for TensorFlow models and do the following:
To bring models trained in TensorFlow 2 into MATLAB, you can use the function importTensorFlowNetwork, which enables you to import the model and its weights into MATLAB. (Note: you can also use importTensorFlowLayers to import layers from TensorFlow).
| >>>>>>>>>>>>>>>>>>>>>>>>>>>>>To see a more-detailed post on how to bring in TensorFlow model into MATLAB, check out this related post on bringing in TensorFlow (and other) networks >>>>>>>>>>>>>>>>>>>>>>>>>>>>> | Related Post: Importing Models from TensorFlow, PyTorch, and ONNX  |
Figure 1: Common workflows after importing TensorFlow model into MATLAB
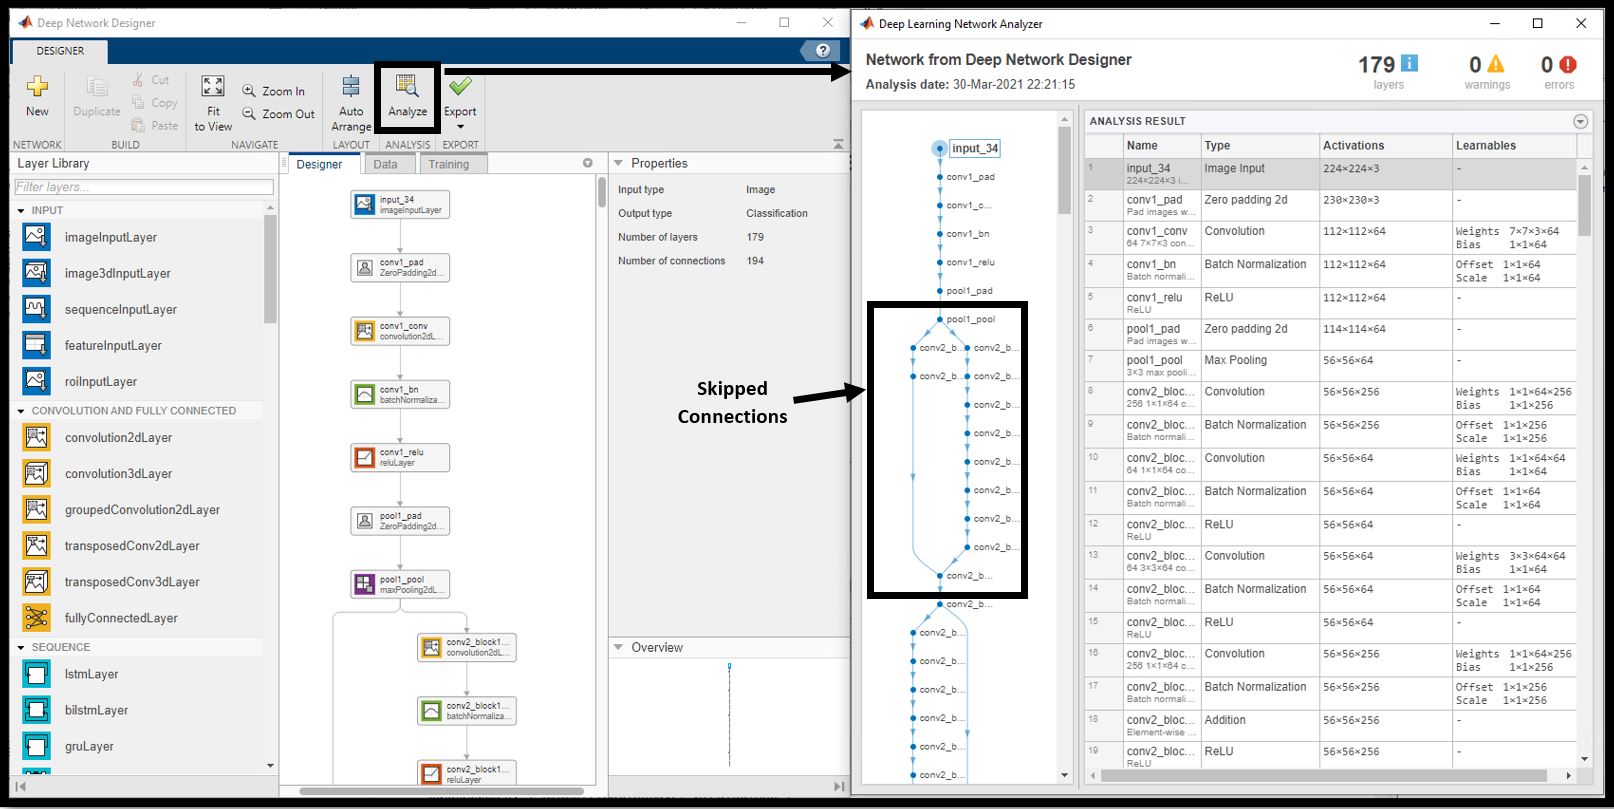
1. Visualize and analyze the networkTo understand the network, we'll use Deep Network Designer app to visualize the network architecture. To load up the app, type deepNetworkDesigner in the command line and load the network from workspace. Once imported into the app, the network looks like Figure 4a. The layer architecture contains skip-connections which is typical of ResNet architectures. You can at this stage use this network for transfer learning workflows. Check this video out to learn how to interactively modify a deep learning network for transfer learning. You can also click on the Analyze button in the app (Figure 4b) and investigate the activation sizes and see if the network has errors like incorrect tensor shapes, misplaced connections, etc.

Figure 4a: ResNet50 architecture inside the Deep Network Designer app
Figure 4b: Analyze the imported network for errors and visualize the key components in the architecture – the skipped connections in the case of resnet50. Click for larger view.
2. Generate C/C++/CUDA codeOne of the most common paths our customers take after importing a model is generating code, targeting different hardware platforms.
In this example we'll generate CUDA code, using GPU Coder, targeting the cuDNN library in 3 easy steps.
Step 1: Verify the GPU environment
This performs a complete check of all third-party tools required for GPU code generation. The output shown here is representative. Your results might differ.
envCfg = coder.gpuEnvConfig('host');
envCfg.DeepLibTarget = 'cudnn';
envCfg.DeepCodegen = 1;
envCfg.Quiet = 1;
coder.checkGpuInstall(envCfg);
|
 |
Figure 5: Verify the GPU environment to make sure all the essential libraries are available
Step 2: Define Entry Point Function
The resnet50_predict.m entry-point function takes an image input and runs prediction on the image using the imported ResNet50 model. The function uses a persistent object mynet to load the series network object and reuses the persistent object for prediction on subsequent calls.
function out = resnet50_predict(in)
%#codegen
persistent mynet;

if isempty(mynet)
  mynet = coder.loadDeepLearningNetwork('resnet50.mat','net');
end

% pass in input
out = mynet.predict(in);
Step 3: Run MEX Code Generation
Call the entry point function and generate C++ code targeting cudnn libraries
To generate CUDA code for the resnet50_predict.m entry-point function, create a GPU code configuration object for a MEX target and set the target language to C++. Use the coder.DeepLearningConfig function to create a CuDNN deep learning configuration object and assign it to the DeepLearningConfig property of the GPU code configuration object. Run the codegen command and specify an input size of [224,224,3]. This value corresponds to the input layer size of the ResNet50 network.
Run MEXcfg = coder.gpuConfig('mex');
cfg.TargetLang = 'C++';
cfg.DeepLearningConfig = coder.DeepLearningConfig('cudnn');
codegen -config cfg resnet50_predict -args {ones(224,224,3)} -report
GPU Coder creates a code generation report that provides an interface to examine the original MATLAB code and generated CUDA code. The report also provides a handy interactive code traceability tool to map between MATLAB code and CUDA. Figure 6 shows a screen capture of the tool in action.
Figure 6: Generated report for code generation. Click to see details.
In this example, we targeted the cuDNN libraries. You can also target Intel and ARM CPUs using MATLAB Coder and FPGAs and SoCs using Deep Learning HDL Toolbox.
3. Integrate the Network with SimulinkOften, deep learning models are used as a component in bigger systems. Simulink helps explore a wide design space by modeling the system under test and the physical plant where you can use one multi-domain environment to simulate how all parts of the system behave. In this section, we will see how the resnet50 model imported from TensorFlow can be integrated into Simulink.
We'll integrate this model with Simulink in 3 easy steps. But first, save the Resnet50 model in your directory in MATLAB. Use save('resnet50.mat','net') to do so.
Step 1: Open Simulink and Access Library Browser
-
Open Simulink (type simulink in the command window) and choose 'Blank Model'
-
Click on Library Browser

Step 2: Add the Simulink Blocks
-
Add an image from file block from the Computer Vision Toolboxlibrary and set the File name parameter to peppers.png. This is the sample image we are going to classify using the resnet50 model in Simulink.
-
Preprocess the image: We need to add a couple of preprocessing lines to make sure the network gets the image as expected. To write MATLAB code in Simulink, we will use MATLAB Function block. Click anywhere on the Simulink canvas and type From the list of options, select MATLAB Function. Inside the MATLAB Function block, we'll add a couple of lines to flip the image channels and resizing the image.
function y = preprocess_img(img)

  img = flip(img,3);
  img = imresize(img, [224 224]);
  y = img;
end
-
Add the ResNet50 model: Navigate to Deep Learning Toolbox --> Deep Neural Networks in Simulink library browser and drag the 'Predict' block onto the Simulink model canvas.
Double-click on the predict block which opens the Block Parameters dialogue and select the 'Network from MAT-file' option from the Network dropdown as shown. Navigate to the location where you've saved the resnet50 model and open it. Click OK once you're done.
 |
Figure 7: Built-in deep learning blocks can be used for prediction and classification
-
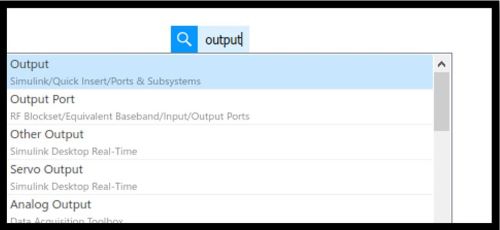
Add an output to predict scores: Next, click anywhere on your Simulink canvas and type output and select the first option

Figure 8
-
Connect the blocks you've created so far. Once done, it should look like the below figure.

Figure 9
Step 3: Run the simulation
Once the simulation has run successfully, you absolutely should test if the simulation output predicts the bell pepper image correctly. Below is the prediction made by the output of the simulation on the image.

Figure 10
This was a simple example demonstrating how you'd integrate a simple model with Simulink, but the bigger systems are much more complex. Let's use an example of a lane following algorithm used by an autonomous car. There are many components that make this application successful: object detection, sensor fusion, acceleration control, braking, and quite a few more (See Figure 11). Deep learning algorithm represents one (but very important) component of the bigger system. It is used for detecting lanes and cars, and the deep learning system needs to work within the larger system. Below is a pictorial representation of such a system that performs Highway Lane Following. In Figure 11, only the 'Vision Detector' is the deep learning network and rest of the components in the system perform other tasks such as lane following control and sensor fusion.
We didn't discuss much about the highway lane following example here but if you're interested, here is the link to the documentation example.
 |
Figure 11: System showing how a typical plant looks like for building a bigger system where many components interact with each other
ConclusionIn this blog we learned how we can collaborate in the AI ecosystem working with TensorFlow and MATLAB using the converter for TensorFlow models. We saw ways in which you could enhance TensorFlow workflows by bringing a model trained in TensorFlow into MATLAB via the converter and analyze, visualize, simulate, and generate code for the network.
What's Next
In the next blog, we will look at the ability of the importer to autogenerate custom layers for the operators and layers that are not supported for conversion into a built-in layer by MATLAB's Deep Learning Toolbox.
We'd love to see you use the TensorFlow model converter and hear what your reasons are to bring in models from TensorFlow into MATLAB.
- 类别:
- Deep Learning


评论
要发表评论,请点击 此处 登录到您的 MathWorks 帐户或创建一个新帐户。