
Build Simulink Apps with App Designer
 |
Guest Writer: Robert Philbrick Robert Philbrick is a principal engineer responsible for new interactive App Designer workflows. He joined MathWorks in 2012 and has made many contributions to the App Building area, including developing the GUIDE to App Designer Migration Tool for MATLAB, improving the App Designer onboarding experience, enabling App Designer in MATLAB Online, adding support for custom UI component authoring in App Designer, and making it easier to build Simulink apps interactively with App Designer. Outside of software development, Robert enjoys mountain biking, skiing, reading, and playing board games.
|
If you have ever created a Simulink model, you may at one point have wanted to make an app for your model. Creating an app for your model can make it easier for your end users to use your simulation without needing to be familiar with Simulink. For example, your app could provide controls for easily tuning parameters of the simulation and visualizations of the simulation results. In addition, if you use Simulink Compiler to share the app as a standalone executable or a web app, your end users don’t even need an installation of Simulink.
In the past, creating an app for a Simulink model involved writing a lot of manual code to connect the app’s UI components to the model. This code was tedious to write and difficult to optimize, and it was challenging to ensure that it would work in deployment. But now, with the release of R2024a, you can build apps for Simulink models interactively in App Designer with little-to-no coding required! To make it easier to build Simulink apps, we have introduced a set of new Simulink-specific UI components and an interactive workflow for connecting UI components to tunable variables and logged signals of your model. I will briefly go over these features and provide a walkthrough on how to use them to create an app for a Simulink model.
Simulink UI Component Set
The new Simulink UI components, available in the App Designer component library, encapsulate common simulation tasks and reduce the need to write code for common simulation scenarios. These components, shown in the image below, include controls for starting/pausing/stopping a simulation, a simulation progress bar, buttons for loading inputs and saving outputs, a variable tuner for tuning the value of variables used by the simulation, and a time scope for visualizing logged signal data. When you add these components to your app, App Designer configures them to automatically interface with the model without you needing to do anything. The time scope is optimized to display Simulink signal data performantly with minimal impact on the model simulation run-time.

Interactive UI Component to Simulink Model Binding Workflow
In addition to the new Simulink UI components, we have created an interactive workflow in App Designer to make it easy for you to connect common UI components of your app to tunable variables and logged signals of your model without needing to write code. Whenever you add a Simulink component to a blank app or create a blank Simulink app from the App Designer start screen, you will be prompted to select the Simulink model to associate with your app. You can then add UI components that allow a user to set numeric values, such as spinners, sliders, and numeric edit fields, to tune model variables. You can also add UI components that display information, such as time scopes, gauges, and labels, to visualize logged signals. With the added UI component selected, you can use the Simulink tab in the App Designer toolstrip or the component’s context menu to add a binding to a Simulink element. As illustrated in the image below, this will open the model in Simulink and allow you to select the variable or logged signal that you want to connect to. It is as easy as that!

Example: Building an App for an Automatic Transmission Controller
To follow this example, you will need MATLAB and Simulink installed.
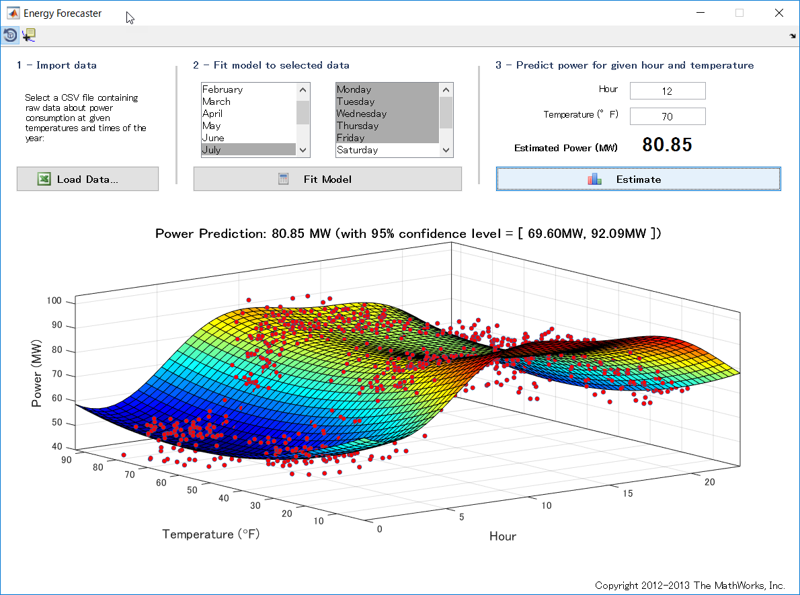
Let’s use the new Simulink UI components and interactive workflow to build an App Designer app for a Simulink model of an automatic transmission controller for a car. We want to build an app that allows us to control how much throttle and brake is being applied to the car and then visualize the engine’s RPM and the car’s speed over time. Here is what the result will look like, below.

Open and adjust model
First let’s open the example model we will be using:
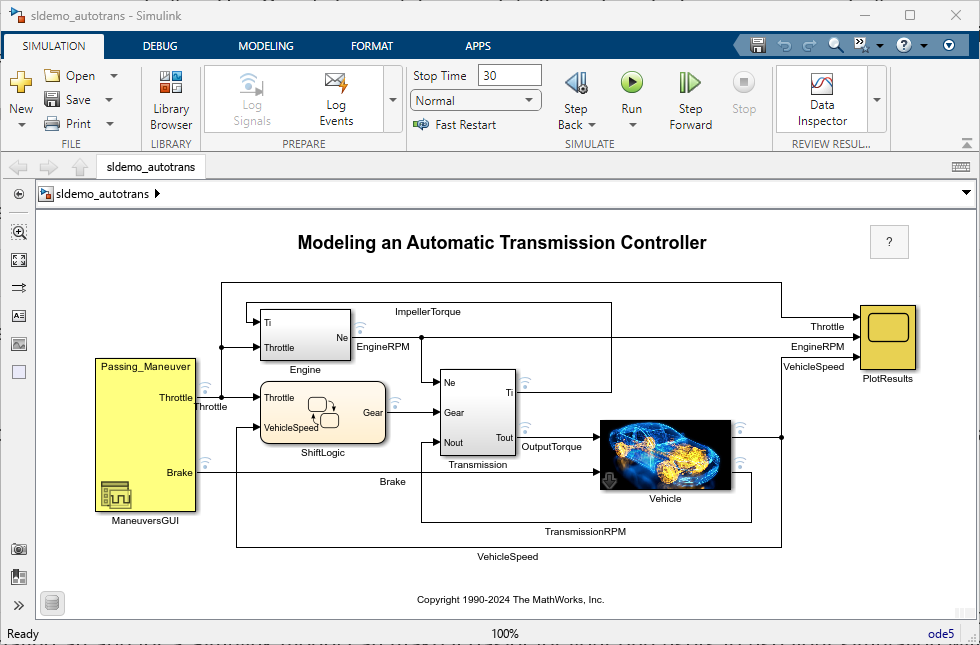
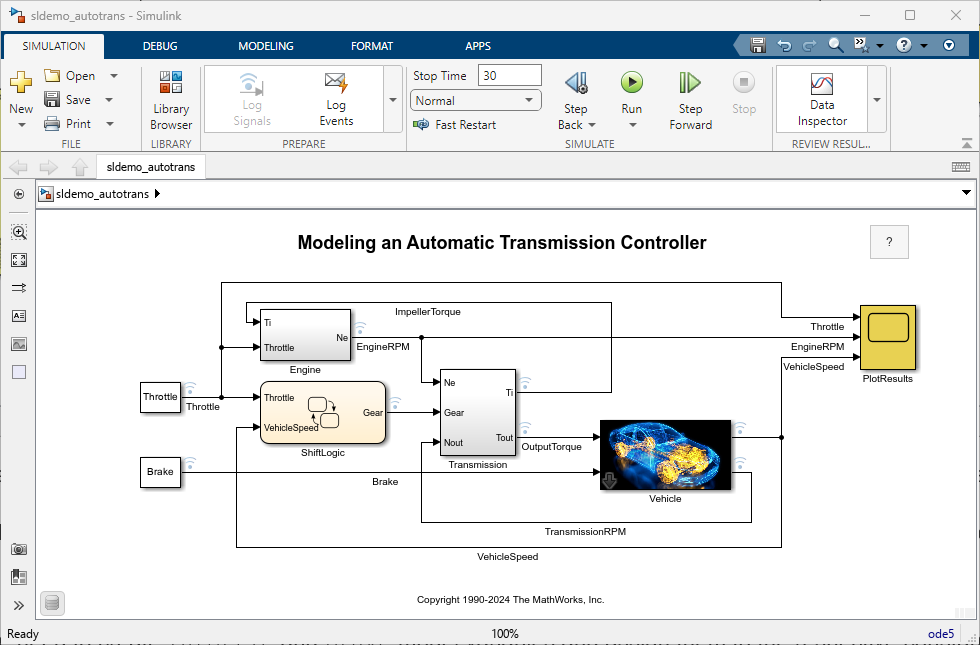
This example model has a Signal Editor block (ManeuversGUI) that provides the input signals (Throttle and Brake) for different driving scenarios. Instead of having predefined inputs, we want our app to allow the user to specify the throttle and the brake amounts. To do this, delete the ManeuversGUI, and add two constant blocks, one for the Throttle and one for the Brake signal.
App Designer apps can control tunable parameters of a simulation by using base workspace or model variables. Therefore, we need to create Throttle and Brake model variables and assign them to the respective constant block value parameter. Also, we need to make sure that the signals out of the constant blocks are logged and the model is saved.
Create and lay out the app
Now that the model has been adjusted for our use case, let’s create a new blank app for this Simulink model. We can do this by using the Apps > Design App > Create App for Model option from the Simulink toolstrip.

This will create a new blank app in App Designer that is associated with the model. We can confirm this by verifying the model’s name specified for the app in the Simulink toolstrip tab in App Designer.

We can now lay out the app by adding common UI components and Simulink UI components. Let’s add the following components:
- Two knobs to control the Throttle and Brake model variables
- Two Simulink time scopes to visualize the engine RPM and car’s speed
- A Simulink simulation controls component to start / pause / stop the simulation
- A Simulink progress bar to visualize the simulation progress

Interactively bind the UI components to the model variables and logged signals
The simulation controls and simulation progress Simulink UI components are automatically connected to the Simulink model associated with the app. However, the knobs and the time scopes are not automatically connected, because we need to specify what variables and logged signals we want to connect them to. This is very straightforward to do. For example, to connect the first knob to the Throttle model variable, we can select the knob, right-click and select Add Binding. This will bring the Simulink model to front in connect mode and allow us to choose the Throttle variable by selecting the constant block that uses that variable, as illustrated below. The app will then have a binding in the generated code representing the connection between the knob and the variable.

We can repeat those steps for the second knob but create a binding to the Brake model variable instead. Similarly, we can do the same thing for each time scope but instead of creating a binding to a model variable, we will connect to the EngineRPM logged signal and the VehicleSpeed logged signal, as illustrated below. When connecting to a logged signal, you can either click on the signal line or the block from which it is coming out. Also, a time scope UI component can have multiple logged signals connected to it.
Note that App Designer can only connect to a logged signal, so ensure that the signal is logged and that the model has signal logging enabled.

Run app and verify
Let’s now run the app from App Designer and verify that we can start the simulation, tune the throttle and brake variables, and visualize the logged signals. You may want to add simulation pacing to the model, using the option in the Simulink model’s run button dropdown, so that you have time to adjust the knob values and visualize changes to the signal data before the simulation ends.

Use Simulation object to modify model parameters
That’s all it takes to create our app! It is awesome that we were able to create an app for a Simulink model in a few minutes without writing a single line of code. Part of what makes this all possible is the new Simulation object that the app uses to interface with the model. When you create an App Designer app that is associated with a Simulink model, App Designer generates code to create an instance of a Simulation object and assigns it as an app property.

If you want to further customize your simulation, such as by setting model parameters, you can do that using the Simulation object in code. For example, we can add an edit field to the app that can be used to specify the simulation stop time. We can then add a ValueChangedFcn callback to the edit field and use the following code to set the stop time on the Simulation object.

Here is our final app:

At this point we can share our Simulink model and app with our end users. Or, using the Share button in App Designer, we can use Simulink Compiler to deploy our app as a standalone executable or web app.
Final thoughts
You’ve briefly seen how much easier and quicker it can be to create a Simulink app with little to no coding required using the new Simulink UI component set and the interactive binding workflow in App Designer in R2024a. We would love to hear in the comments your thoughts on these new features and what other improvements you would like to see. Are there additional pains you are facing, are there additional Simulink UI components you would like to have, or are there specific types of Simulink apps you want to create? Please also let us know if there are any topics of this workflow that you would like us to touch on more in a future blog post.
For more information on the Simulink UI components, interactive App Designer workflow, and more examples, see Create Apps to Control Simulations and Develop Apps Using App Designer.
Read more about the R2024a graphics and app building features.


评论
要发表评论,请点击 此处 登录到您的 MathWorks 帐户或创建一个新帐户。