
Bring PyTorch Models in Your Live Script with an Interactive Task
MATLAB makes it easy to integrate Python®-based AI models into your MATLAB and Simulink workflows. You can call PyTorch® and TensorFlow™ models - or any Python code - directly from MATLAB. For example, you can compare Python-based models to evaluate their accuracy and performance as part of the AI workflow you’ve built in MATLAB, helping you identify the best-performing model with minimal effort.
In this blog post, I am going to show you how to use the Run Python Code task in a live script for quickly using a PyTorch model for image classification.
 The image was correctly classified by the PyTorch model.
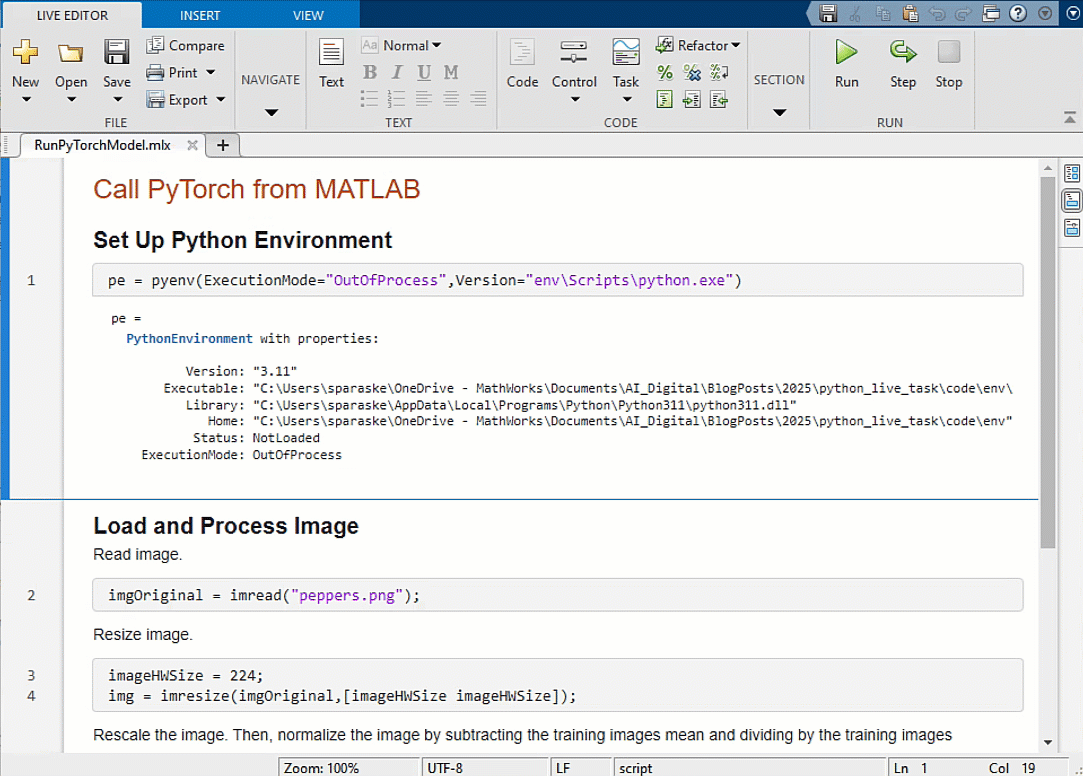
Set up Python Environment
To run Python code from MATLAB, you must first set up a Python environment. Then, set up the Python interpreter for MATLAB.pe = pyenv(ExecutionMode="OutOfProcess",Version="env\Scripts\python.exe");
Load and Process Image
Read the input image. Resize the image to the input size of the network.imgOriginal = imread("peppers.png");
imageHWSize = 224;
img = imresize(imgOriginal,[imageHWSize imageHWSize]);
Rescale the image. Then, normalize the image by subtracting the training images mean and dividing by the training images standard deviation. For more information, see Input Data Preprocessing.
img = rescale(img,0,1);

meanIm = [0.485 0.456 0.406];
stdIm = [0.229 0.224 0.225];
img = (img - reshape(meanIm,[1 1 3]))./reshape(stdIm,[1 1 3]);
Permute the image data from the Deep Learning Toolbox dimension ordering (HWCN) to the PyTorch dimension ordering (NCHW), where H is the height of the images, W is the width of the images, C is the number of channels, and N is the number of observations. This is a necessary step to use the image for prediction with a PyTorch model.
imgForTorch = permute(img,[4 3 1 2]);
Classify Image with PyTorch Model
The code you need to classify the image with a PyTorch model is the following. You import the necessary libraries, load the convnext_small model, and perform inference using the model.import numpy as np import torch as torch import torchvision as vision model = vision.models.convnext_small(weights="DEFAULT"); # Convert the image to tensor. X = np.array(imgForTorch); X_torch = torch.from_numpy(X).float(); #Classify image. torch.manual_seed(0); y_val = model(X_torch); predicted = torch.argmax(y_val); predicted = torch.argmax(y_val);As shown in the following animated figure, you can insert the Run Python Code task into your live script, type the above Python code into the task, and run the task. You can select specific output variables for the task to return. In this case, I selected the variable predicted, which is the index of the class with the highest probability.
Show Classification Result
Specify the class names. Get the class names from squeezenet, which is also trained with ImageNet images.squeezeNet = squeezenet; ClassNames = squeezeNet.Layers(end).Classes;Get label from prediction. Remember that Python uses zero-based indexing.
label = ClassNames(double(predicted.tolist)+1);Display the classification result.
imshow(imgOriginal);
title(label,FontSize=16)
The image was correctly classified by the PyTorch model.
| Want to keep exploring how to integrate MATLAB with PyTorch for your AI workflows? | |
| Pocket Guide: MATLAB with Python for Artificial Intelligence |  |
- Category:
- Deep Learning,
- MATLAB with Python,
- PyTorch


Comments
To leave a comment, please click here to sign in to your MathWorks Account or create a new one.