
Project Yourself!
Hello everyone. It has been quite a long time since we've posted anything in this forum. It's not for lack of topics though! We have many great and exciting topics to discuss, and we'd like to kick it off with a great guest post from Laura Dempsey. Laura is an application engineer in our UK office and she has a great energy and interest in how we can develop high integrity MATLAB code. She is here to discuss a feature that is both mature and established as well as new and exciting. Take it away Laura.
In a previous post, Amy explained how to organize your toolbox code. Much of the advice remains the same, but the arrival of MATLAB projects in R2019a significantly advances this workflow. This post is to help you understand current best practice for organizing, testing, and deploying your MATLAB code. For more information, check out the MATLAB and Simulink Projects landing page on our website.
Toolbox Tools, which creates templates for developing new toolboxes, has also been updated on File Exchange to include MATLAB projects. Check it out after reading this blog!
What are MATLAB projects?
For those developing MATLAB toolboxes and applications, the process often looks like the following workflow cycle. The cycle repeats as new features, bug fixes, and more are added to the toolbox.
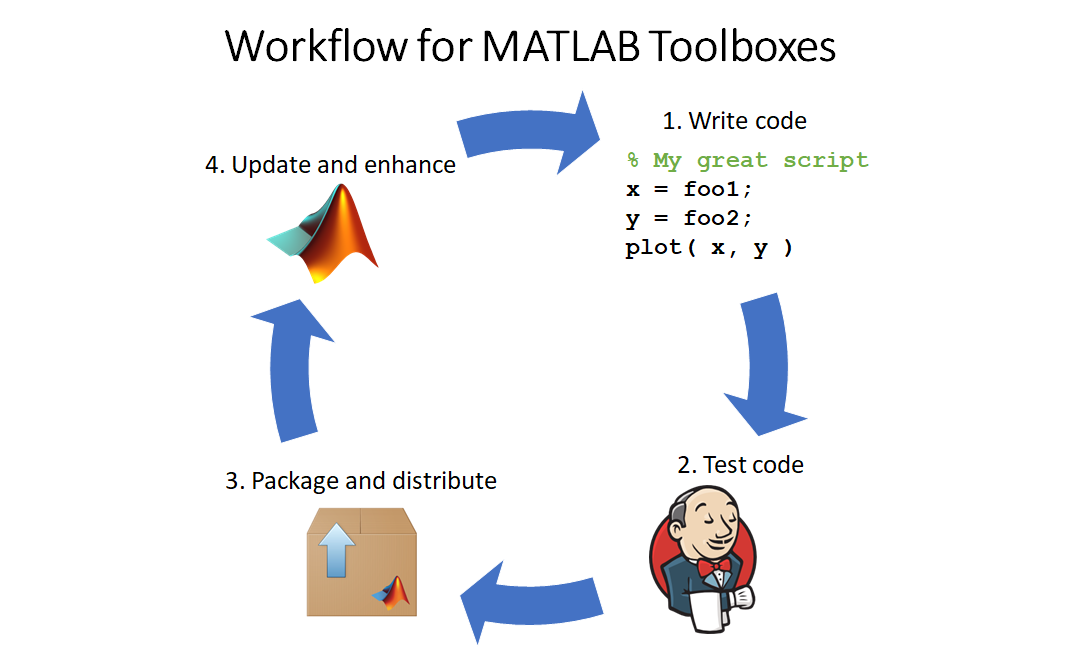
Those that have updated toolboxes, or are working collaboratively with others on toolbox development, know that it can be difficult to maintain the code base between versions and/or developers. MATLAB projects can provide consistency and automation by helping to manage your code development environment. With MATLAB projects, you can organize toolbox code by:
- managing and sharing files and settings;
- finding required files;
- interacting with source control; and
- simplifying test automation.

Simulink projects have existed for many years, but MATLAB projects only became available to users in R2019a (Note: they are essentially the same thing, so for the rest of the article I will simply refer to them as “projects”).
Defining a project (and thereby an associated project root folder) is important for toolbox development. Among other things, it provides a reproducible environment for writing and testing code. By defining this environment, a project also enables MATLAB to quickly determine dependencies and notice packaging errors. Finally, when a new version of the toolbox is ready for release, the organization capabilities of the project make it easy to automate common tasks, such as running tests and packaging.
If you’re still not convinced, watch how Ned Gulley and Joe Hicklin use projects in their 2019 MATLAB EXPO talk.
Creating a new project
We’ll now run through the steps for setting up a new project using an existing toolbox. I will be using Amy’s original Toolbox Tools from the File Exchange as an example.
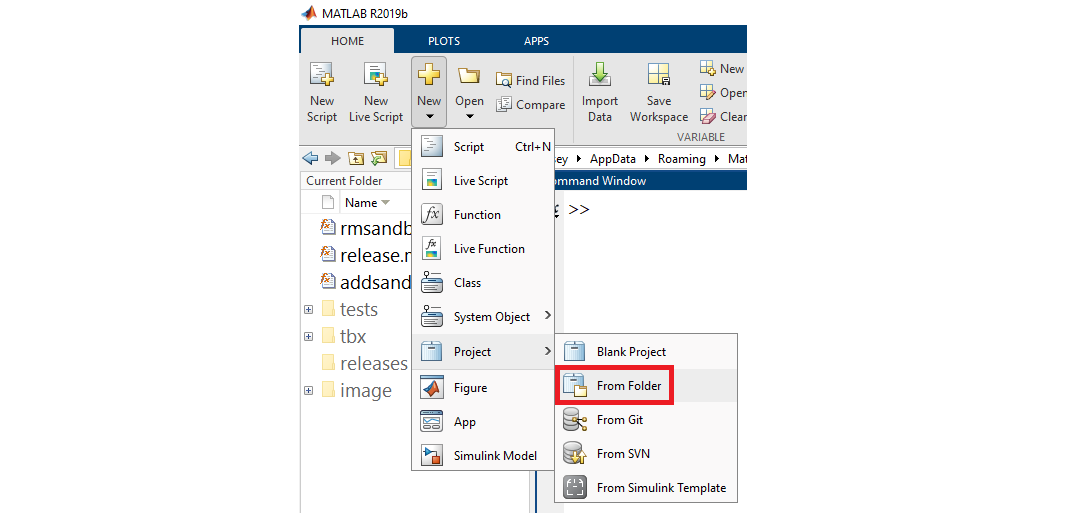
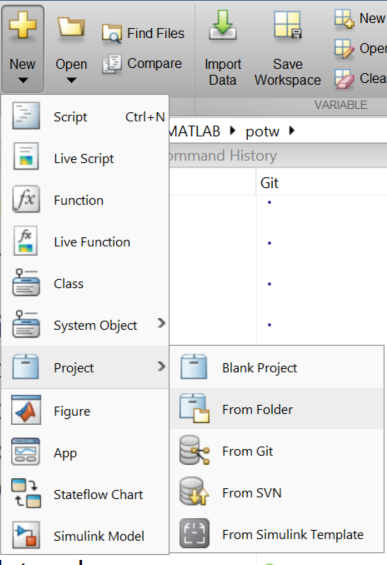
To create a new project, navigate to the home tab, then click on New -> Project -> < option >... If you already have some toolbox code that you are updating, then the “From Folder” option is probably what you need. When I click on this option, a project called Template.prj is created in the directory. The name “Template” matches the name of the folder I selected. This *.prj file must be located within the toolbox repository root.
Aside: As a bonus with this command, Projects will automatically detect your version control system (VCS) if one is in place.
Setting up your sandbox
Path management
Managing the MATLAB search path for your end users is important – it ensures they can use the toolbox (along with any necessary dependencies) and helps prevent conflicts with other files. Previously, we recommended writing addsandbox() and rmsandbox() for path management. Including this step in your sandbox functions is no longer necessary, as projects allow you to specify the folders that should be on the path when the project is open. You will be prompted to select folders upon creating the project, or you can change the configuration later by clicking on “Project Path” within the Environment area of the “Project” tab. This means the MATLAB environment is set up automatically and consistently for anyone who uses that project. It also ensures we have a properly encapsulated MATLAB environment to develop our toolbox code. When you close the project, the associated folders and subfolders are removed from the path.
In summary, open a project to add toolbox folders to the path and close the project to remove them. When working on toolbox code, the project should be open.
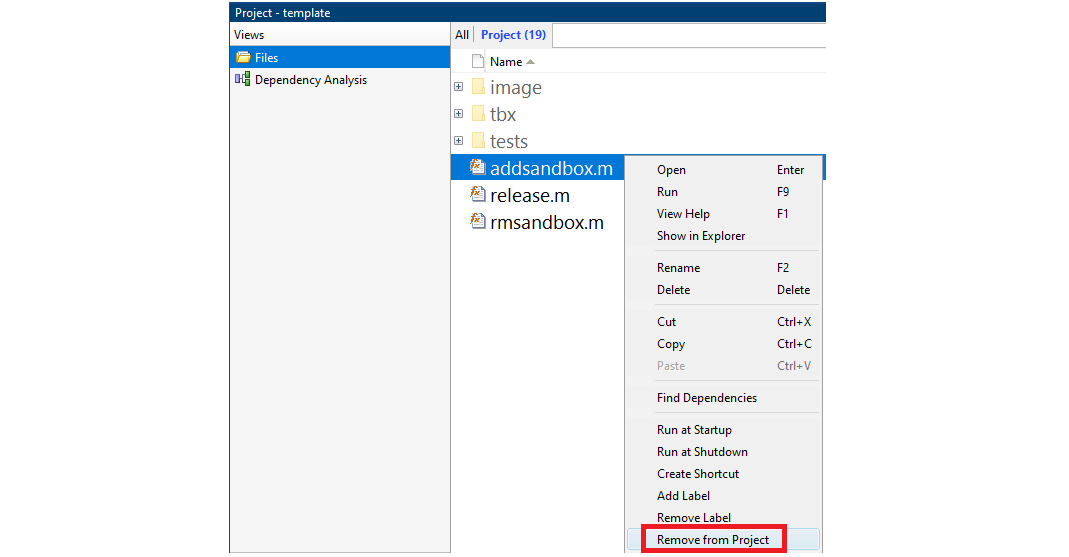
With this in mind, I’m first going to remove addsandbox() and rmsandbox() from the project by right-clicking these files in the Project tab and selecting “Remove from Project.”
Next, I’m going to add the folders and files specified in addsandbox() to the project using the “Project Path” shortcut. I need to click on “Add with Subfolders…” and select \tbx. Now whenever the project is open, these folders will be on the path. I can also go ahead and delete addsandbox() and rmsandbox().

Startup and shutdown functions
If you need to perform other tasks in addition to path management, you can specify startup and shutdown functions in the project configuration. For example, check for and enable certain versions of specific dependencies, or add *.jar files to the Java path. As before, these settings can be accessed in the Environment area by clicking “Startup Shutdown.”
Linking to source control
The projects user interface provides a convenient way to use source control from within MATLAB. Git and SVN are supported as standard. As mentioned earlier, projects will automatically link to your VCS if you create a project from a folder which is already under source control. You can also create a new project from an existing git or SVN repository if you specify the remote location.
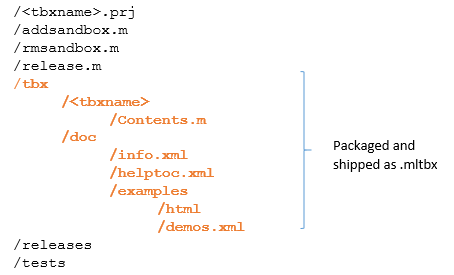
Default toolbox development structure
We previously gave a blueprint for how to organize your sandbox and where to place an app within a toolbox. With projects now integrated in our toolbox development workflow, we need to update this blueprint. The following shows our new organization suggestion; folders within the root directory are shown in bold for clarity. Orange items are packaged and shipped as an *.mltbx.
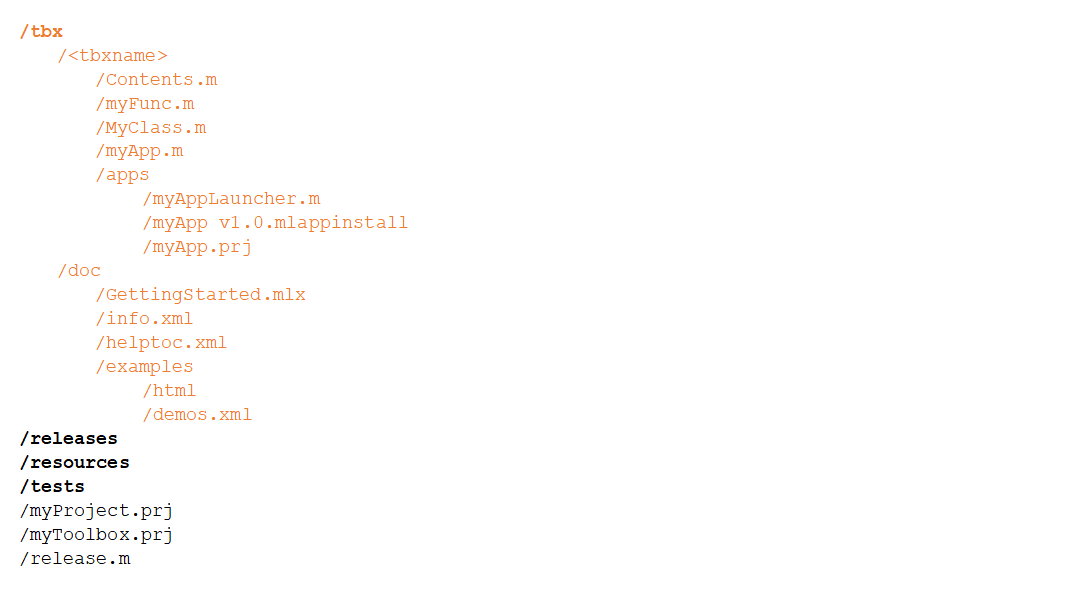
One thing you may have noticed is that upon creating a new project, a /resources folder is created in the root directory. This folder contains files necessary for the project and should not be modified.
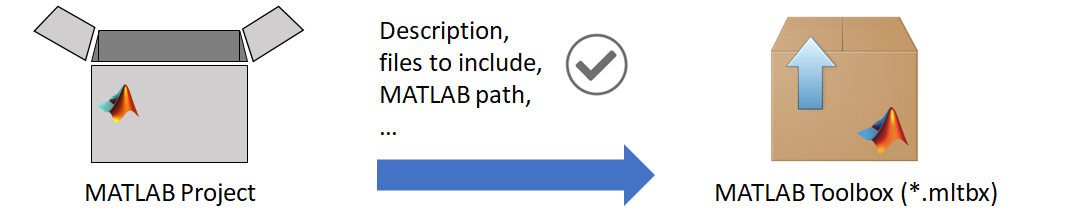
Sharing code
Projects also makes sharing your toolbox code easy. We can create a toolbox with a couple clicks from the “Share” menu of the “Project” tab.

Projects prepopulates the information for your toolbox, such as the description, necessary files, and what folders need to be on the path. You should only package your tbx folder and associated subfolders, not the other files and folders in your project root directory. These packaging configuration settings are stored within the myToolbox.prj file, where it is also possible to change the version number, toolbox icon, and more.
You can also create this toolbox packaging configuration file from the Add-Ons menu in the Home tab:

For more control over the packaging process, we recommend writing a release() function and adding it as a project shortcut. For example, release() could automatically extract the version information from myToolbox.prj, create and rename the resulting *.mltbx file, and place it in the /releases folder.

function release()
% release packages the toolbox and stores it in a release folder.
folder = fileparts( mfilename( "fullpath" ) );
tlbxPrj = fullfile( folder, "myToolbox.prj" );
version = matlab.addons.toolbox.toolboxVersion( tlbxPrj );
mltbx = fullfile( folder, "releases", ...
    "myToolbox " + version + ".mltbx" );
matlab.addons.toolbox.packageToolbox( tlbxPrj, mltbx );
end % release
Try it!
Future blog posts will cover how to take advantage of projects to help automate and expedite testing your code. For now, give projects a try and let us know what you think by leaving a comment below. Don't forget to also download the new Toolbox Tools!
- Category:
- Projects,
- Toolbox Development


Comments
To leave a comment, please click here to sign in to your MathWorks Account or create a new one.