
Applications in Response to COVID-19: Mask Detection
Today’s post is from Wanbin Song, Application Engineer in MathWorks Korea Office, here to talk about how engineers are reacting to the COVID-19 pandemic with new and innovative applications. Please note Chrome is the recommended browser for best video viewing experience.
Deep Learning applications related to COVID-19 research have increased dramatically, in part due to the prevalence and availability of publicly available datasets.
For this application, I asked my colleagues in the MathWorks Korea office to help create a new dataset used to train and test the algorithm. (Special thanks to everyone who contributed!)
I’ll briefly walk through the development workflow focusing on the following steps: automatic image labeling, comparing training algorithms, and generating code to accelerate inference. You can follow along by downloading the code here: https://github.com/matlab-deep-learning/COVID19-Face-Mask-Detection-using-deep-learning
 To create an automation algorithm, we need to test with sample images from our dataset. We wrangle all images by creating an imageDatastore, and download and import a pretrained face detector. (Note that there is also a face detector in Computer Vision Toolbox, but I wanted to demonstrate interoperability with Caffe.) By analyzing the lower part of the bounding box predicted by the face detector, we can see that the approach is well-suited for mask labeling.
 For these sample images, this code works quite well to detect the location of masks, but now I want to apply this algorithm to the entire training dataset. Using imageLabeler, we can automate this process. We can use custom algorithms to label and identify regions of interest - quickly modify any bounding boxes that aren’t perfect - and export the bounding boxes for all training images. Here is a short clip showing automatic labeling in imageLabeler:
We need to perform a few steps before training, such as dividing data into training, validation and test sets, determining anchor box estimation, and implementing data augmentation for robustness and improved accuracy. After these data preparation processes, we are ready for training. I decided to train various object detectors and compare the results. The detectors take roughly an hour to train, and we can compare the results in the next step.
For these sample images, this code works quite well to detect the location of masks, but now I want to apply this algorithm to the entire training dataset. Using imageLabeler, we can automate this process. We can use custom algorithms to label and identify regions of interest - quickly modify any bounding boxes that aren’t perfect - and export the bounding boxes for all training images. Here is a short clip showing automatic labeling in imageLabeler:
We need to perform a few steps before training, such as dividing data into training, validation and test sets, determining anchor box estimation, and implementing data augmentation for robustness and improved accuracy. After these data preparation processes, we are ready for training. I decided to train various object detectors and compare the results. The detectors take roughly an hour to train, and we can compare the results in the next step.
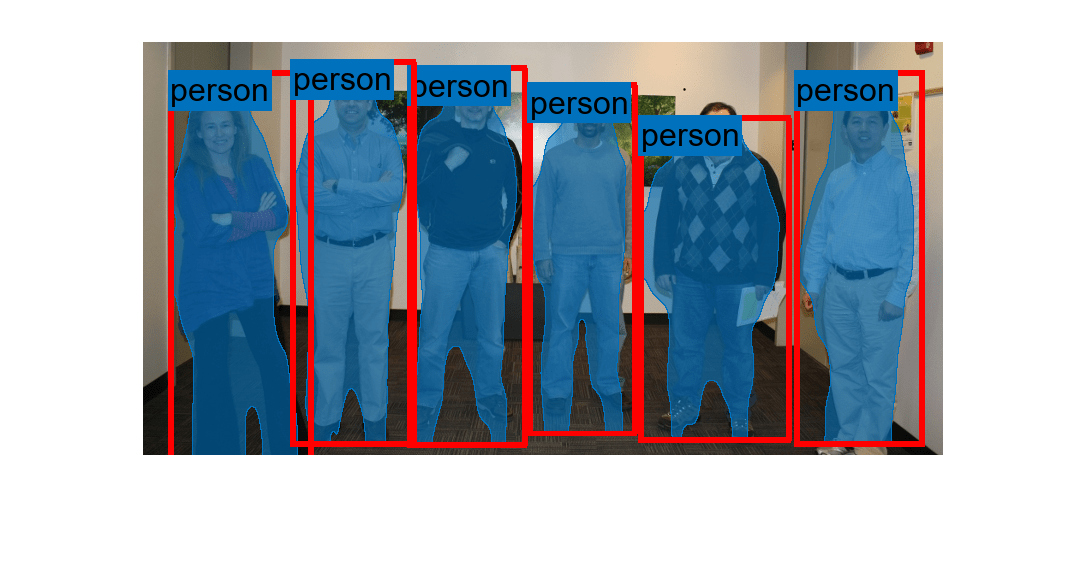
 There are many object detection algorithms in research; I’ve chosen to implement 1-stage detectors like YOLO v2 and SSD for real-time inference of trained models. For these detectors, we do not need to implement a region proposal extraction process before feeding images into networks like the RCNN series. For this demo, I prioritized inference speed over accuracy; these considerations led me to YOLO v2 and SSD detectors for this application. Both detectors work quite well to detect masks as shown below.
- Chest X-Ray dataset from WHO/University of Montreal (Link)
- Articles & documents dataset from the White House (Link)
- Research Papers dataset (Link)
- COVID-19 tracking dataset (Link)
Mask Detection
Using Deep Learning, I want to detect the presence of a person wearing a mask. You can envision a scenario where this would be useful: perhaps ensuring masks are being worn before entering a location where masks are required. You can see the results of the code here:Automatic Image Labeling
It can be a time-consuming process to label all training images. Can we semi-automate the process of mask labeling? Here is the approach: we know we can detect faces with reasonable accuracy using pretrained face detectors (There are many detectors available on FileExchange, and in Computer Vision Toolbox). The theory is we can use the lower half of the face to detect where the mask should be. The figure below shows the workflow as a set of steps:Showing automatic detection of masks used as input to the mask detector training. Start with image of person wearing mask (left), detect face (center), detect mask as lower half of face (right).
% create imageDatastore to gather all training images
imds = imageDatastore("SampleMaskData\")
% Please change "SampleMaskData" to your training data location
Import a pretrained face detector from Caffe
% import pretrained face detector
faceYoloNet = importCaffeNetwork('models\net_face_yolo_deploy.prototxt',...
   'models\net_face_yolog.caffemodel','OutputLayerType','regression');
save net_face_yolog.mat faceYoloNet
Next, read a sample image, detect the face, and use bottom half of bounding box as approximate mask location.
img = read(imds);
ori_sz = size(img,[1 2]);
re_sz = [448 448];
imgr = imresize(img,re_sz);
scale = ori_sz ./ re_sz;

% Detect Face
bbox = predictFace(imgr,'net_face_yolo.mat');

% Find lower half of bounding box
bbox(:,4) = bbox(:,4) ./2 + 20;
bbox(:,2) = bbox(:,2) + bbox(:,4) - 20;
bbox(:,3) = bbox(:,3) + 20;
bbox = bboxresize(round(bbox),scale);

% Display Final Image
img = insertShape(img,'Rectangle',bbox,'LineWidth',15);
figure; imshow(img); title('DetectedMask');
Screen shot showing result of code. This does a reasonable job of detecting mask location.
Comparing Training Algorithms
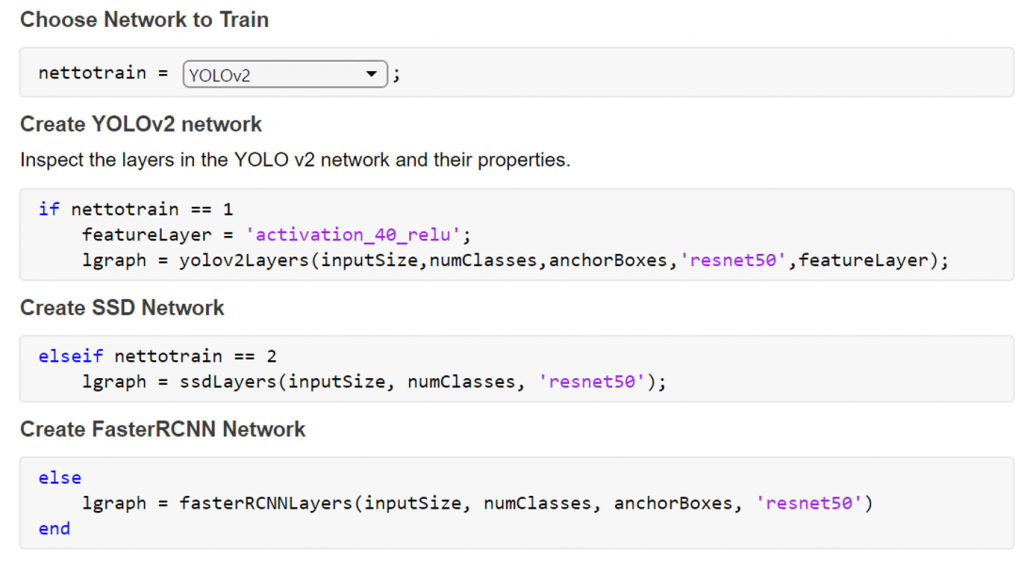
Using MATLAB Live Editor Controls, you can quickly switch between networks and customize the deep learning training or testing with minimal code changes.
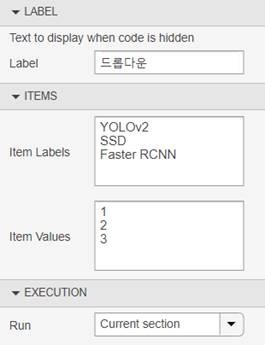
With Live Editor Controls, you can assign each item a value, and then write code (above) for when that option is selected. For this example, each network is assigned a simple value of 1,2,3 as shown below.
There are many object detection algorithms in research; I’ve chosen to implement 1-stage detectors like YOLO v2 and SSD for real-time inference of trained models. For these detectors, we do not need to implement a region proposal extraction process before feeding images into networks like the RCNN series. For this demo, I prioritized inference speed over accuracy; these considerations led me to YOLO v2 and SSD detectors for this application. Both detectors work quite well to detect masks as shown below.
Comparing SSD and YOLO v2 detectors.
Generating Code to Accelerate Inference
You can see in the following video the different frame rates captured in the top left corner. What accounts for the difference in speed? The video on the left is running the code on a GPU in MATLAB, and the video on the right is running the code converted to optimized CUDA in MATLAB. While generating code is optional for this demo, I’ve observed that generating a CUDA MEX performs:- Approximately 8x faster than a CPU running the code in MATLAB
- Approximately 2x faster than a GPU running the code in MATLAB (Note I'm using an external GPU with thunderbolt connection for this demo)
- Category:
- Deep Learning


Comments
To leave a comment, please click here to sign in to your MathWorks Account or create a new one.