MATLAB and Simulink for Autonomous System Design
Hi everyone — Sebastian here. I’ve been doing a few presentations at schools and robotics events, so I wanted to convert these talks into a comprehensive blog post for everyone else. I hope you enjoy this material!
Many people know MATLAB (and maybe Simulink) as the “calculator” they had to use in their undergraduate engineering classes. In my talks, I am looking to debunk that myth by sharing, at a high level, what these software tools offer to help you design of robotic and autonomous systems. Some of it is new functionality, and some of it has been around for a while and used in industry.
A while back, we did a video with my teammate and Robotics Arena co-host, Connell D’Souza. We tried classifying everything we work on and came up with a few ways to break down the problem. It’s slightly reworded in this blog, but the main points remain the same.
- What capabilities does your robot need? There is an entire hierarchy of capabilities needed by any autonomous system to successfully operate — all the way from reliably operating each individual sensor and actuator to executing an entire mission or task.
- How do you design your robot? The more complicated the robot, the more challenging it is to directly program all the necessary hardware with their intended capabilities… and expecting the robot to work.
In this post, I will dig deeper into the questions above, showing some examples of MATLAB and Simulink along the way.
Note: While I use the word “robot” frequently, you can just as well replace it with “self-driving car”, “unmanned aerial vehicle”, “autonomous toaster oven”, or anything else you may be working on that consists of sensors, actuators, and intelligence.
What Capabilities Does Your Robot Need?
First, we will explore typical capabilities that most modern robotic systems require to operate autonomously.
Planning, Navigation, and Control
I consider these three terms to be the “chain of command” of any robot that moves in an environment. Given a specific task, you need to program your robot to plan a solution, figure out how to get to such a goal, and be able to do so reliably in a realistic setting full of uncertainty.
Where am I? This consists of two elements: Mapping is knowing what the environment looks like, and localization is knowing where the robot is in that environment. Often, these problems are solved in parallel, which is known as simultaneous localization and mapping (SLAM).
Where do I need to be? Completing a task requires the robot to go from its current state to a goal. Goals can be assigned either by a human operator or by a separate autonomous component — for example, a camera detecting the location of a target object.
How do I get there? Now that the robot has a known start and goal, it must make a plan. This plan can be generated using information such as the obstacles in the known environment map, limitations of the robot motion (for example, a four-wheeled car-like vehicle cannot move in place), and other optimality constraints (e.g., trajectory smoothness or energy consumption).
Let’s get there! This has to do with executing on the plan above, which is known as navigation. In other words, given the provided path or trajectory, how do you control your actuators to reliably follow the path? Is the system robust enough to handle uncertainty such as dynamic obstacles, sensor and actuator noise, or other unexpected situations?

Mobile Robot Navigation Example
[Left] Initial robot position and goal, [Middle] Planned path from start to goal, [Right] Actual robot path using lidar to avoid walls
Perception and Intelligence
We briefly mentioned sensors in the previous section as being supporting actors in planning, navigation, and control. However, the challenges of processing sensors to make intelligent decisions easily deserves its own section. This is especially true with perception sensors like cameras and lidar, as images and point clouds (respectively) contain large amounts of information about the environment but require a good deal of processing to make sense of them.
Perception in robotic systems has evolved over the last few years to be very powerful, chiefly due to the rise of machine learning. It’s still worth noting the different categories of perception algorithms, as they are all suited to solve a different set of problems.
Analytical: Uses sensor data with a calibrated, predefined procedure — for example, finding objects by applying thresholds on color, intensity, or location, detecting lines and fitting polynomials, and transforming between image and real-world coordinates using known camera information.
Feature-based: Uses well-known feature detectors to locate edges, corners, blobs, etc., thus reducing the dimensionality of the data for further processing. Feature extraction and matching has popular applications such as object detection by comparing to a set of “ground truth” features, or pose estimation by registering the pose change of the sensor and/or the environment between successive readings.
Machine learning: There are different flavors of machine learning approaches, all of which have some application in perception.
- Unsupervised learning approaches typically include clustering of images or point clouds into individual objects of interest
- Supervised learning can be contrasted with feature-based approaches, except instead of using predetermined features, labeled data is used to train these features so they are tuned to the specific problem to be solved. This is most common for object classification and detection.
- Reinforcement learning is another surfacing area which is enabling end-to-end applications — in other words, learning how to directly use sensor data like images or point clouds to produce a control strategy that can solve a task.
In general, moving from analytical to machine learning techniques can help solve more difficult problems and generalize well to diverse operating conditions, but comes at the expense of having to collect data, increased computational requirements for training and executing a model, and less insight into *why* the algorithm works.

Face Detection Example
[Left] Color Thresholding with RGB Image, [Middle] KAZE Feature Matching to Template Image, [Right] Deep Learning with trained YOLO Object Detector
How Do You Design and Program Your Robot?
Next, we will discuss how software tools like MATLAB and Simulink can help with the design process, in contrast to directly building and programming hardware for autonomous systems. To motivate this section, here are the key questions you should ask yourself:
- How do I know I’ve built my system correctly?
- How am I testing my code before trying it on the system?
Modeling and Simulation
One way to safely test hardware designs and software algorithms is to use simulation. Simulation comes with an initial cost, which is the time and effort needed to create a good virtual representation of the system that would allow you to test certain behavior. Typically, the more expensive your hardware and the more dangerous your environment, the more you may be inclined to try simulation.
Simulation can take many shapes, and we often classify simulations by their level of detail — or fidelity:
- Low-fidelity: Simple and fast simulation used to test out high-level behavior without concentrating on the physical details of the robot or the environment. This may only require a basic kinematic model, or approximate dynamics that represent a subset of key elements in the real problem.
- High-fidelity physics: Detailed simulation of robots and environment, often involving physical models of the robot mechanics, actuation (electronics, fluids, etc.), and interactions with the environment (collisions, disturbances, etc.). This is good for validating complex hardware designs performed in CAD tools with dynamic simulation, determining requirements for actuator sizing, and designing low-level control algorithms.
- High-fidelity environment: This is a different kind of high-fidelity simulation that I felt needed a separate category. Instead of focusing on the physics of the robot, this is more about recreating a realistic environment for system-level testing. This may involve the use of popular simulators such as Gazebo and Unreal Engine, which allow for photorealistic sensor simulation (camera, lidar, etc.) and fast, although often approximate, collision physics with complex environments.
While you can certainly set up a simulation with both high-fidelity physics and environment models, you should always keep in mind the computational cost of simulation. My general rule is that high-fidelity physics are suitable for robot builders, whereas high-fidelity environments are suitable for robot programmers.

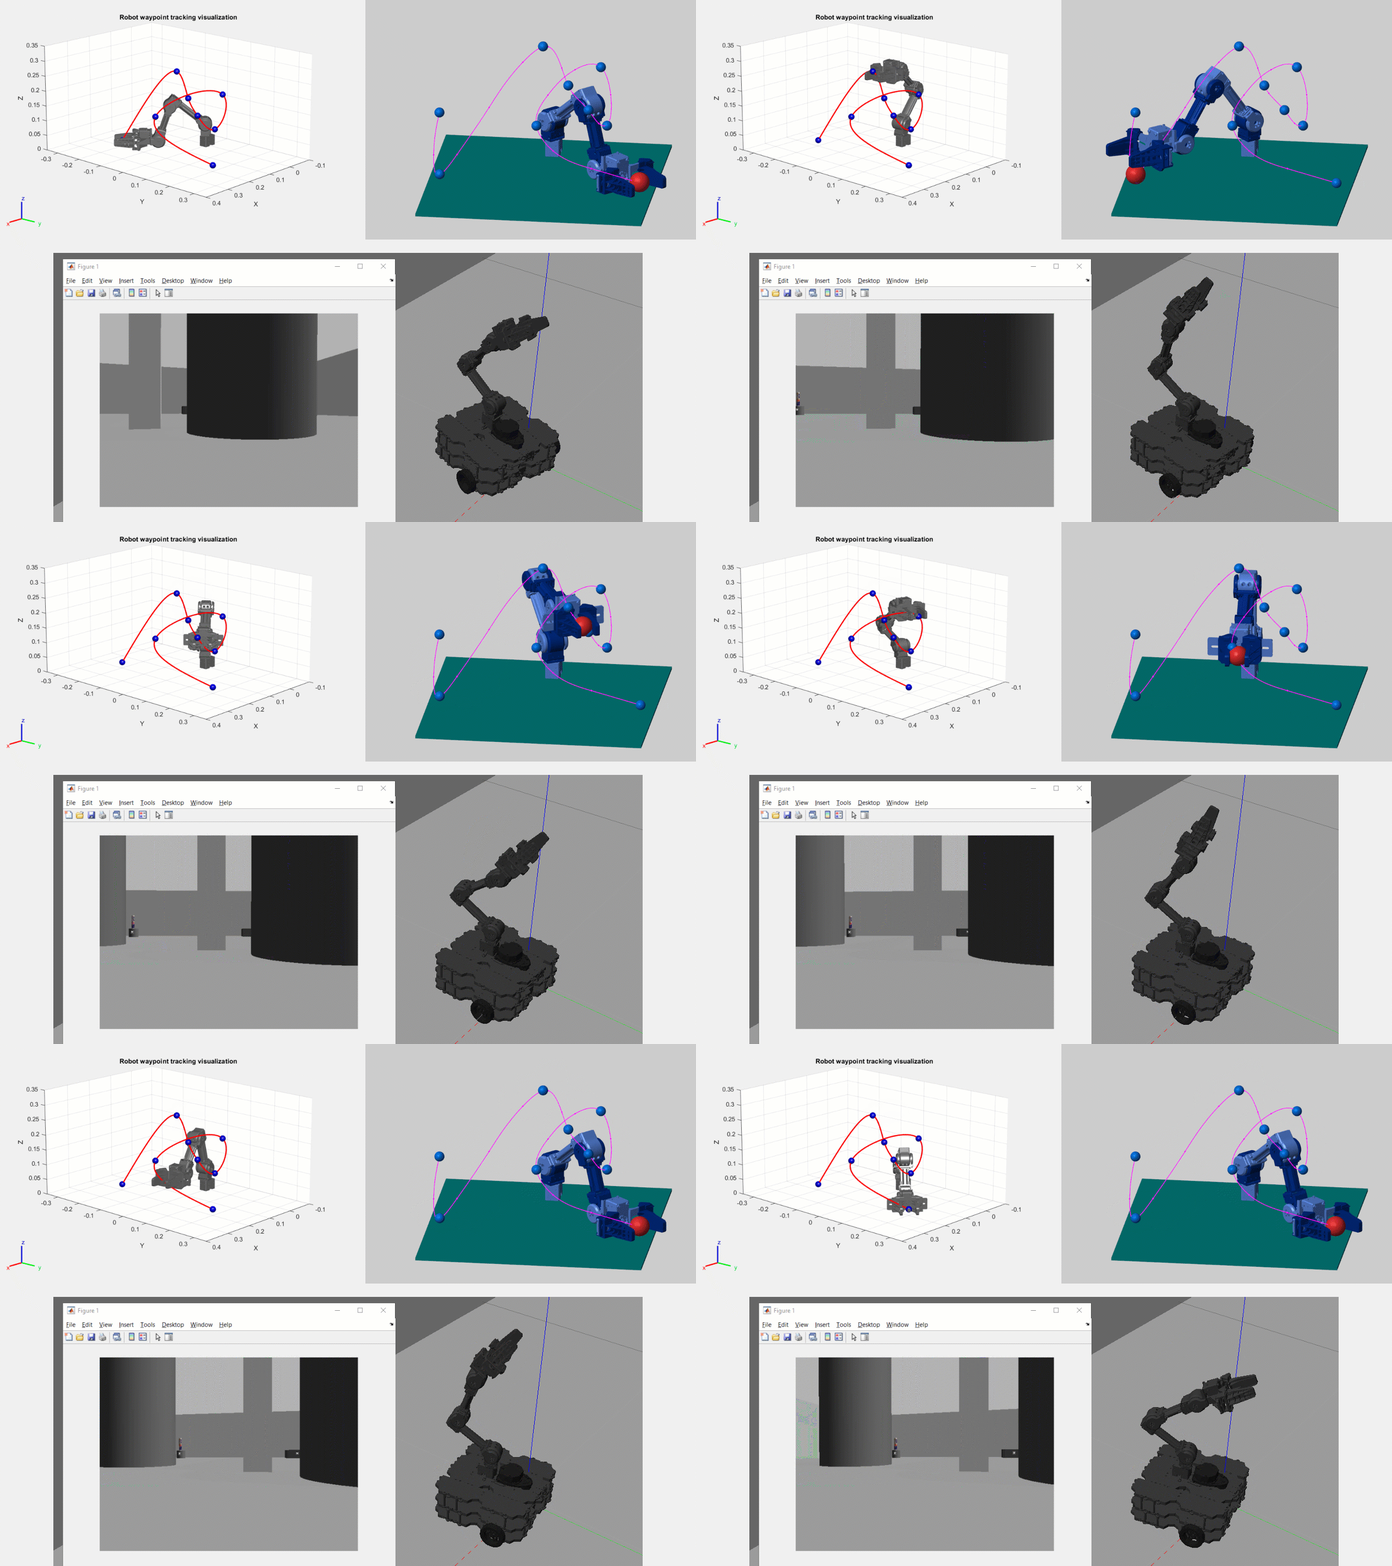
Simulation Fidelity with Robotic Manipulator
[Top Left] MATLAB Rigid Body Tree for kinematic analysis, [Top Right] Simscape Multibody 3D rigid body simulation
[Bottom] Virtual world simulation with Gazebo
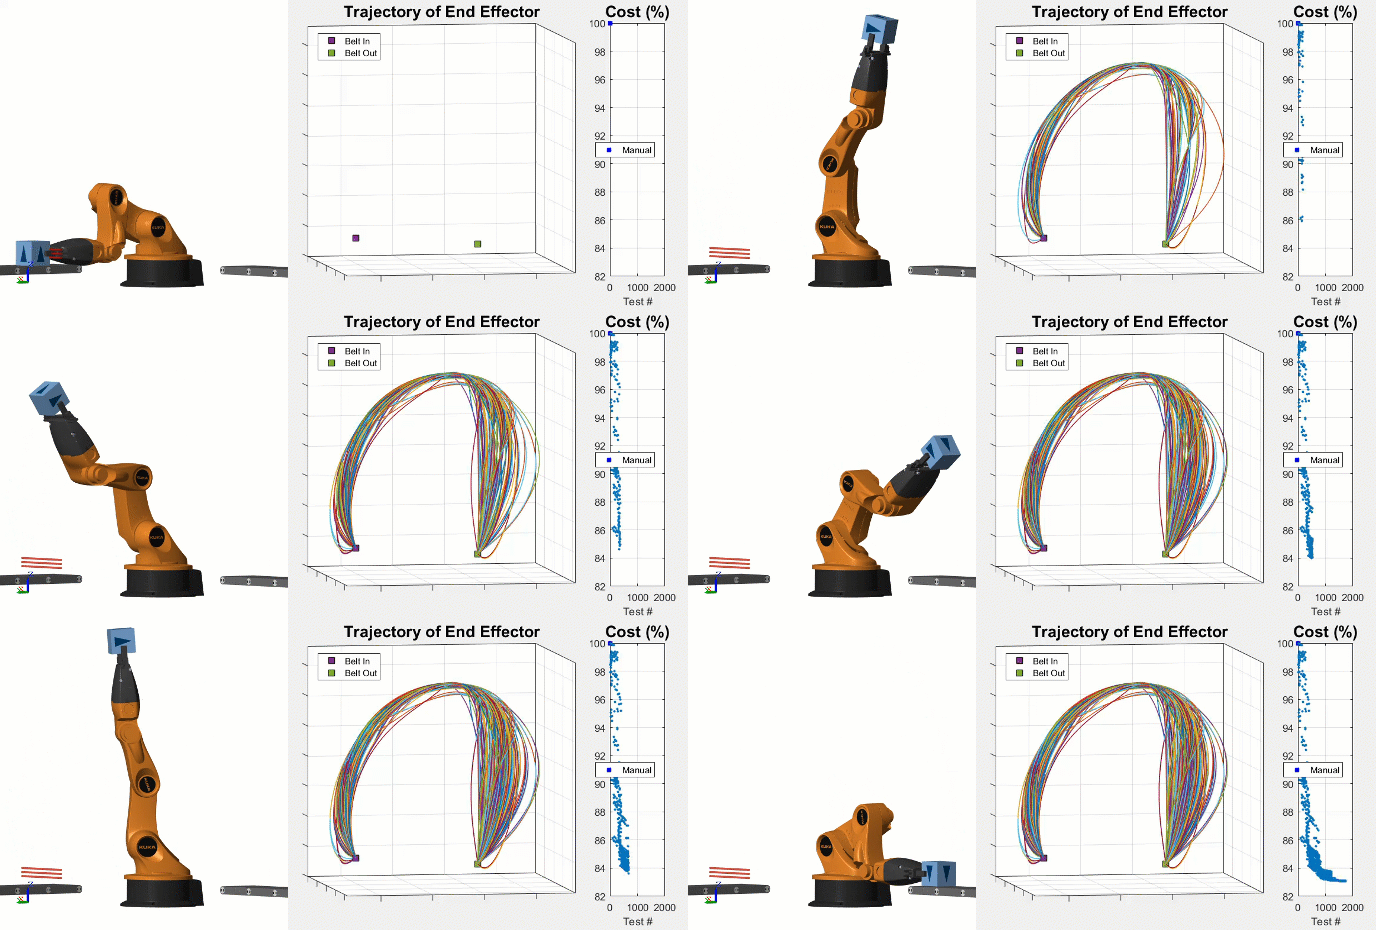
So why simulate in MATLAB and Simulink? My top answer would be that MATLAB is a versatile environment, which means your simulation is directly integrated with important design tools for scripting, optimization, parallel computing, data analysis and visualization, and more. Take the example in the animation below, which I borrowed from my colleague Steve Miller. In his “Robot Arm with Conveyor Belts” example, Steve includes an optimization script that tunes the parameters of a motion trajectory to minimize power consumption. I consider this a very good conceptual example of how simulation can aid design.

Software Development and Hardware Deployment
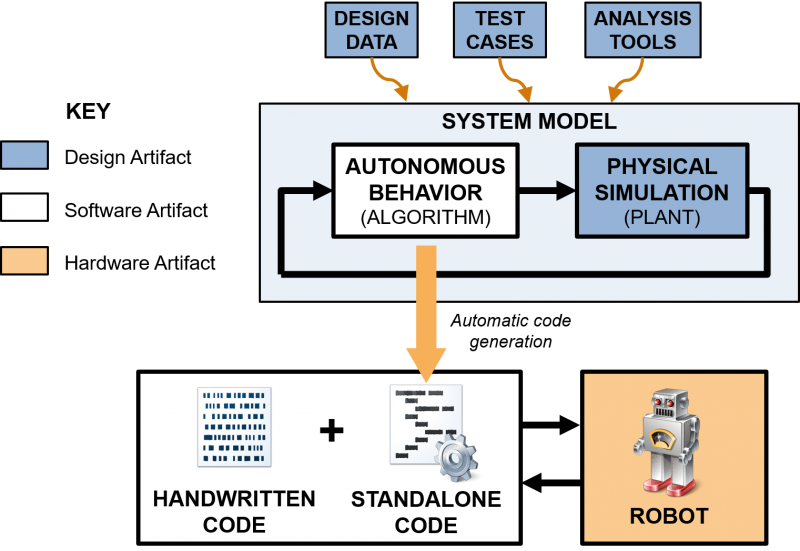
Let’s take a step back and think of everything we have created so far to prototype our robot behavior. There are two types of artifacts involved:
- Design artifacts: Simulations, analysis tools (optimization, data loading/logging, visualization, etc.)
- Software artifacts: Algorithms that can be tested on their own, against simulation, and later deployed to robot hardware
Depending on how you prototyped and tested your algorithm, whatever you created may need to be changed — or even completely ported to another language — to run it on the intended robot hardware. MATLAB and Simulink offers automatic code generation tools that can reduce this manual work of changing your designs to be compliant with hardware. More importantly, not having to make manual changes to your original design reduces the risk of introducing bugs.
Automatic deployment can include:
- Standalone code generation: Generating portable code, libraries, or executables that can be integrated with other software as with any other handwritten code.
- Deployment to software frameworks: Generating code that connects to popular frameworks such as Robot Operating System (ROS) or libraries for NVIDIA GPUs.
- Deployment to hardware: Generating code that automatically transfers and compiles files on supported hardware (see our catalog here). The main benefits here are reducing the time to get code on the hardware, as well as minimizing the need to write device drivers.

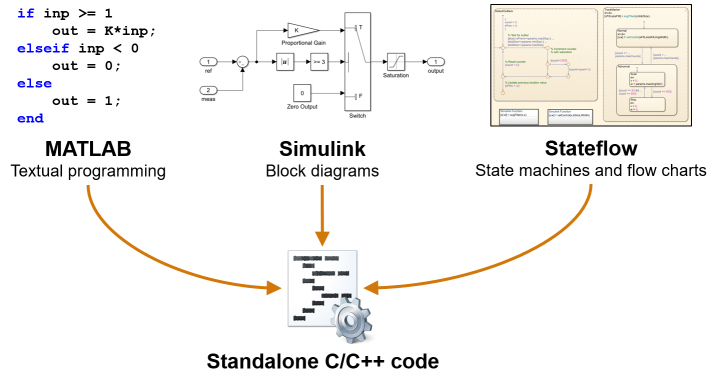
Specific to our tools, these deployable “software artifacts” can be treated as source code even if they are developed using graphical modeling tools, since code generation can translate them into actual robot code. In fact, there are 3 main modeling “languages” that can (and should) be combined to implement complex robotics algorithms:
- MATLAB is a text-based programming language, suitable for mathematical computations such as matrix operations, searching, and sorting.
- Simulink is a graphical block diagram environment, and is suitable for feedback control systems, signal processing, and multirate systems.
- Stateflow enables the modeling of logical constructs like flow charts and finite-state machines, with important features such as persistent memory, temporal logic, and event-based execution.

Conclusion
This post outlined one way of classifying the development of an autonomous system. We first made the distinction between the capabilities of a system and how to design those capabilities from concept to implementation. To summarize,
- Capabilities relate to how an system can use information about itself and the environment to autonomously take action and solve a problem.
- Design relates to how software and hardware prototypes can be systematically modeled, tested, and finally deployed to the autonomous system.
I would like to point out: the breakdown of an autonomous system design process presented above is not a unique one. Another way to slice the process is by progressing from prototyping and exploration to implementation on robot hardware. Professor Peter Corke and I talk about this in our Robotics Education with MATLAB and Simulink video.
To learn more, you can read more of our blog posts, follow our MATLAB and Simulink Robotics Arena video series, and check out our video tutorials.
If you want to get in touch with us, feel free to leave us a comment or connect with our MATLAB and Simulink Robotics Arena community.


コメント
コメントを残すには、ここ をクリックして MathWorks アカウントにサインインするか新しい MathWorks アカウントを作成します。