 Cleve’s Corner: Cleve Moler on Mathematics and Computing
 The MATLAB Blog
 Guy on Simulink
 MATLAB Community
 Artificial Intelligence
 Developer Zone
 Stuart’s MATLAB Videos
 Behind the Headlines
 File Exchange Pick of the Week
 Hans on IoT
 Student Lounge
 MATLAB ユーザーコミュニティー
 Startups, Accelerators, & Entrepreneurs
 Autonomous Systems
 Quantitative Finance
 MATLAB Graphics and App Building
Sign Me Up! – Sign Language Interpretation in MATLAB
In today’s post, Harshita Sharma joins us to talk about how she used MATLAB and Transfer Learning to build an application that helps differently abled children interpret sign language alphabets! Her hack won her the award for Best Use of MATLAB at HackMerced VII! VERY COOL! Harshita, over to you…
My name’s Harshita Sharma and I’m from India. I am a junior at BIT, Mesra majoring in Computer Science. I am tech enthusiast, always finding an opportunity to learn, develop and make myself fit for the tech industry. I love learning new technologies and implementing my knowledge to solve real-world problems. One of the main reasons why I am pursuing a degree in Computer Science is to make technology more accessible for people who aren’t part of the tech industry, people like my grandparents, small businessmen, farmers, etc, and accessible to the differently-abled! I enjoy working with code to develop applications, and am an open-source software enthusiast as well! I am also working on my Data Structures and problem-solving skills. Dancing Kathak and listening to music help me relax. I love travelling to places and experiencing their culture and cuisine. You can follow me and my work on my social media links below.
Inspiration:
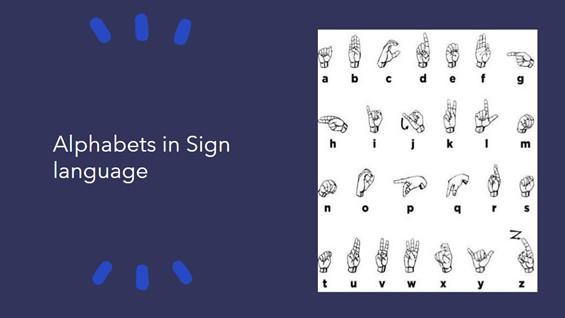
Sign language is a necessity for differently-abled people, especially deaf people since it’s their way of communication. It is estimated that there are 70 million deaf people that use sign language and around 1 million people use ASL as their primary language of communication. It is one of the oldest and most natural forms of language for communication, but since most people do not know sign language and interpreters are very difficult to come by, I have come up with a real-time method using neural networks for fingerspelling based on American sign language.
I built this for deaf children especially and people around them so that they can learn using an interactive platform.
Breaking down the problem:
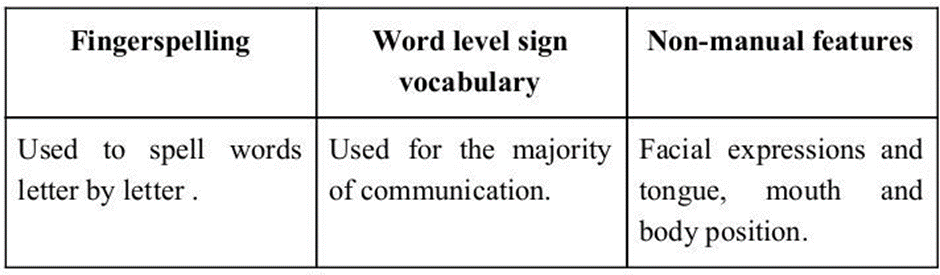
Deaf and Mute people make use of their hands to express different gestures to express their ideas with other people. Gestures are the nonverbally exchanged messages and these gestures are understood with vision. This nonverbal communication of deaf and dumb people is called sign language. Sign language is a visual language and consists of 3 major components
The problem was divided into 3 parts:
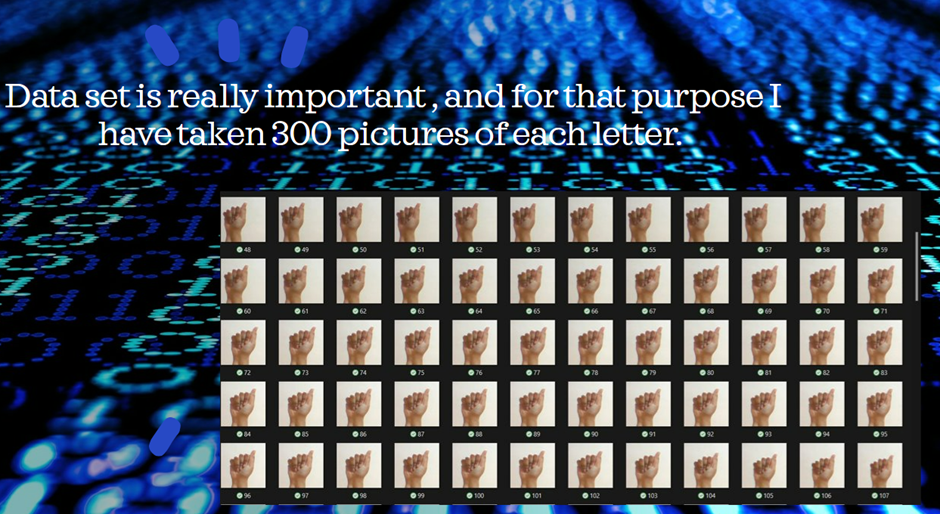
1. Creating a Dataset
I have created my own dataset for following reasons, firstly I was not able find a dataset which has size same as of alexnet’s input layer, secondly by creating my own dataset and working on other dataset made me realise that working on your own build dataset increases accuracy. I have taken 300 pictures for every letter for this purpose.While making the dataset one more thing which I kept in mind was the background and lighting conditions.
2.Training the Model
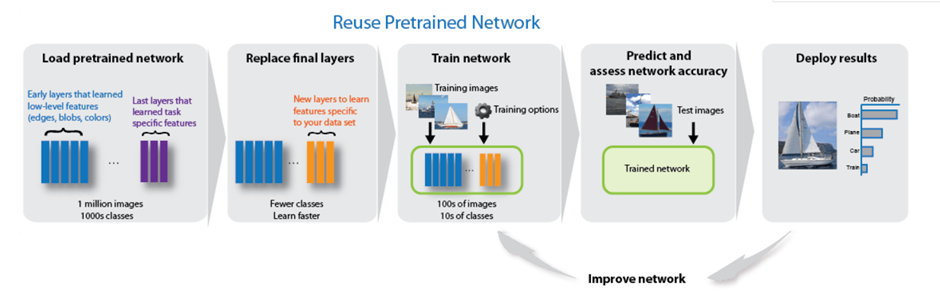
Transfer learning is commonly used in deep learning applications. You can take a pretrained network and use it as a starting point to learn a new task. Fine-tuning a network with transfer learning is usually much faster and requires less data than training a network with randomly initialized weights from scratch. You can use layers from a network trained on a large data set and fine-tune on a new data set to identify new classes of objects.
How did I implement it?
Creating the Dataset:
To create the dataset, I used the MATLAB Support Package for USB Webcams, if you are using MATLAB Online, no additional installation is required, watch this video to learn more. First a processing area was created and declared the variable temp. Then a while loop is set to create the dataset folder so the loop will run until 300 photos have been clicked. In the loop, the image is stored in “BMP” and image was resized and cropped for AlexNet as it’s input layer requires images of size 227*227. Clearing the camera object c will shut down the connection to the webcam
c = webcam; % Create the Camera Object
% Processing Area
x = 0;
y = 0;
height = 300;
width = 300;
bboxes=[x y height width];
temp=0;
% Loop to click 300 photos for each letter
while temp<=300
e=c.snapshot;
IFaces = insertObjectAnnotation(e,‘rectangle’,bboxes,‘Processing Area’);
imshow(IFaces);
filename=strcat(num2str(temp),‘.bmp’); % Image Filename
es=imcrop(e,bboxes);
es=imresize(es,[227 227]); % Resize to meet AlexNet’s specs
imwrite(es,filename);
temp=temp+1;
drawnow;
end
clear c;
Train the Network:
For this application, as discussed above, I used AlexNet, which is a convolutional neural network that is 8 layers deep. You can load a pre-trained version of the AlexNet trained on more than a million images from the ImageNet database. The pretrained network can classify images into 1000 object categories, such as keyboard, mouse, pencil, and many animals. As a result, the network has learned rich feature representations for a wide range of images. The network has an image input size of 227-by-227. To download AlexNet I used the Deep Learning Toolbox Model for AlexNet File Exchange Submission.
g = alexnet;
layers = g.Layers; % extract the layers
layers(23) = fullyConnectedLayer(10); % 10 indicates the output size
layers(25) = classificationLayer;
allImages = imageDatastore(‘testing’,‘IncludeSubfolders’,true, ‘LabelSource’,‘foldernames’);
opts = trainingOptions(‘sgdm’,‘InitialLearnRate’,0.001,‘MaxEpochs’,20,‘MiniBatchSize’,64);
myNet1 = trainNetwork(allImages,layers,opts);
save myNet1;
Testing the Network:
To test my trained network, I start by first loading the network, and then making a connection to the webcam to stream in images in real time. I then crop out thr processing area and resize to fit AlexNet’s input layer requirements.
load myNet1; % Load the trained network
c = webcam; % create camera object
x=0;
y=0;
height=300;
width=300;
bboxes=[x y height width];
% Loop
while true
e=c.snapshot;
IFaces = insertObjectAnnotation(e,‘rectangle’,bboxes,‘Processing Area’);
es=imcrop(e,bboxes);
es=imresize(es,[227 227]);
label=classify(myNet1,es);
imshow(IFaces);
title(char(label));
drawnow;
end
Results
As you can see in the photo below, the network I trained was able to identify the letter a, in real-time. I was able to get this up and running duing a weekend of hacking and you can too! My code is available on this GitHub repository and you can watch this YouTube video I submitted to the Hackathon.

Why MATLAB?
My MATLAB journey started during my 2nd year in engineering college when my professor introducedus to MATLAB. I really like how through MATLAB we can calculate things like matrix multiplication in seconds when in real life or while coding it will take minutes to solve. MATLAB seemed to be a mystery, a mystery that attracted me. So, I did the MATLAB Onramp and paid more attention to my MATLAB classes. Eventually, my interest in MATLAB grew more and more. I am still learning it and hope to be part of MathWorks one day!
How I participated in HackMerced?
I am a big fan of hackathons, why not, when you participate in a hackathon you get to meet new people, learn new things, and most importantly build a project! Even better if you win the hackathon. So, believing the same concept I decided to participate in a hackathon. I was scrolling through Major League Hacking’s website one evening and came across a GitHub Repository where I saw some MLH hackathons where MATLAB was a partner and that was the moment I decided to participate in this. So yes, funny enough but true that’s how I participated in HackMerced Hackathon and built a MATLAB project and won “Best Use of MATLAB” category award yay. Here is the winning swag which I received.


Comments
To leave a comment, please click here to sign in to your MathWorks Account or create a new one.