
MATLAB with TensorFlow from Your Jupyter Notebook
The MATLAB Kernel for Jupyter® (GitHub: jupyter-matlab-proxy) was released a few months ago. The MATLAB Kernel for Jupyter now supports Windows®, in addition to macOS® and Linux®. In this blog post, Yann Debray and I will show how you can create a deep learning model and convert it from MATLAB to TensorFlow™ by running MATLAB code and train the converted TensorFlow model by running Python code; all from the same Jupyter notebook.
 Most importantly, in this blog post we will show how easy it is to switch between MATLAB and Python code in your Jupyter notebook. Because we don’t have to switch coding environment – we just switch kernels - this was the fastest model exchange prototype that we have created so far.
For demonstration purposes, we made the example in this post lightweight and easy to follow. But you can extend this example to more complicated workflows, such as:
Most importantly, in this blog post we will show how easy it is to switch between MATLAB and Python code in your Jupyter notebook. Because we don’t have to switch coding environment – we just switch kernels - this was the fastest model exchange prototype that we have created so far.
For demonstration purposes, we made the example in this post lightweight and easy to follow. But you can extend this example to more complicated workflows, such as:
 Now, we are ready to run MATLAB and Python code from the same Jupyter notebook.
You can run the following MATLAB code the same way you would from any other MATLAB environment, for example from MATLAB desktop and MATLAB Online.
Create Layer Graph
Create a long short-term memory (LSTM) network to classify sequence data. An LSTM network takes sequence data as input and makes predictions based on the individual time steps of the sequence data.
 Load the exported model from the Python package myModel.
Load the training data in training_data.mat.
Most importantly, in this blog post we will show how easy it is to switch between MATLAB and Python code in your Jupyter notebook. Because we don’t have to switch coding environment – we just switch kernels - this was the fastest model exchange prototype that we have created so far.
For demonstration purposes, we made the example in this post lightweight and easy to follow. But you can extend this example to more complicated workflows, such as:
- Processing and exploring domain-specific data (e.g., radar, wireless, audio, and medical images) in MATLAB for training a TensorFlow or PyTorch® model.
- Using Bayesian optimization to train a model in MATLAB and then, perform inference in TensorFlow or PyTorch.
- Create a TensorFlow or PyTorch model, and then visualize the model behavior in MATLAB.
- For more workflows that use MATLAB with Python together for AI, see our previous blog posts and MATLAB Deep Learning GitHub.
Set Up
Previous blog posts on the MATLAB Kernel for Jupyter showed how to use the kernel in Windows and Linux. In this blog post, we used a MacBook to execute the workflow. The initial setup happens at the macOS terminal. First, install the MATLAB Kernel for Jupyter.pip install jupyter-matlab-proxyThe MATLAB executable is not necessarily on the system path (at least it was not on my Mac), so we run the following command.
sudo ln -s /Applications/MATLAB_R2023a.app/bin/matlab /usr/local/binCheck that all the tools are installed as expected. After you verify that the right version of Python and all the necessary libraries are installed (and the MATLAB executable is on the path), open Jupyter notebook. There are other ways to start up a Jupyter notebook, for example by using CPython.
Now, we are ready to run MATLAB and Python code from the same Jupyter notebook.
Create Model with MATLAB Kernel
First, we are going to create an LSTM model in MATLAB. In your Jupyter notebook, specify your kernel as MATLAB. This is a one-click process.
inputSize = 12;
numHiddenUnits = 100;
numClasses = 9;

layers = [
       sequenceInputLayer(inputSize)
       bilstmLayer(numHiddenUnits,OutputMode="last")
       fullyConnectedLayer(numClasses)
       softmaxLayer];

lgraph = layerGraph(layers);
Create Data Set
Load the Japanese Vowels training data set. XTrain is a cell array containing 270 sequences of dimension 12 and varying length. YTrain is a categorical vector of labels "1","2",..."9", which correspond to the nine speakers. To learn more about the data set, see Sequence Classification Using Deep Learning.
[XTrain,YTrain] = japaneseVowelsTrainData;Prepare the sequence data in XTrain for padding.
numObservations = numel(XTrain);
for i=1:numObservations
    sequence = XTrain{i};
    sequenceLengths(i) = size(sequence,2);
end

[sequenceLengths,idx] = sort(sequenceLengths);
XTrain = XTrain(idx);
YTrain = YTrain(idx);
Pad XTrain along the second dimension.
XTrain = padsequences(XTrain,2);Permute the sequence data from the Deep Learning Toolbox™ ordering (CSN) to the TensorFlow ordering (NSC), where C is the number of features of the sequence, S is the sequence length, and N is the number of sequence observations. For more information on dimension ordering for different deep learning platforms and data types, see Input Dimension Ordering.
XTrain = permute(XTrain,[3,2,1]);
YTrain = double(YTrain)-1;
Save the training data to a MAT file, so you can use them to train the exported TensorFlow network using Python code.
filename = "training_data.mat";
save(filename,"XTrain","YTrain")
I wish the variables weren’t lost when I switch between MATLAB and Python code in the Jupyter notebook. But it would be same if I was going to leave any MATLAB environment for a Python environment. Convert Model from MATLAB to TensorFlow Export the layer graph to TensorFlow. The exportNetworkToTensorFlow function saves the TensorFlow model in the Python package myModel.
exportNetworkToTensorFlow(lgraph,"./myModel")
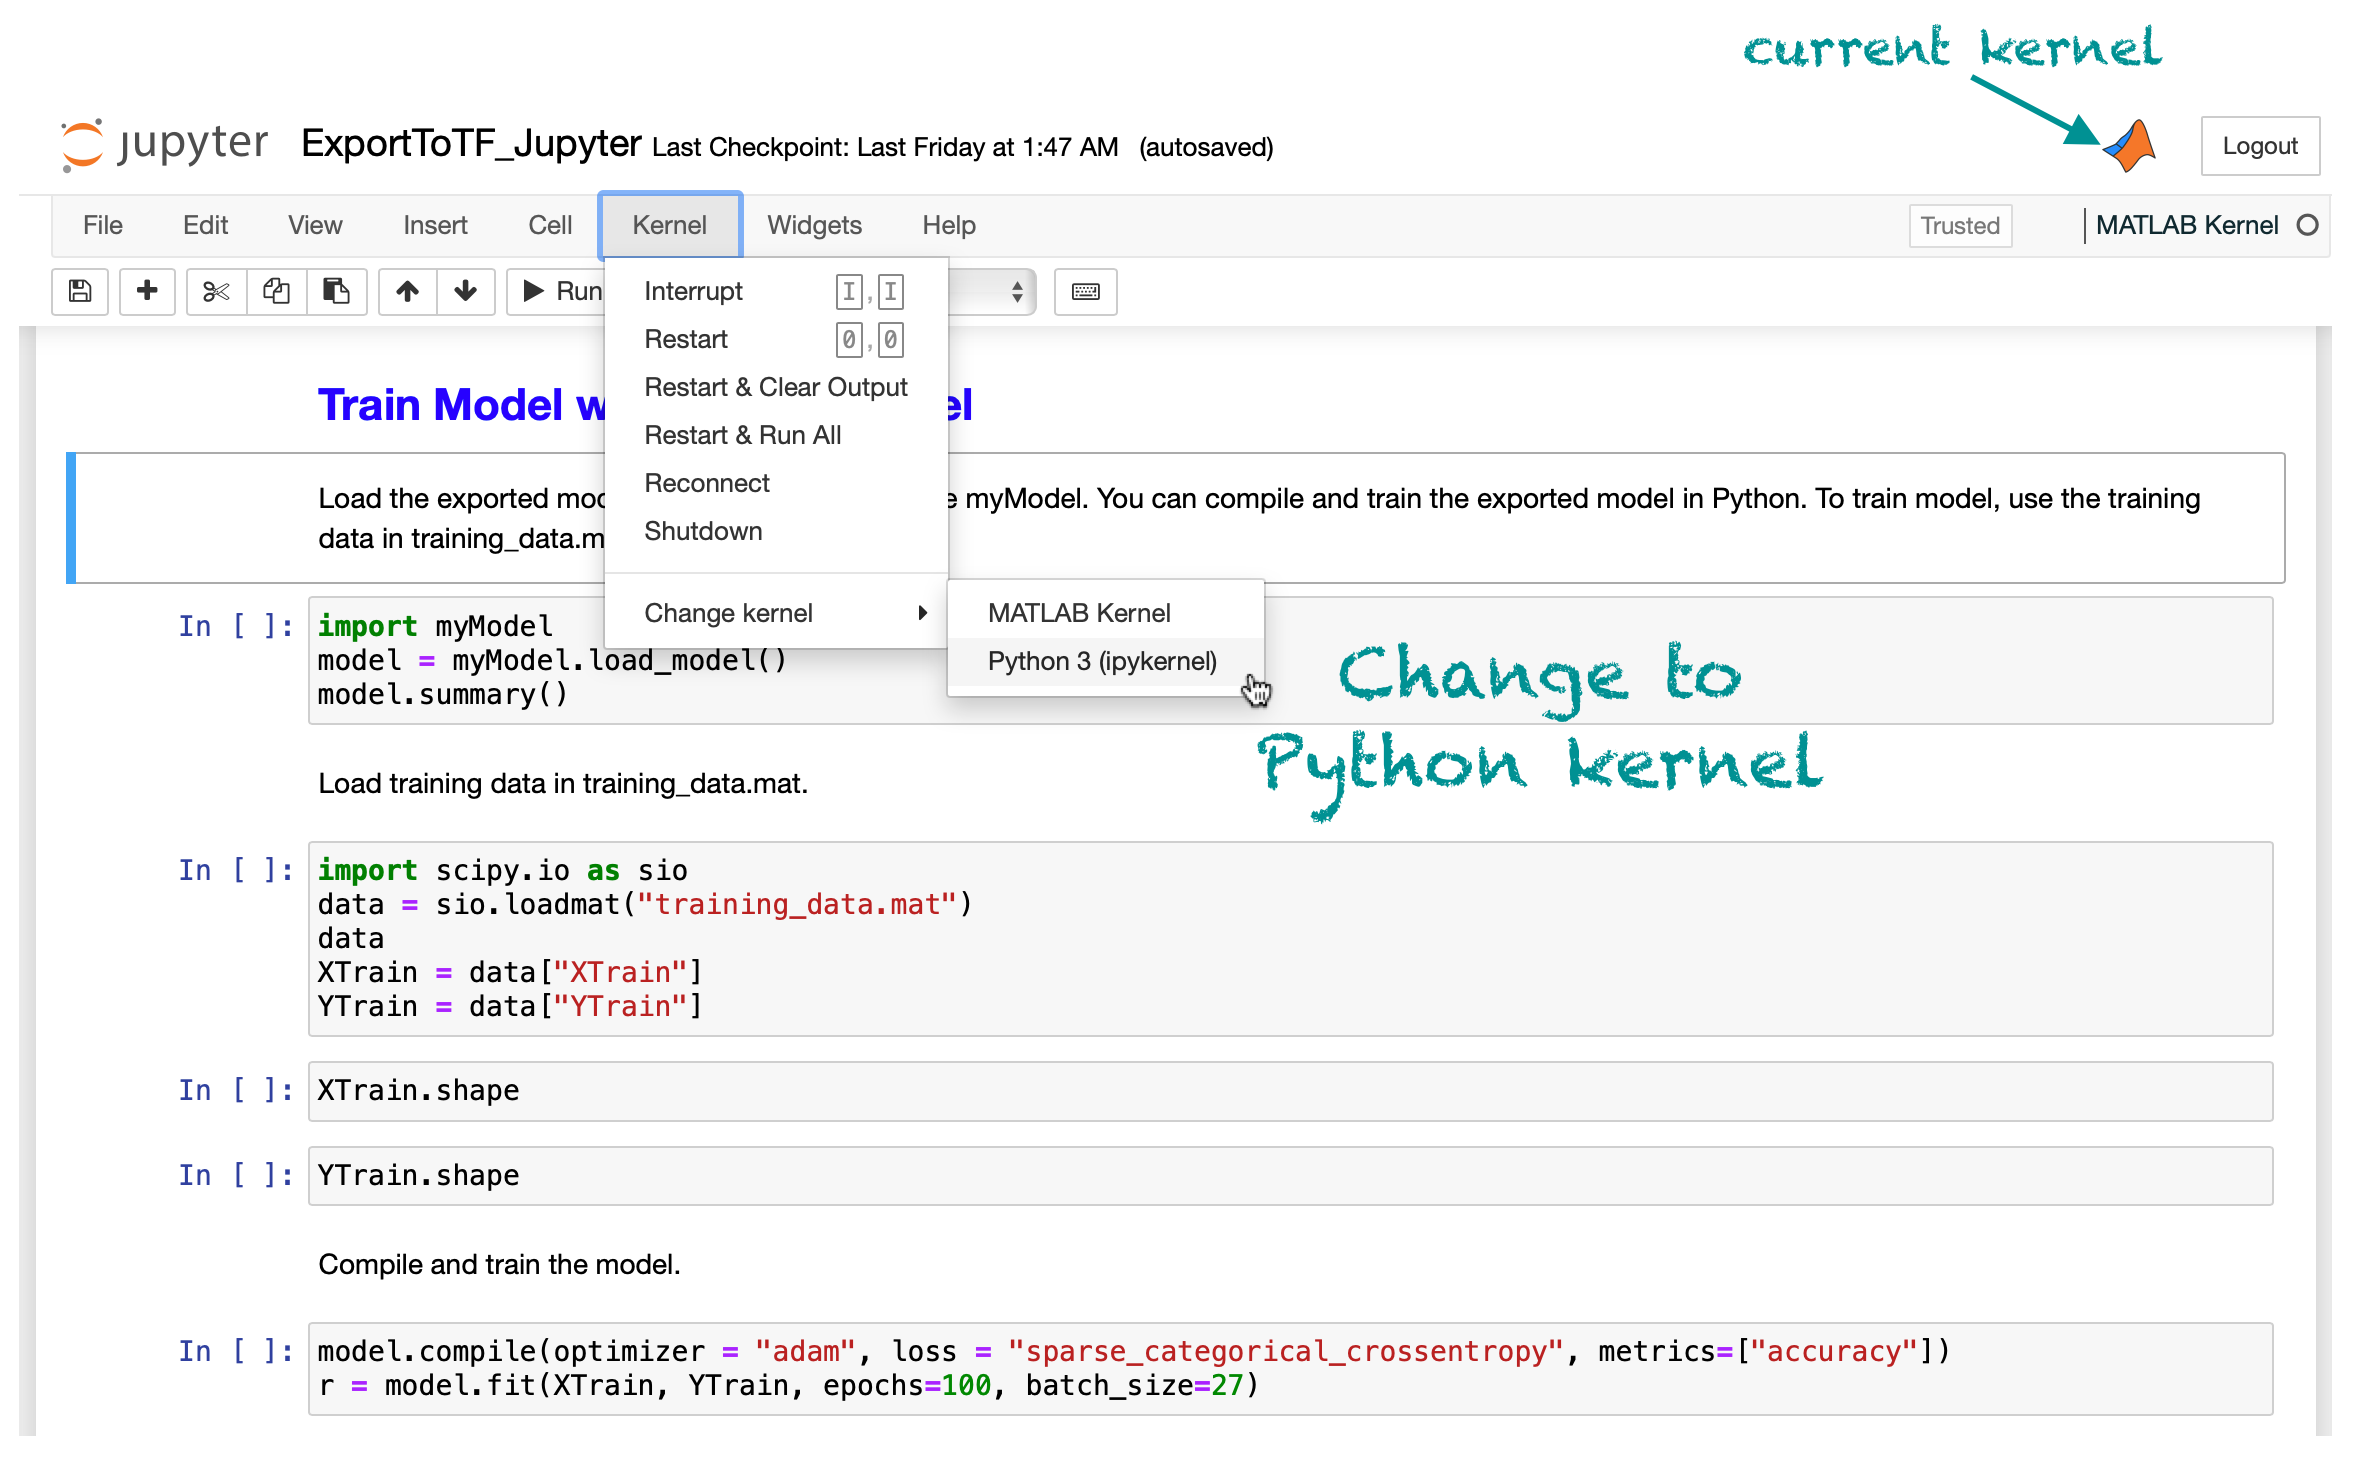
Train Model with Python Kernel
Then, we are going to train the exported TensorFlow model using Python. Specify your kernel as Python 3.
Load the exported model from the Python package myModel.
import myModel
model = myModel.load_model()
model.summary()

import scipy.io as sio
data = sio.loadmat("training_data.mat")
XTrain = data["XTrain"]
YTrain = data["YTrain"]
Compile and train the model.
model.compile(optimizer = "adam", loss = "sparse_categorical_crossentropy", metrics=["accuracy"])
r = model.fit(XTrain, YTrain, epochs=100, batch_size=27)
Save the training history to a MAT file. I only need to do this because I am going to use the data in MATLAB in the next section.
sio.savemat("training_history.mat",{"training_history":r.history})
Plot Metrics with MATLAB Kernel
Now, we are switching back to MATLAB kernel to plot training metrics. We are going to create a very simple plot that you could create either with MATLAB or Python. For more complicated deep learning workflows and visualizations (for example, semantic segmentation), I find that MATLAB offers more options and easier to implement visualizations. Also, I don’t need to install any additional Python libraries for plotting. However, especially in this case, the point is that when it’s so easy to switch between MATLAB and Python, why not just choose the most natural option for you. Load the training history.load("training_history.mat")
history = struct(training_history)
Plot the loss and accuracy.
tiledlayout(2,1,TileSpacing="tight")

nexttile
plot(history.accuracy)
xlabel("Epochs")
ylabel("Accuracy")

nexttile
plot(history.loss)
xlabel("Epochs")
ylabel("Loss")

Conclusion
Collaboration, integration, and easy access are key for developing AI-driven applications. On the AI blog, we have previously talked about how to and why use MATLAB with TensorFlow or PyTorch. The Jupyter integration makes it even easier to use different deep learning tools together, especially for prototyping and initial development. There is still a manual element in switching between kernels (meaning you can’t run all the notebook cells), so we might consider other options to run MATLAB and Python code together for a plug-and-play version of the code. Check out previous blog posts on how to use MATLAB with TensorFlow and PyTorch, and the release of MATLAB kernel for Jupyter:- Category:
- Deep Learning,
- MATLAB with Python,
- TensorFlow


Comments
To leave a comment, please click here to sign in to your MathWorks Account or create a new one.