
Mathematical Visualization with Plywood and Power Tools
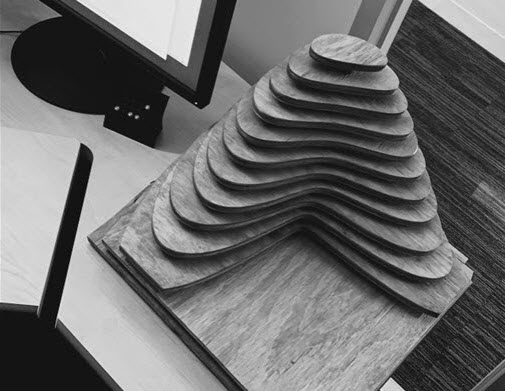
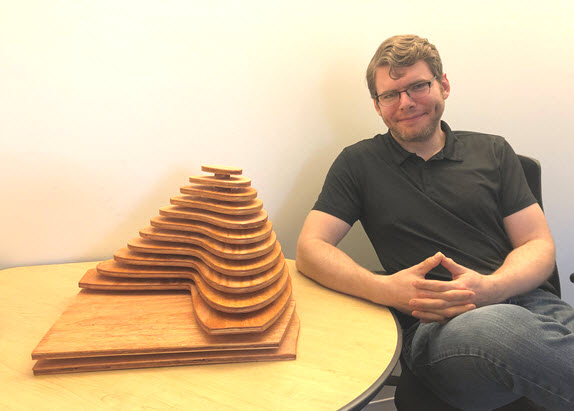 This is Hollis Potter (he’s the one on the right). He works on the Community team here at MathWorks. On the table next to Hollis is an L-shaped membrane, the same shape that forms the MathWorks logo. If you wanted to make something like this out of plywood, I’m sure you can imagine a tedious process that would converge on this result. It would involve glue, finicky stencils, and about a million hours of jigsaw time. Also, sore hands.
But Hollis didn’t use stencils and a jigsaw. First, he made a little robot friend with sharp teeth. He taught his robot how to talk to MATLAB, and then he set the two of them loose in his garage (along with a generous supply of half-inch plywood). This sculpture is the result of their union, and now MATLAB and the robot are best friends.
I will admit, I may be embellishing the truth somewhat. For “robot” you should read MaslowCNC. MaslowCNC is a do-it-yourself numerically controlled router. And when I say MATLAB could talk to the robot, what I really mean is that Hollis wrote some MATLAB code that can generate the necessary G-code tool paths to drive the router.
I knew you would be interested in this project, so I asked Hollis a few questions. Ever the gentleman, Hollis was nice enough to respond.
Ned: How did you learn about MaslowCNC?
Hollis: I first encountered Maslow CNC on Kickstarter early 2018, after a successful funding and community growth. I was only distantly familiar with CNC, usually thinking in terms of expensive industrial equipment. An upright system for 4×8 material, with limited footprint and under $500 investment? Incredible, I thought. Most interesting was that the entire project was open sourced, so the initial kits had all shipped, other distributors were quickly stepping in and incorporating community improvements.
Ned: Have you always thought of yourself as a maker?
Hollis: Absolutely, albeit mostly under other labels like Hobbyist, Tinkerer, DIYer, etc. I’ve always cobbled things together to sometimes useful, sometimes silly, purposes. Sometimes that means learning 6502 assembly code, other times it means learning to sew. Here, it meant learning about G-code, routers, Arduino, and surface plots in MATLAB for some much needed art in my office. The thought process almost invariably begins with, “Hey, I bet I can make that…”
Ned: Was the L-membrane the first project you attempted? How did you come to choose that shape?
Hollis: The L-membrane was my first large scale project with the Maslow after a few simple test signs. I was inspired by similar projects to 3D print the membrane and the incredible MATLAB Zoetrope. A large-scale plywood membrane seemed like a great project to get a little deeper into producing G-code directly from a mesh. To keep material use down, I decided to interlace the contours with gaps, which gave it an great retro logo effect. It’s all around an aesthetically cool shape, and its convex surface made for simpler contours for me to work with.
Ned: What are some of the reactions you’ve gotten to the project?
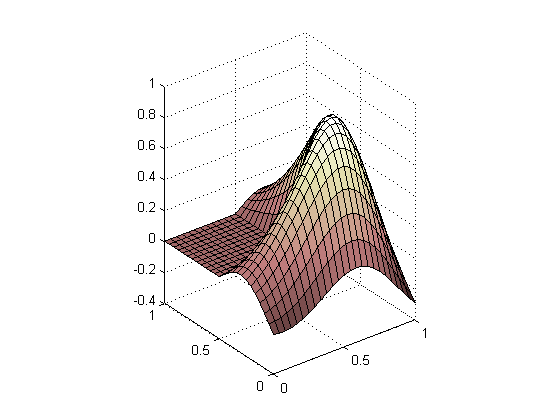
Hollis: Even when someone didn’t know what it was, they loved it. It then gave me a jumping off point to talk about MathWorks, the L-shaped membrane, and its origin with Cleve Moler’s Ph.D. thesis. When asked where I had it made, it was all too satisfying to say, “On a laptop in my garage!” Others started to immediately envision their own favorite mathematical formula as an art piece. The best response of all came from Cleve himself after I brought it to the office. He loved it.
Ned: Was it easy to set up your rig? How did the community help you get going with your MaslowCNC?
Hollis: It was intimidating at first. I received my kit in December 2018, and waited until March to dive in. In talking to others, this seems common. The kits are cheap enough for a hobby user like me, and ship in such a small box, that it can be a little too easy to tuck them off to the side. Add to that (at the time) no obvious assembly instructions. I just had a box of parts and a USB stick. That was before I joined the community. There is the main community on https://forums.maslowcnc.com/, and the Facebook group https://www.facebook.com/groups/maslowcnc/, both overflowing with information and smart, friendly people. I was able to catch up on the many iterations and not long after had a pretty good idea which parts went where. I used the Bar’s Bolt Together Frame instructions on GitHub (https://github.com/MaslowCommunityGarden/Bolt-Together-Maslow-Frame/blob/master/INSTRUCTIONS.md), then when I hit a snag, fellow users were incredibly quick and welcoming, quickly troubleshooting common issues like initial Z-axis accuracy and chain tension. I’ve since had the opportunity to pass that information forward to other new users.
Ned: Did you need a lot of space to set it up?
Hollis: Not at all. The Maslow is upright at a slight angle, and with a DIY frame, can easily be modified to fold flat against a wall. I would say the working footprint is about 10’ wide and 3’ deep. Mine is comfortably in a one car garage with room for a small car and a motorcycle. Although, to be honest, the car spends little time inside as the project queue steadily grows.
Ned: Was the MATLAB part of your project tricky to write? Are there resources out there for MATLAB Maslow Makers?
Hollis: The trickiest part came in getting the contour map of the membrane. I had completely overlooked that contour function and instead was getting the boundary of a linear matrix cross section. After a day of fine tuning the shrink factor and compressing the resulting vector, I came across a MATLAB Answers post mentioning contour. It utterly negated hours of tedious work and gave me what I needed in one line. So, first and foremost, keep MATLAB Answers and Examples at the ready.
This Instructables post helped me in writing the G-code itself.
Of course, don’t forget to check out the source to the Maslow Membrane!
Ned: What were some of your surprises and lessons learned?
Hollis: Producing figures that then drove the CNC rig put an unexpectedly visceral feel to my MATLAB code. As an example, I’d generated a single layer for a test cut, and set recessed tabs to hold the final piece in place as part of the matrix. What had seemed ample in the figure turned out to be incredibly thin, since I had not factored in the routing bit diameter. As the router moved around the eigenfunction, it broke free, and I quickly stuck a pencil in the gap to hold it steady for the remainder of the cut. While the piece came out accurate and smooth, I would not recommend that particular solution.
Similarly, I found the order of the cuts I generated had a significant impact on time and accuracy. An early effort attempted to create tabs by cutting to the full depth in short segments, then sweep through to knock out the upper portion of the tab. Previewing the model, all looked well. But I quickly saw my errors when cutting began. All of those out of order cuts took more time, as the router raised its bit, moved across the plywood, only to come right back and finish. Worse, if a deeper channel had already been cut, the router tended to pull into the cavity, taking it off course briefly. So, I really had to think about the precise order of cuts, their depth, and how the router was physically going to move. There are G-code optimizers out there I’ve since learned, but honestly, I really gained a lot of value connecting my MATLAB efficiency with physical costs.
Ned: If I wanted to get started with a MATLAB-driven MaslowCNC machine, what advice would you have for me?
Hollis: Get to know both the MATLAB and the Maslow communities, especially Answers and File Exchange. Do not be afraid to ask questions. Critically, use a G-code previewer, like ncviewer.com. A router is a very powerful tool, and suspended from chains, things can go wrong in a very destructive way. Speaking of routers, most users are equipping their Maslow with a Ridgid R22002 router, so I followed suit. In a community driven project like this, going the now well-trodden path makes it much more likely you’ll find help if you get into trouble.
Ned: What’s your next project? Do you think this will become one of your commonly used tools now?
Hollis: I have a feeling few weekends will pass now without the buzz of the router. I am the proud owner of an 1870 New England folk Victorian home with a lot of interesting woodworking details that are sadly in rough shape. Many of them seem to have a suspiciously formulaic curvature that I just may implement as MATLAB figures first…
Enough talk! Let’s say you’re sold and want to make one of these things tomorrow afternoon. Where’s the code, already? Hollis has you covered. It’s all available on GitHub here:


Comments
To leave a comment, please click here to sign in to your MathWorks Account or create a new one.