 Cleve’s Corner: Cleve Moler on Mathematics and Computing
 The MATLAB Blog
 Guy on Simulink
 MATLAB Community
 Artificial Intelligence
 Developer Zone
 Stuart’s MATLAB Videos
 Behind the Headlines
 File Exchange Pick of the Week
 Hans on IoT
 Student Lounge
 MATLAB ユーザーコミュニティー
 Startups, Accelerators, & Entrepreneurs
 Autonomous Systems
 Quantitative Finance
 MATLAB Graphics and App Building
It’s Time for Real-Time!
Today, I am happy to welcome guest blogger Sarah Dagen, from MathWorks Consulting Services to talk about real-time simulation and testing.
Why Real-Time?
Working in MathWorks consulting services, one of my favorite things is helping customers with real-time simulation and testing. Since many aspects of this technology have not been discussed before on this blog, I am going to walk through a design task that leverages many of the benefits of Simulink Real-Time and real-time simulation and testing.
Design Task
Let’s begin with an example problem: Guy and I decide that we really need to develop a device that will fetch us beverages from the kitchen, saving us the enormous exertion of having to stand up and walk to get it ourselves.

At a very high level, the system comprises 2 components:
- A physical device that will walk (or roll, or fly) to the kitchen, get the requested beverage, and bring it to us;
- An embedded controller that will control the actions of the physical device.
Since Guy is a mechanical engineer and much better at this than me, I’ve asked him to develop the physical device (the “plant”, in control design speak). I’m going to develop the controller.
Desktop Simulation
Not surprisingly, Guy soon sends me a simulation model of his robot. We want to make sure the physical device and the controller interact properly before we invest in the production of the final system. Meanwhile, I’ve developed a control algorithm in a model.
Using model referencing, we connect the plant and controller models to simulate the entire system.
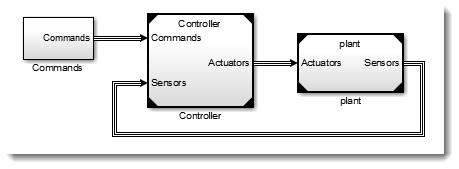
After a few rounds of iterating on our designs, we have a design that we think could work.
So what do we do next?
Let’s Real-Time!
To simulate our models in real time, we will be using Simulink Real-Time. With Simulink Real-Time, in one click C code is generated for the model, downloaded to a dedicated system, and executed in real-time. Once the executable is running on the target, we can perform automated or interactive testing and create instruments for monitoring and controlling the real-time application.
As dedicated target computer hardware, we will use Speedgoat mobile real-time target machines.
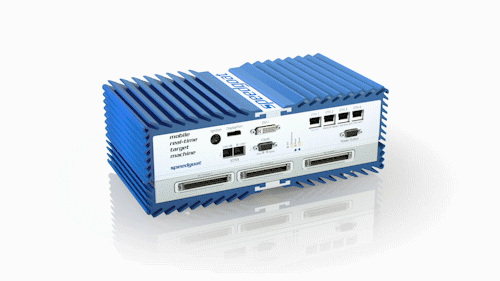
Wondering what Speedgoat is? Speedgoat makes a range of real-time target computers and offers a huge array of hardware I/O connectivity modules. Speedgoat target computers are specially designed and optimized to work seamlessly with Simulink Real-Time.
Now let's talk a bit about our setup. When we talk about real-time simulation and testing, there are 3 basic configurations:
- Rapid prototyping: the controller is simulated on a real-time target computer, and the real physical plant is connected to it.
- Hardware-in-the-loop: the plant is simulated on a real-time target computer, and the real embedded controller hardware is connected to it.
- All simulation: the plant is simulated on one real-time target computer, and the controller is simulated on a separate real-time target computer, with electrical connections between the two.
Let's see how we apply each of those to our project.
All Simulation
Guy is working on building the physical robot, and I’ve chosen an embedded target hardware for the controller. We have agreed on the electrical interfaces for sensor feedback and control signals between the controller and the physical robot. Before we have received all the mechanical and electrical parts we will need, we’d like to continue to refine our designs.
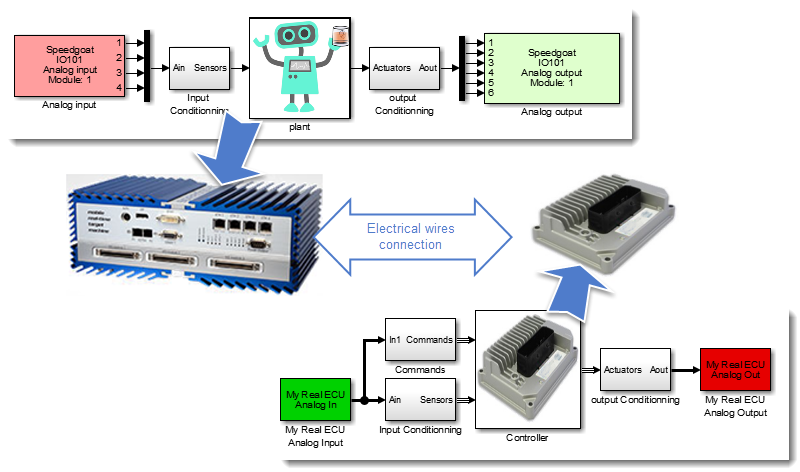
For the all simulation setup, we have two real-time target computers from Speedgoat. We decided on the mobile real-time target machines because we want to be able perform field testing with our simulations and the rugged mobile design is great for this. Also, they are just straight-up good-looking. Each of the target machines has an analog input/output card which we have chosen because it emulates the electrical characteristics of the real hardware we will use in our beverage-fetching robot. I add the I/O connections to the controller and plant models to for the electrical interfaces.
Here’s an image showing the setup of plant and controller each on real-time simulation target computers:
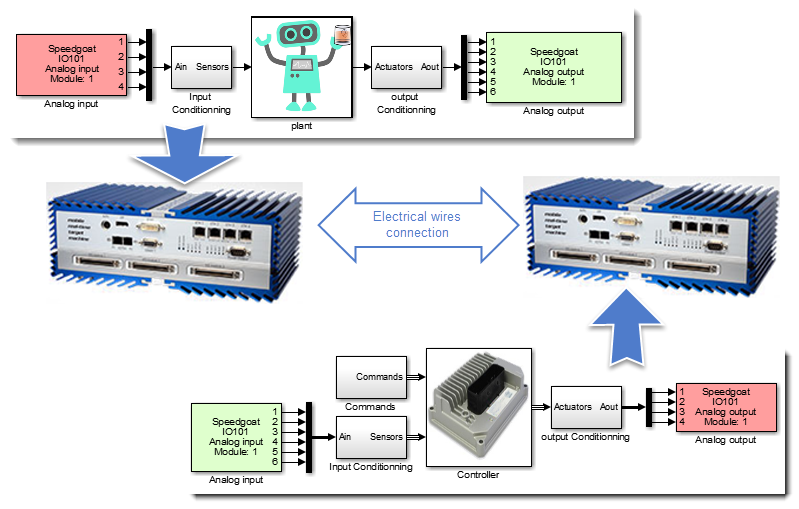
Our testing with this real-time configuration reveals that we haven’t properly converted the electrical signals into engineering units – glad we found this out now! We fix the errors and continue with successful testing.
Rapid Control Prototyping
Guy has finished building the first physical robot before my controller hardware has even been shipped. We are both eager to continue development, and now we can test my controller design to see if it can actually control the position of Guy’s mechanical creation.
For this configuration, we replace the Speedgoat target hardware that was simulating the plant with the real physical robot. He doesn’t have an embedded controller yet, so we will use the second Speedgoat target computer as the controller. We build some test harnesses and wire up the I/O connections between the robot and the Speedgoat target computer.
Here’s an image showing this setup:
Thanks to all of the up-front simulation and testing we’ve already done, Guy and I find that our initial tests trying to control the robot’s position are fairly successful. The control seems to be a bit sluggish, though, and I think that I can improve the algorithm after seeing how it behaved with the real physical device. And since I don’t have to go through the entire embedded code generation process, I am able to quickly make changes to the controls and immediately test the performance. Simulink Real-Time allows me to easily tune parameters in real-time, so I can tweak my controller without having to regenerate any code!
Hardware-in-the-Loop
My controller hardware finally arrives. With a refined control algorithm design ready to go, I generate embedded code and deploy to my new production target.
I call Guy and let him know that it’s time to test my real controller with his robot – but Guy has his own opinions on the matter. He’s not ready to let me endanger his robot masterpiece until I demonstrate to him that there are no issues with the controller deployment.
No problem – I can use a Speedgoat target computer and Simulink Real-Time to simulate the physical robot and connect it to my embedded controller and use hardware-in-the-loop (HIL) simulation to test out the controller. I create a large test suite, including some very aggressive test cases to make sure the control design is robust and failure-tolerant (there are delicious beverages at stake!).
Here's the HIL simulation setup:
Vindicating Guy’s insistence on HIL testing, we discover that a certain combination of faulty sensor feedback signals can cause the controller to command the robot to an unstable position, which our plant model shows could result in the robot spilling the beverage on itself – not good for our beverages, and definitely not good for the robot! I add additional safety logic for such cases and deploy the updates to the controller.
After running through HIL testing, I am pleased with my controller’s performance, and confident that the system will be able to handle aggressive field testing with the real robot.
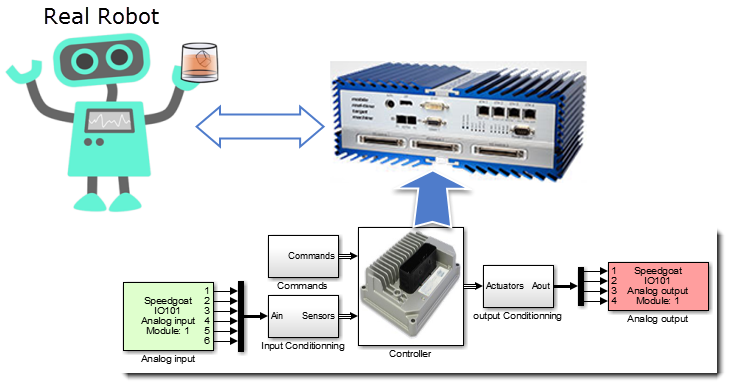
And finally…
The next day, Guy brings over the robot and we integrate the embedded controller. With a high level of confidence in our well-tested system, we proudly sit back and wait for our drinks to arrive.

Now it’s your turn…
Do you use real-time simulation and testing in your design processes? Would you like to read more about using Simulink Real-Time? Leave a comment below!


コメント
コメントを残すには、ここ をクリックして MathWorks アカウントにサインインするか新しい MathWorks アカウントを作成します。