 Cleve’s Corner: Cleve Moler on Mathematics and Computing
 The MATLAB Blog
 Guy on Simulink
 MATLAB Community
 Artificial Intelligence
 Developer Zone
 Stuart’s MATLAB Videos
 Behind the Headlines
 File Exchange Pick of the Week
 Hans on IoT
 Student Lounge
 MATLAB ユーザーコミュニティー
 Startups, Accelerators, & Entrepreneurs
 Autonomous Systems
 Quantitative Finance
 MATLAB Graphics and App Building
Simulation Based Testing with Simulink Test Manager
Today, Ajay Puvvala is back to talk about testing.
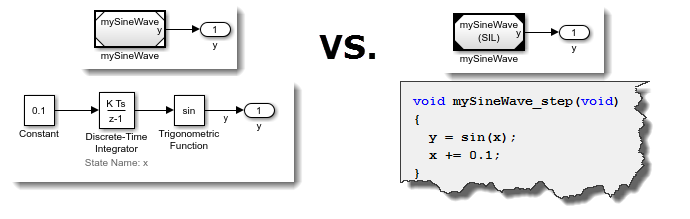
Recapitulation
In last week's post, we looked at how we could apply MATLAB Unit Testing Framework to Simulink context. We authored a scripted test to verify the output of the generated code of a simple model against normal mode simulation. In that test, we:
- Simulated the system under test in normal and software-in-the-loop to obtain expected and actual simulation results
- Leveraged the MATLAB Unit qualification API verifyEqual to compare the numerics with and without tolerance
- Developed a simple SDI diagnostic to visualize the signal differences for failure investigation
As you probably remember, steps 2 & 3 required writing a reasonable amount of code to extract the signals to compare and then defining a diagnostic that could help with failure analysis. That isn't unexpected, since the MATLAB Unit Testing Framework is a general purpose tool to test any software with MATLAB API. It doesn't specialize in a particular application domain.
That's where Simulink Test comes into picture, bringing in specialization for testing Simulink models. It provides tools for authoring, executing and managing simulation-based tests for models and generated code. It also provides the ability to create test harnesses that assist with testing selected components in a model independently. Its integration with products such as Simulink Verification and Validation provides a great platform for model-based testing.
Have not tried it yet? I strongly recommend you check out the product page.
The Goal
In today's post, we use Simulink Test's Test Manager to create and execute the same equivalence test we did in last week's post.
We want to validate the results of generated code, via Software-in-The-Loop simulation, against normal mode simulation of a simple model.
Test Manager Setup
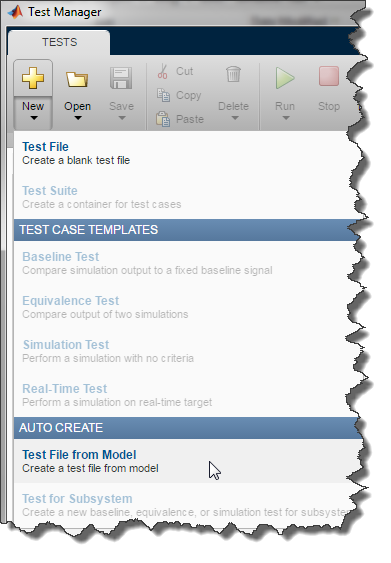
After launching the Test Manager from the Analysis menu of the model, I select to create a new Test File From Model:
and I specify the type of test:
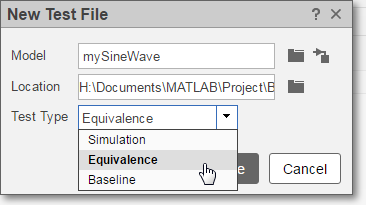
Test Creation
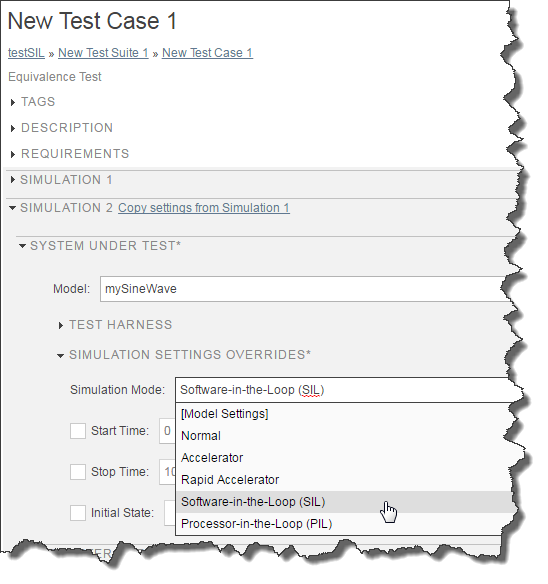
When you select an equivalence test, it allows you to define simulation settings for two simulations. In this case, we will define Simulation 1 as normal mode simulation and Simulation 2 as software-in-the-loop simulation.
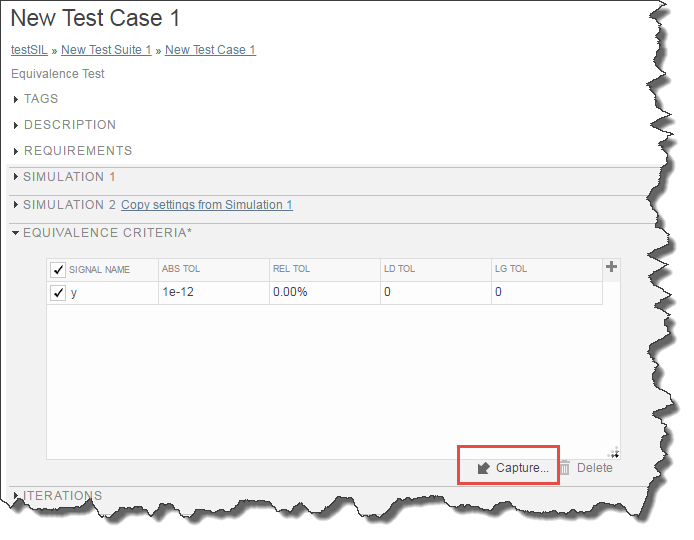
Qualification Criteria
In the Equivalence Criteria section, you select which signal you want to compare. Using the Capture button, the Test Manager will analyze the model and list all the logged signals that could potentially be used in the comparison. In our case, it finds the Outport block, for which the logging is enabled.
Once the signals are in the table, you can specify tolerances. As we did last week, we specify an absolute tolerance to allow expected small differences between the two simulations.
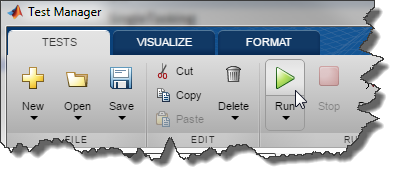
Running the Test
Now it's time to click the Run button:
When the test terminates, we can inspect the results. The integration of the Simulation Data Inspector within the Test Manager makes it convenient to inspect the results without writing a single line of code. In our example, we can see the small difference within the specified tolerance.
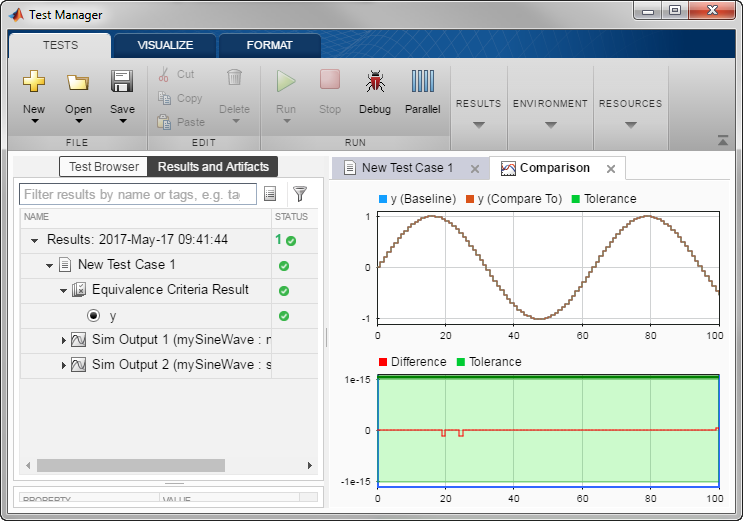
Notice the Highlight in Model button. It is convenient to analyze failures in large models where many signals are logged.
What else?
I want to mention a few more items I find very useful in the Test Manager:
- Debug: If you enable the Debug button, the Test Manager will setup everything and pause the simulation at t=0, allowing you to go step by step through the simulation to understand what is going wrong.
- Parallel: With the Parallel Computing Toolbox, this button will run the tests in parallel, possibly saving you lots of time.
- Time-Based Tolerances: When specifying the tolerances in the equivalence criteria, it is possible to specify leading and lagging tolerances. For example, if I am simulating a vehicle and testing in which gear the transmission is, I probably want to allow shifting to happen slightly before or after the baseline.
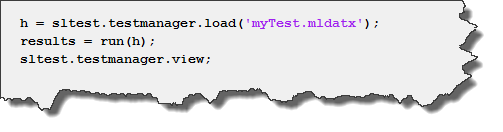
- Programmatic API: Once your tests are defined and saved, it is easy to run them programmatically. With just three lines of code, you can load the test file, run the tests, and view the results.
Now it's your turn
Let us know what you think of the Test Manager by leaving a comment below.


评论
要发表评论,请点击 此处 登录到您的 MathWorks 帐户或创建一个新帐户。