Creating Custom Valve in Simscape
Today I want to share a technique I like to use when I need to create custom hydraulic components in Simscape.
The Problem
I often get questions similar to the following from users:
I need to model a Pilot-Operated Check Valve. The block should look like the Pilot-Operated Check Valve included with SimHydraulics:

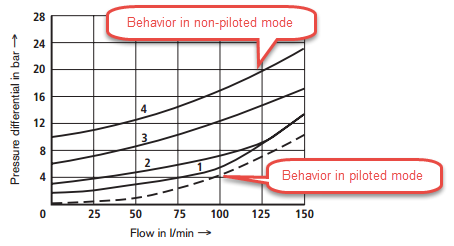
However the behavior I am looking for is slightly different. The only data I have from the supplier is the following figure. When the pressure on the pilot port, multiplied by the pilot ratio, is smaller that pressure on port B, the valve should behave like curve 4, allowing flow only form A to B. When the pressure on the pilot port becomes larger, the valve should go in piloted mode and let flow in both directions, following the characteristic of the dashed curve
Overview of the solution
Since all we have are flow-pressure curves, we are going to use an approach similar to the one used in the Fixed Orifice Empirical.
This approach consists of sensing pressures and imposing a flow rate. For a simple orifice, the implementation looks like:
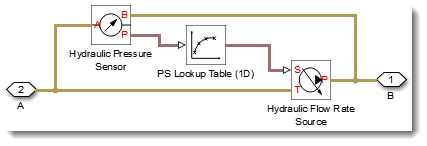
For our Pilot Valve, we will need to sense different pressures and we will need to use two Lookup Tables, one for each mode.
Getting the Data
The first thing we need is to do is get data out of the datasheet. For that, I like to use a File Exchange submission titled Data Thief by Adnan.
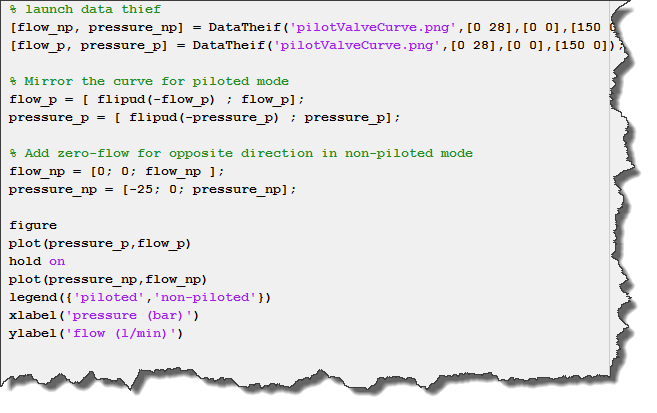
This submission is very easy to use. If your datasheet is in PDF format, take a screenshot of it and save it as a image file, like a PNG file. Then you can call the Data Thief function by passing it the name of the image file, and the limit values of the curve. In my example, the max value of the pressure axis is 28 bar, the origin is at 0 bar, and 0 l/min, and the maximum flow is 150 l/min. A figure will popup, where you click on the maximum y, origin, maximum x, and then points you want to extract. When you are done, hit enter and the function will return the x and y values in the specified output variables.
Once I get the data, I need to prepare the data so I can cover the full range. In the piloted case, I need to mirror the curve to allow the flow in both direction. In the non-piloted case, I need to set the flow to zero for all the range below the cracking pressure. The code looks like:
This gives us the data we need for our model.
Option 1: Using blocks
Now we can use this data in two ways. If you prefer to connect blocks graphically, this option is for you. Using blocks like Pressure Sensor, a Simscape Lookup Table, and a Flow Source, and a few others from the Physical Signals section of the library, we can come up with the following:
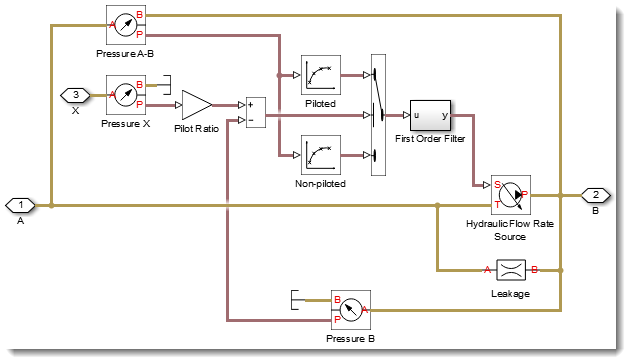
When specifying the x and y values for the lookup table, be careful with the units. The Lookup Table needs to receive and output values in the standard MKS system, here this means Pascals and meter cube per second, while the data we got from the datasheet is in bar and l/min.
One more things to note, I inserted a very small orifice in parallel with the flow source. This is to ensure that our custom valve never generate exactly zero flow. This would behave badly numerically.
Option 2: Custom Simscape Component
A second option that will help managing the units more easily is a Simscape composite component. Using this approach, in the components section, we declare which blocks we want to use, and in the connections section, we define how they are connected together. In a setup section, we can use the value function to specify that the values passed to the lookup table block should be in Pascal and m^3/sec. By doing so, the user can specify values in any units he wants, and we take care of the conversion automatically.
The code looks like the following:

The Results
To test the valve, I created a model that exercises the valve in its whole range of validity.
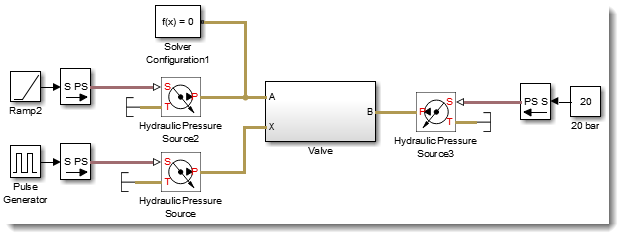
We can see that the flow can go in both directions when the valve is piloted, and that it cracks at 10 bar when non-piloted.

Now it's your turn
If you are interested in this topic, I also recommend this MATLAB Central File Exchange submission. It contains lots of ressources to model hydraulic components based on datasheets.
Let us know how you model custom components in SimHydraulics by leaving a comment here.
- Category:
- Community,
- Physical Modeling




Comments
To leave a comment, please click here to sign in to your MathWorks Account or create a new one.