Internal Combustion Engine Ignition Controller Example – Part 2
In my previous post, I introduced an example I recently published on MATLAB Central: Four-Cylinder Engine Ignition Control Simulation.
After describing how the plant model has been implemented, it is now time to describe how the controller is implemented, and how the overall system is simulated.
The Big Picture
Let's start with reviewing the overall system we are dealing with:

In this system, the following happens:
- The engine crankshaft is equipped with a toothed wheel. In this case, the teeth are equally spaced every 10 degrees, with one missing tooth.
- When the crankshaft rotates, the teeth pass in front of a sensor that triggers an interrupt, executing code on the ECU.
- The code computes the position and speed of the engine and determines when the next cylinder should fire.
- The code sets a hardware timer that will fire the appropriate spark plug at the appropriate time.
The goal of this project is to design an algorithm to be executed by the Embedded Control Unit (ECU) Operating System (OS) scheduler. This algorithm computes the position and speed of the engine and determines when the next cylinder should fire. Once this is determined, the algorithm calls a timer service provided by the ECU OS that will take care of making the ignition happen at the right time.
Following the Model-Based Design philosophy, we (of course!) want to simulate the entire system to help to design and validate the control algorithm that will be deployed on the ECU.
Important Model Architecture Decision: Importing Code versus Exporting Code
Before describing the controller and its implementation, I want to cover an important design choice I made for this example.
On this blog, in most of my posts involving code generation, the end of the story is: Click the Build button to generate code, and the final executable is automatically compiled and executed on the target. This is how Simulink Real-Time and our support packages for targets like Raspberry Pi or iPhone/iPad work. In those cases, if the final application requires legacy C/C++ code to be included the code is imported in Simulink, typically using a TLC wrapper. See my blogs about a Tweeting Raspberry Pi or Custom driver for LEGO MINDSTORM for examples.
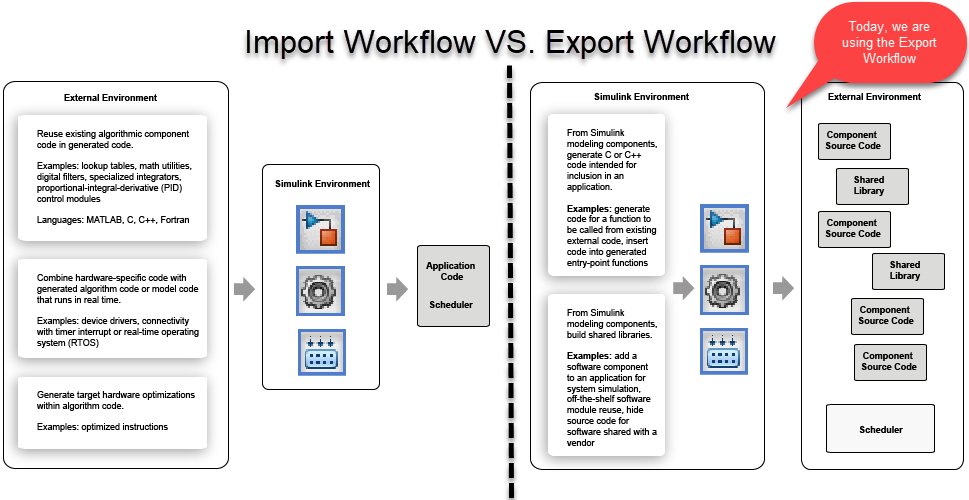
This is one way of doing things... we call it the Import Workflow.
Now, it is time to go read the documentation page Choose an External Code Integration Workflow to learn about the other way of doing things... the Export Workflow.
Here is a schematic comparing those two workflows side by side:

Why did I choose the Export Workflow for this project?
The use case addressed by the Export Workflow is where you have an existing large C/C++ software project composed of hand-written and legacy components. In such case, if you want to develop a new component in Simulink, you can export the generated code and include it in the existing software project.
That way, the code exported by Simulink can both be called by the legacy code, and call legacy code. In the next sections, we will see:
- How the final application deployed on the embedded controller looks
- How the simulation of the entire system looks
- How to emulate a legacy scheduler executing code exported from Simulink
- How to setup part of a model to generate code compatible with the Export Workflow
- How to emulate services provided by the ECU being utilized by the code exported from Simulink
The Final Application Deployed on the Embedded Controller
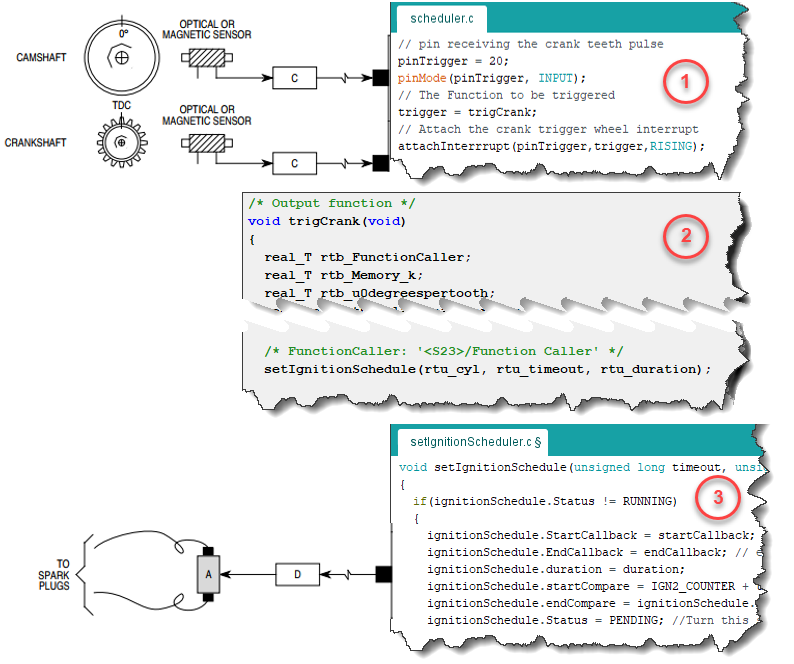
Here is a picture describing how the final deployed application looks. Note that, to make the difference between handwritten legacy code and Simulink-generated code more obvious, I took the screenshots of the legacy code using a different editor, the Arduino IDE.

In this picture, we have:
- The ECU scheduler registers the code exported from Simulink (trigCrank) to be executed based on the motion of the mechanical shaft.
- The code exported from Simulink (trigCrank) determines when the next spark ignition should happen.
- The code exported from Simulink calls a service provided by the ECU OS (setIgnitionSchedule) that will use a hardware timer to produce the spark ignition at the right time.
Simulating the Entire System
Here is a screenshot of the top level of the model simulating the entire system. I used the same numbering as in the above image to showcase which subsystem is equivalent to which part of the deployed application. This means that the Stateflow chart marked with a "1" and the Subsystem marked with a "3" are emulating legacy functionality provided by the ECU.

Emulating a Legacy Scheduler using Stateflow
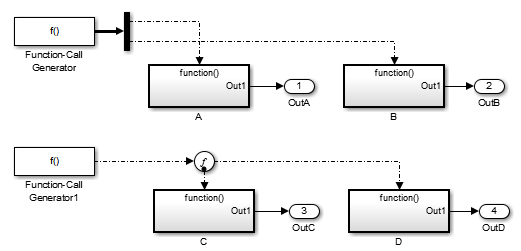
In the deployed application, the OS scheduler calls functions. In Simulink, this means that we need to generate Function-call signals. For periodic events, it is simple: we can use the Function-Call Generator block.
To generate function-call signals when the crank-angle passes specific angles, I used a block from the example model sfcndemo_angle_events.slx, which is part of the S-Function Examples. I simply had to connect it to the crankshaft and camshaft and specify the teeth pattern in the block dialog.

Using zero-crossing detection, this block will accurately generate function-call events every time a tooth is hit. I can then combine those events with a periodic function-call generated using a Function-Call Generator block to trigger the scheduling chart:

The Stateflow chart then outputs function-call signals that will execute the control algorithm for which we want to export code.
Setting Up Part of a Model to Generate Code Compatible with the Export Workflow
Now it's time to talk about that control algorithm for which we want to export the generated code!
To be compatible with the Export Workflow, we placed the algorithm inside a separate model and referenced it in our system simulation using a model block.
To make it an Export-Function Model, the control algorithm must be placed inside Function-Call Subsystems which are triggered by Root-Level Inport blocks marked to output Function-Call signals.
When generating code for this model, in contrast to "normal" models, no step function will be generated. Instead, one function per root-level function-call Inport will be generated.

Emulating Services Provided by the ECU
Last piece of the puzzle... the control algorithm needs to utilize functionalities provided by the ECU. In other words, it needs to call external functions - and we want to simulate those.
For that, in the export function model, I used a Function Caller block to be executed when it is time to schedule when the next cylinder needs to fire.
This Function Caller block will behave differently in the generated code and in simulation:
- The code generated for Function Caller blocks will call and link against functions available on the ECU.
- When referenced in our system simulation model, the Function Caller block will call a Simulink Function located in the top simulation model.

For this specific application, the OS service that needs to be emulated is a hardware timer that will fire the spark plug after a desired amount of time. For that, I decided to use SimEvents.
The Simulink Function generates a SimEvents message, or entity. This entity passes through two Entity Server blocks. The first one serves it until it's time to charge the spark plug. The second serves it until it is time to discharge the spark plug. Every time the entity exits one of the two servers, they call the Simulink Function trigCyl that generates the ignition signals sent to the engine.

And the loop is now closed!
Simulation Results
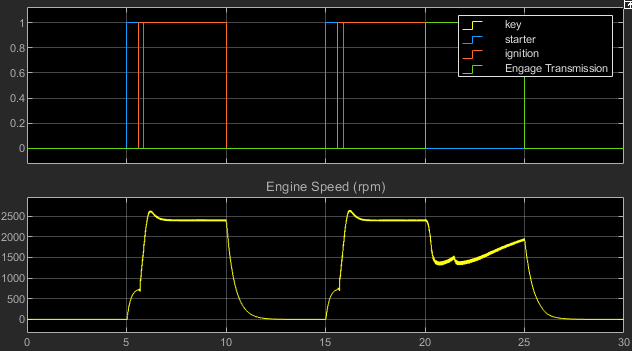
When you simulate the model, you will see how the engine RPM evolves as we start and shut down the engine, and when we engage the transmission.

If you zoom on the ignition command, you will see when each cylinder is fired as the crankshaft rotates.

Now it's your turn
Let us know in the comments what you think of this model architecture and if there are other features for which you would like to see this kind of example.


댓글
댓글을 남기려면 링크 를 클릭하여 MathWorks 계정에 로그인하거나 계정을 새로 만드십시오.