 Cleve’s Corner: Cleve Moler on Mathematics and Computing
 The MATLAB Blog
 Guy on Simulink
 MATLAB Community
 Artificial Intelligence
 Developer Zone
 Stuart’s MATLAB Videos
 Behind the Headlines
 File Exchange Pick of the Week
 Hans on IoT
 Student Lounge
 MATLAB ユーザーコミュニティー
 Startups, Accelerators, & Entrepreneurs
 Autonomous Systems
 Quantitative Finance
 MATLAB Graphics and App Building
Creating Driver Blocks for Arduino, Lego, and other targets
As you may know, it is easy to run Simulink models on a set of supported target hardware. This has been possible since R2012a.
Even if we add more targets and support more features for each target with every new release, it is still possible that you will need a driver that is not included in the Simulink support package. If you desperately need a driver for your hardware, you can always build it yourself.
Let's see how this works using an example from a LEGO NXT project I worked on.
The LEGO Light Sensor
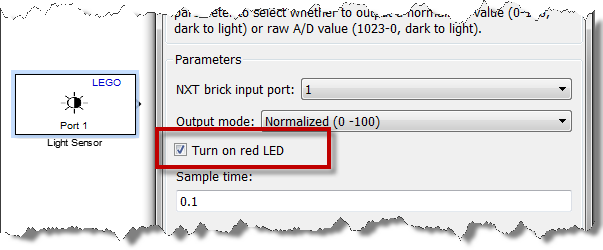
The LEGO NXT kit ships with a Light Sensor including a red LED that can be turned on or off. In the Simulink support package, you can control the light from a checkbox parameter in the block dialog.
For our project, we used this sensor to make a line following robot. To make our algorithm more robust, we thought it would be interesting to turn the light on and off while tracking the line, to actively filter out the ambient light.
Step 1: Determine the code to be generated for your driver block
In the LEGO MINDSTORMS NXT Support from Simulink, you can find many small examples showing how the robot can be programmed in C. By default, they are located in C:\MATLAB\SupportPackages\R2013a\nxtOSEK\samples_c. In one of those example, I found a function initializing the robot that looked like:
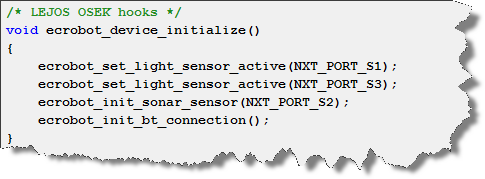
The function ecrobot_set_light_sensor_active is exactly what I need to generate from my driver block. I also figured that a corresponding function ecrobot_set_light_sensor_inactive exists to turn the light off, and I found that those functions are declared in a file named ecrobot_interface.h.
Step 2 - Create an S-Function
Here you have 2 options to create the S-Function
Step 2 - Option 1: S-Function Builder Block
My colleague Giampiero Campa published a very good submission on MATLAB Central titled Device Drivers showing how to use the S-Function Builder block to include the code you found during step 1 in your model.
His submission contains detailed procedures and screen captures to guide you through the process step-by-step. If you are intimidated by writing an S-function, I recommend using his S-Function Builder technique.
Step 2 - Option 2: Writing an S-Function and a TLC file
If you are like me and want to understand the magic that is happening when you click build in the S-Function Builder block, this second option is for you.
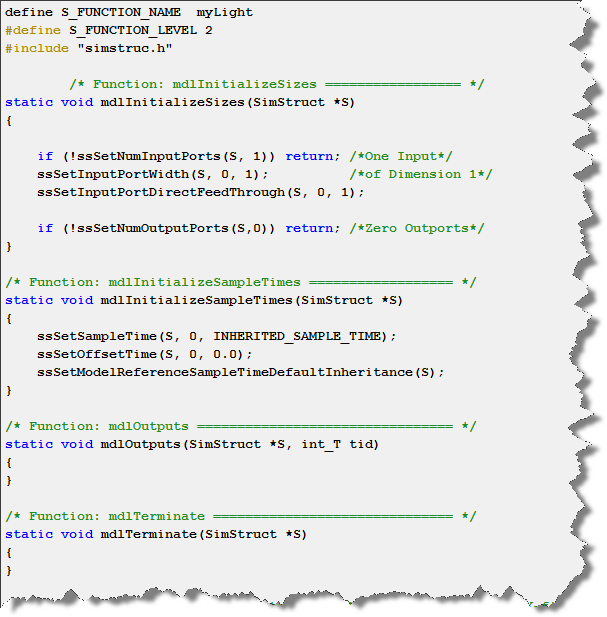
First, we need to realize that unless you model the interaction of the sensor/actuator with the environment, in simulation, driver blocks typically do nothing. All blocks must specify the number of ports and parameters, and their dimensions, even if they do nothing. In my case, I created an s-function with 1 input port of dimension 1 to specify if the light should be on or off. Here is the entire code for my s-function.
To specify the code generated for your block, you need to use the Target Language Compiler.
Concretely, this means that you need to write a TLC file for your block. For that, I recommend starting with examples from sfundemos.
For this example we need our TLC to do two things: Tell the compiler to include ecrobot_interface.h, and call ecrobot_set_light_sensor_active and ecrobot_set_light_sensor_inactive. Here is what it looks like.

Note that I used BlockTypeSetup to include the header file, and Outputs to define what the block output method should be.
Now it's your turn
Download this LEGO example or a similar example for the Arduino target and begin creating your own driver blocks!
If you develop custom drivers for the Simulink Target Hardware, share them on MATLAB Central and let us know by leaving a comment here.
- Category:
- Code Generation,
- S-functions


Comments
To leave a comment, please click here to sign in to your MathWorks Account or create a new one.